ကဲ LAB ေတြ စလုပ္က်စို ့.. ခုစလုပ္ရမွာက login lab ေတြပဲ.. Login နဲ ့ပါတ္သက္တာေတြ ေပါ့.. Cisco switch/router
ေတြကို ပထမဆံုး console နဲ့ ရင္စ၀င္ရပါမယ္။ double click မနွိပ္နဲ ့ေနာ္ ့.. Real world မွာ က စက္ကို လက္နဲ့ နွစ္ခ်က္ထိလို ့မွ
မရတာ :P ကဲ ဆုိေတာ့ console နဲ့ login အရင္၀င္ ျပီးမွ လိုတာေတြ configure ဆက္ခ်ေပါ့။ secure ျဖစ္ဖုိ့ console
အတြက္ေရာ .. remote login (Telnet/SSH) အတြက္ေရာ password နဲ့ login ၀င္တာ Username & Password နဲ့ login ၀င္တာ
.. AAA server ေတြ သံုးျပီး Login ၀င္တာေတြကို Lab လုပ္ျပထားတာပါ။
Login Lab

ဒီေနရာမွာ တစ္ခုမွတ္ထားရမွာက login ဆိုတဲ့ keyword ရိုက္ဖုိ့ ေမ့တက္က်တယ္။ ကိုယ္က Password
{your password} ရိုက္က္ျပီး Login ဆိုတဲ့ command ရိုက္ဖုိ့ ေမ့ခဲ့ရင္ ကိုယ္ deviceကို ၀င္တဲ့ အခ်ိန္မွာ
password ေတာင္းမွာမဟုတ္ပါဘူး.. အဲ့ေတာ့ authentication လုပ္ေစခ်င္ရင္ Login ဆိုတာေလးကို
မေမ့မေလ်ာ ့ ရိုက္ေပးဖုိ့ လိုပါတယ္။ login ဆိုတာေလးရိုက္မွ Login ၀င္တဲ့အခ်ိန္မွာ Password ေတာင္းမွာပါ။
{your password} ရိုက္က္ျပီး Login ဆိုတဲ့ command ရိုက္ဖုိ့ ေမ့ခဲ့ရင္ ကိုယ္ deviceကို ၀င္တဲ့ အခ်ိန္မွာ
password ေတာင္းမွာမဟုတ္ပါဘူး.. အဲ့ေတာ့ authentication လုပ္ေစခ်င္ရင္ Login ဆိုတာေလးကို
မေမ့မေလ်ာ ့ ရိုက္ေပးဖုိ့ လိုပါတယ္။ login ဆိုတာေလးရိုက္မွ Login ၀င္တဲ့အခ်ိန္မွာ Password ေတာင္းမွာပါ။

Console Login

Login Lab 3 ( login & login local)

Router>en
Router#conf t
Router(config)#username cisco password cisco
Router(config)#line console 0
Router(config-line)#password ccna
Router(config-line)#login
Router(config-line)#exit
Router(config)#line vty 0 4
Router(config-line)#login local
Router(config-line)#exit
Router(config)#int g0/0/0
Router(config-if)#ip add 192.168.1.1 255.255.255.0
Router(config-if)#no sh
Router(config-if)#exit
Router(config)#enable password enable
Router(config)#enable secret CCNA
Router(config)#exit
Router#
%SYS-5-CONFIG_I: Configured from console by console
exit
Line console 0 ဆုိျပီး password ccna လုိ့ေပးျပီး login လုိ့ပဲ ရိုက္ခဲ့တဲ့ အတြက္ console access (အျပာေရာင္
console ျကိဳး) အတြက္ password ပဲ ေတာင္းမွာ ပါ ccna လုိ့ ရုိုက္ျပီး ၀င္ရမွာပါ။ ethernet cable ကေန IP နဲ့ ၀င္မယ့္
computer အတြက္က line vty 0 4 မွာ login local လုိ့ ေျပာခဲ့တဲ့အတြက္ local database ထဲ က Username(cisco)
Password(cisco) နဲ ့၀င္ရမွာပါ။ စမ္းျကည့္က်ပါ။
console ျကိဳး) အတြက္ password ပဲ ေတာင္းမွာ ပါ ccna လုိ့ ရုိုက္ျပီး ၀င္ရမွာပါ။ ethernet cable ကေန IP နဲ့ ၀င္မယ့္
computer အတြက္က line vty 0 4 မွာ login local လုိ့ ေျပာခဲ့တဲ့အတြက္ local database ထဲ က Username(cisco)
Password(cisco) နဲ ့၀င္ရမွာပါ။ စမ္းျကည့္က်ပါ။
PS : enable secret will overwrite enable password
Login Lab4

ခုဒီ lab မွာဆို router သံုးခု အတြက္ မတူညီတဲ့ lab-script ေတြပါတယ္။ Multi-user login Lab ပါတယ္။ျပီးေတာ့ user
တစ္ေယာက္ဆီတုိင္း ရဲ့ လုပ္ပိုင္ခြင့္ိကုိ ခြဲျခားသတ္မွတ္ေပးတဲ့ Privilege level for user lab ပါတယ္။ login banner
message ျပတာပါတယ္။ plz try!!
တစ္ေယာက္ဆီတုိင္း ရဲ့ လုပ္ပိုင္ခြင့္ိကုိ ခြဲျခားသတ္မွတ္ေပးတဲ့ Privilege level for user lab ပါတယ္။ login banner
message ျပတာပါတယ္။ plz try!!
##Multi-user Login##
|
#Enable secret login Banner##
|
##Privilege level for each user##
|
enable
|
enable
|
enable
|
conf t
|
conf t
|
conf t
|
int g0/0
|
int g0/0
|
int g0/0
|
ip add 192.168.0.1 255.255.255.0
|
ip add 192.168.1.1 255.255.255.0
|
ip add 192.168.2.1 2 255.255.255.0
|
no sh
|
no sh
|
no sh
|
exit
|
exit
|
exit
|
username user1 password user1
|
username user1 password user1
|
username admin privilege 15 password admin
|
username user2 password user2
|
line vty 0 4
|
username user privilege 2 password user
|
line console 0
|
login local
|
line console 0
|
login local
|
exit
|
login local
|
exit
|
enable password cisco
|
line vty 0 4
|
line vty 0 4
|
enable secret ccna
|
login local
|
login local
|
do show run | include enable
|
exit
|
exit
|
privilege exec level 2 show run
| |
enable password cisco
|
service password-encryption
| |
banner motd $
|
အုိေက ခု devices ေတြမွာ လုပ္သင့္တဲ့ command ေလးေတြ ခ်ေရးျကည့္ရေအာင္..
ဘယ္သူမဆို၀င္လို့မရေအာင္ console နဲ့ remote login အတြက္က
line console 0
Password cisco
login
Username CCNA password CCNA
line vty 0 4
login local
ေနာက္တစ္ခါ enable mode ကုိ ၀င္ရင္လဲ password တစ္ခု ထပ္ခံထားလိုက္ပါ။
enable secret routingswitching
ခု lab လုပ္ရင္းနဲ ့ေတြလာရမွာက enable mode မွာ မွားရိုက္မိရင္ naming translate လုပ္ေနတာေတြ
မျဖစ္ေအာင္
မျဖစ္ေအာင္

no ip domain-lookup
လို့ ရိုက္ထည့္ေပးရမွာပဲ ျဖစ္ပါတယ္။
ေနာက္တစ္ခါ ထပ္ေတြရမွာ တစ္ခုက cisco ISO ကေန log message ေတြ ျပတဲ့အခါ ေနာက္ထပ္
command ဆက္ရိုက္ရတာ စိတ္အေနွာက္အရွက္ျဖစ္ရင္
command ဆက္ရိုက္ရတာ စိတ္အေနွာက္အရွက္ျဖစ္ရင္

Router(config)#line vty 0 4
Router(config-line)#logging synchronous
လုိ့ ရပါတယ္။ အဲ့အခါက telnet / ssh ၀င္တဲ့အခ်ိန္မွာ config ခ်လဲ message ေတြေျကာင့္
စိတ္အေနွာက္အရွက္ မျဖစ္ရေတာ့ေပါ့.. Message ေတြကို ျမင္ရမွ စိတ္ခ်မ္းသာတဲ့ ကိုယ္ေတြလုိ
ဆုိ showdown တုိ့ ဘာတုိ့ရိုက္ျပီးရင္ enter သာေခါက္ေပးလိုက္..
စိတ္အေနွာက္အရွက္ မျဖစ္ရေတာ့ေပါ့.. Message ေတြကို ျမင္ရမွ စိတ္ခ်မ္းသာတဲ့ ကိုယ္ေတြလုိ
ဆုိ showdown တုိ့ ဘာတုိ့ရိုက္ျပီးရင္ enter သာေခါက္ေပးလိုက္..
ေနာက္ထပ္ သိသင့္တာက timeout(exec or absolute) အဲ့တာကိုေတာ့ ေအာက္မွာ lab တစ္ခု အေနနဲ့
ထည့္ေပးထားပါတယ္။
ထည့္ေပးထားပါတယ္။
Exec timeout vs Absolute timeout lab
Exec TimeOute နဲ့ Absolute TimeOut ဘာမတူလဲ ဆုိတာကို စမ္းျကည့္က်ပါ ;-)

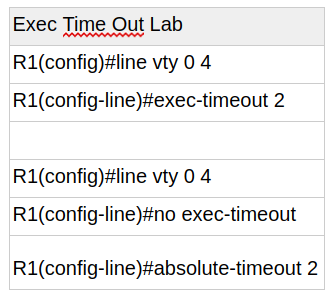
Exec-timeout ဆိုတာက က်ြန္ေတာ္တုိ့ေတြ login ၀င္ command ေတြရိုက္ျပီး ဒီတုိင္း ထားတဲ့အခ်ိန္ ေျပာရရင္
idle ျဖစ္သြားတဲ့အခ်ိန္ သည္ သက္မွတ္ထားတဲ့ limit ေရာက္ရင္ logout ျဖစ္သြားေအာင္ပါ။ ခု config ျဖစ္တဲ့
exec-timeout 2 အတြက္ဆုိ.. Device ထဲကို ၀င္ config ေတြခ် show command ေတြ ျကည့္ ဘယ္ေလာက္
ျကာျကာ ကိစၥမရွိဘူး.. အဲ့ .. ဘာမွ မလုပ္ေတာ့ပဲ idle ျဖစ္တာ အခ်ိန္ နွစ္မိနစ္ ျပည့္သြားရင္ေတာ့ connection
closed ျဖစ္သြားပါလိမ့္မယ္…
Absolute-timeout က်ေတာ့ .. သူ သက္မွတ္ထားတဲ့ အခ်ိန္တစ္ခုေရာက္တာနဲ့ session closed သြားမွာပါ. .
idle ျဖစ္မျဖစ္မျကည့္ပါဘူး.. စက္ထဲ ကို စ၀င္ေရာက္တဲ့ အခ်ိန္ ကေန count down timer မွတ္ထားတဲ့ သေဘာပါ
။ အခ်ိန္ျပည့္ရင္ ထြက္ပဲ..
idle ျဖစ္မျဖစ္မျကည့္ပါဘူး.. စက္ထဲ ကို စ၀င္ေရာက္တဲ့ အခ်ိန္ ကေန count down timer မွတ္ထားတဲ့ သေဘာပါ
။ အခ်ိန္ျပည့္ရင္ ထြက္ပဲ..
**************************************************************************
AAA Authentication Lab

Server ဘက္ျခမ္းမွာ Radius နဲ ့Tacacs server configure လုပ္ပါ secret key ကို cisco လုိ့ထားပါ

AAA server အတြက္ username နဲ ့ password create လုပ္ပါ

ျပီးရင္ server မွာ IP ေပးဖုိ့ မေမ့က်ပါနဲ ့..

AAA Authentication Lab
| ||
Router 1 Config
|
Router 2 Config
|
Switch 1 Config
|
en
|
en
|
en
|
conf t
|
conf t
|
conf t
|
host R1
|
host R2
|
host SW1
|
int g0/0/0
|
int g0/0/0
|
int vlan 1
|
ip add 192.168.123.1 255.255.255.0
|
ip add 192.168.123.2 255.255.255.0
|
ip add 192.168.123.3 255.255.255.0
|
no sh
|
no sh
|
no sh
|
exit
|
int g0/0/1
|
exit
|
ip add 10.0.1.1 255.255.255.0
| ||
no sh
| ||
exit
| ||
Router 1 မွာဆုိရင္ AAA server မွာ config လုပ္ထားတဲ့ Username(CCNA) Password(cisco) သည္ telnet, SSH,
console နဲ့ enable စတာေတြ အကုန္ ၀င္လို့ရ ရမယ္။ R1 က Tacacs Server ကို သံုးမယ္။
console နဲ့ enable စတာေတြ အကုန္ ၀င္လို့ရ ရမယ္။ R1 က Tacacs Server ကို သံုးမယ္။
Router 2 မွာဆုိရင္ AAA server မွာ config လုပ္ထားတဲ့ Username(CCNA) Password(cisco) enable mode ကို
၀င္လို့ရ ရမယ္။ တစ္ျခား console တုိ့ telnet တုိ့ စတဲ့ line ေတြက local database က Username(spacex) Password(cisco)
နဲ ့ ၀င္လို့ရရမယ္။ R2 က Radius Server ကို သံုးမယ္။
၀င္လို့ရ ရမယ္။ တစ္ျခား console တုိ့ telnet တုိ့ စတဲ့ line ေတြက local database က Username(spacex) Password(cisco)
နဲ ့ ၀င္လို့ရရမယ္။ R2 က Radius Server ကို သံုးမယ္။
Switch 1 မွာဆုိရင္ AAA server မွာ config လုပ္ထားတဲ့ Username(CCNA) Password(cisco) သည္ telnet, SSH, console နဲ့
enable စတာေတြ အကုန္ ၀င္လို့ရ ရမယ္။ SW1 က Tacacs Server ကို သံုးမယ္။
enable စတာေတြ အကုန္ ၀င္လို့ရ ရမယ္။ SW1 က Tacacs Server ကို သံုးမယ္။
အကုန္လံုးမွာ backup user & password ထားထားပါ။ AAA server service မရရင္ ပဲ ျဖစ္ျဖစ္ config error ေျကာင့္ပဲ ျဖစ္ျဖစ္ ၀င္လို့ရေအာင္ပါ။
Configuration
| ||
aaa new-model
|
aaa new-model
|
aaa new-model
|
username rollback password cisco
|
username rollback password cisco
|
username rollback password cisco
|
aaa authentication login default group tacacs+ local
|
username spacex password cisco
|
aaa authentication login default group tacacs+ local
|
aaa authentication enable default group tacacs+ local
|
aaa authentication login Console_VTY_AUTH local
|
aaa authentication enable default group tacacs+ local
|
tacacs-server host 192.168.123.254 key cisco
|
aaa authentication enable default group radius local
|
tacacs-server host 192.168.123.254 key cisco
|
radius-server host 192.168.123.254 key cisco
| ||
line console 0
| ||
login authentication Console_VTY_AUTH
| ||
exit
| ||
line console 0
| ||
login authentication Console_VTY_AUTH
| ||
exit
| ||
Comments
Post a Comment