Port security Lab 1 - Static (step by step)
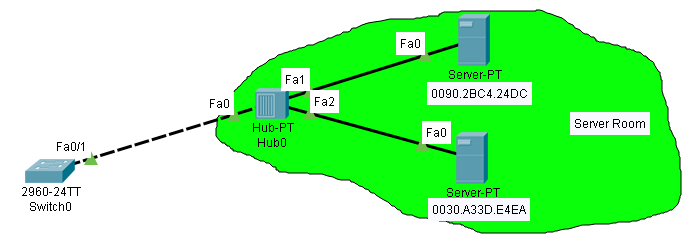
ခုဒီlab မွာေတာ့ mac address ကို static assign ေပးသြားမွာပါ။ ကိုယ္ သတ္မွတ္ေပးထားတဲ့ MAC-address
မဟုတ္ရင္ port ကေနျဖတ္သြားခြင့္မွာမဟုတ္ပါဘူး..
မဟုတ္ရင္ port ကေနျဖတ္သြားခြင့္မွာမဟုတ္ပါဘူး..
enable
| |
conf t
| |
int fa0/1
| |
switchport mode access
|
interface fa0/1 ကို access mode ေျပာင္းေပးလိုက္တာပါ။
|
switchport port-security
|
port security feature ကို enable လုပ္လိုက္တာပါ။
|
switchport port-security mac-address 0090.2BC4.24DC
| |
switchport port-security mac-address 0030.A33D.E4EA
| |
switchport port-security maximum 2
|
default maximum number ကေတာ့ 1 ပါ
|
Switch(config-if)#switchport port-security violation ?
protect Security violation protect mode
restrict Security violation restrict mode
shutdown Security violation shutdown mode
| |
default violation mode က shutdown ပါ
| |
Switch(config-if)#switchport port-security violation protect
|
protect mode ေျပာင္းထားေပးလိုက္ပါ
|
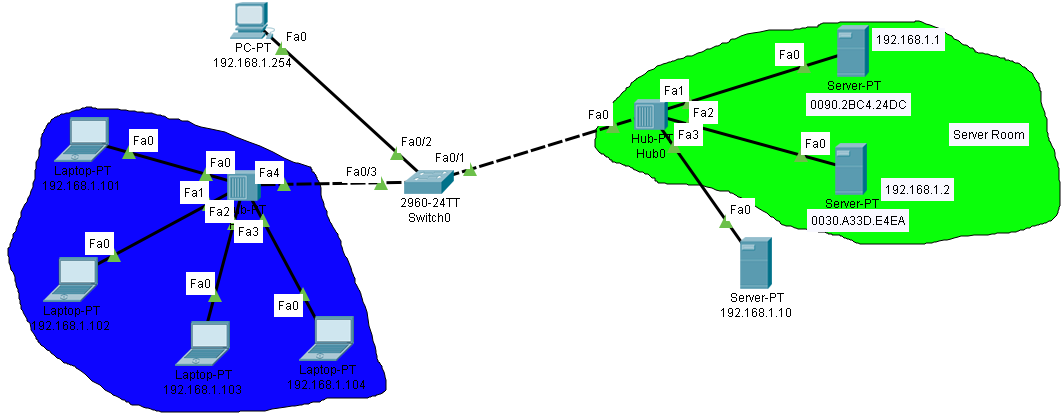
port -security သည္ သူ့ကို config ခ်ထားတဲ့ ၀င္တဲ့ ေကာင္ရဲ့ source MAC-address ကို learning/check လုပ္တဲ့
အတြက္ traffic ေတြ create လုပ္ဖုိ့အတြက္ switch မွာ PC တစ္လံုးထပ္ခ်ိတ္ျပီး same network IP (192.168.1.254)
ေပးလိုက္ပါ။ အဲ့ေနာက္server နွစ္ခု (192.168.1.1 & 192.168.1.2) ကေနလွမ္းျပီး ping ျကည့္ပါ။ အဆင္ေျပေနပါလိ့မ္။
အတြက္ traffic ေတြ create လုပ္ဖုိ့အတြက္ switch မွာ PC တစ္လံုးထပ္ခ်ိတ္ျပီး same network IP (192.168.1.254)
ေပးလိုက္ပါ။ အဲ့ေနာက္server နွစ္ခု (192.168.1.1 & 192.168.1.2) ကေနလွမ္းျပီး ping ျကည့္ပါ။ အဆင္ေျပေနပါလိ့မ္။
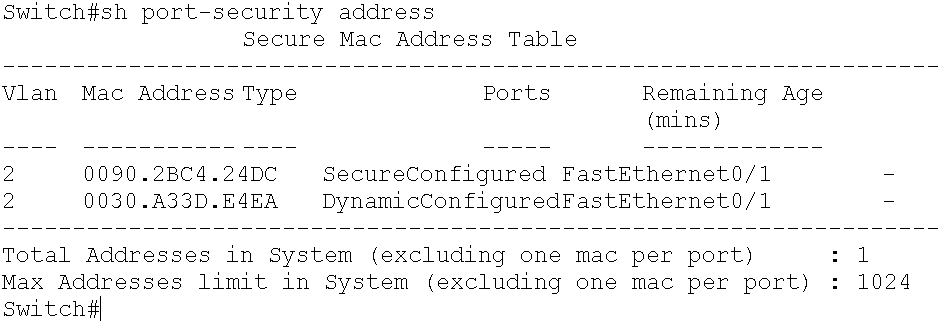
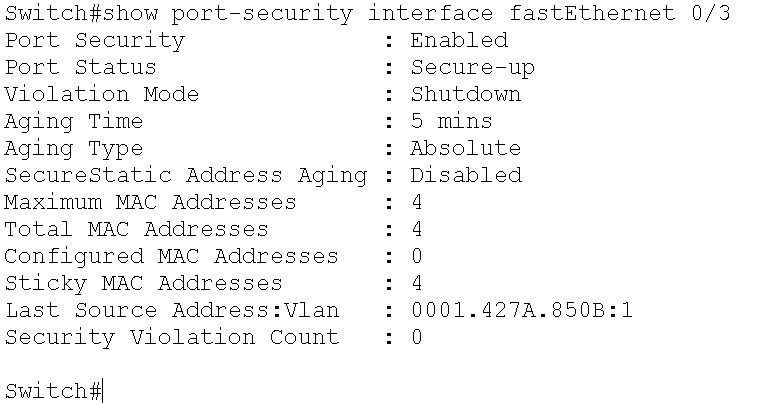
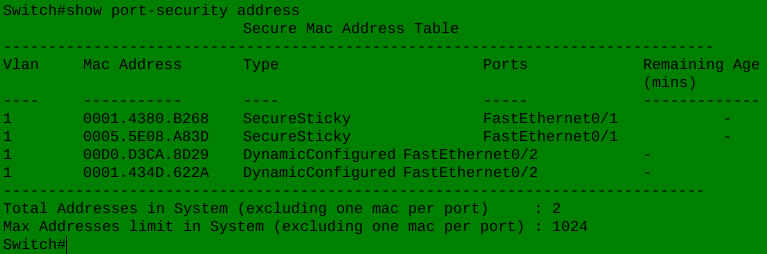
စစ္လို့ရတဲ့ show command ေလးေတြ တစ္ခ်က္ျကည့္လိုက္ရေအာင္ဗ်ာ ့..
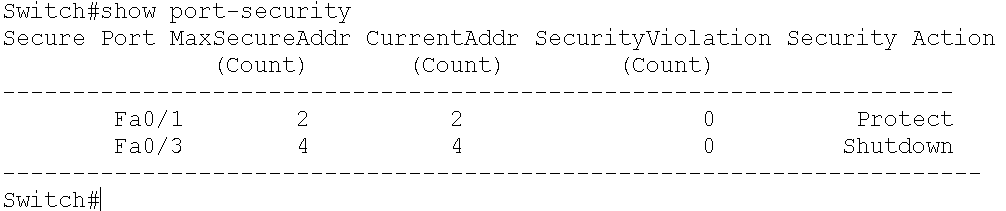
Show port-security

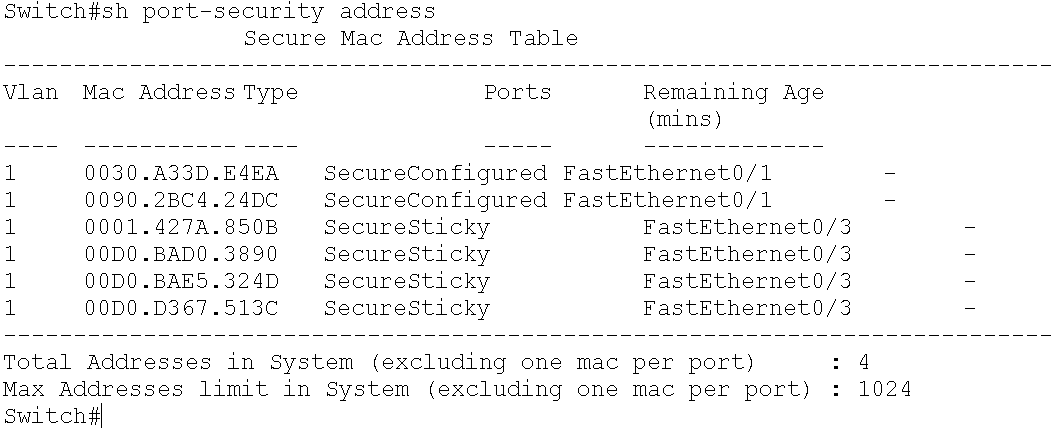
show port-security address
show port-security interface fa0/1

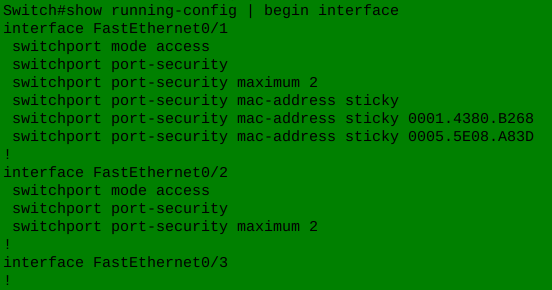
show run နဲ့ ခု ကုိယ္ထည့္ထားတဲ့ config ကို ျကည့္ပါ။
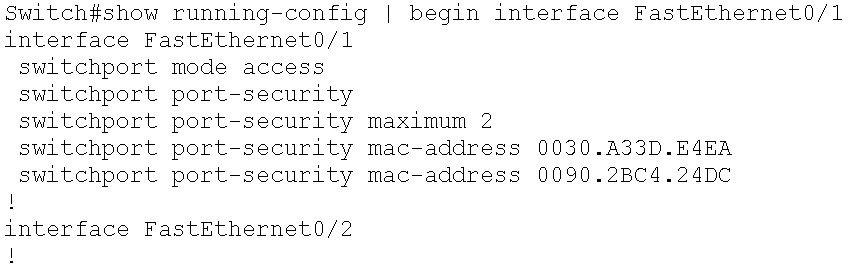
အခုက က်ြန္ေတာ္တုိ့ေတြ static ေပးထားတဲ့ MAC address ရွိတဲ့ server ေတြကေန သြားေနေတာ့ အဆင္ေျပတယ္။
- Sh Port security ကုိျကည့္မယ္ဆုိရင္ေတာ့ port-security enable ထားတဲ့ interfaceေတြ သူတုိ့ရဲ ့ အမ်ားဆံုးခြင့္ျပဳမယ့္
mac အေရအတြက္ unauthorize MAC လာရင္ လုပ္မယ့္ action စတာေတြကို ေတြ့နုိင္ပါတယ္။ - Sh port-security address table ကို ျကည့္ရင္ ကိုယ့္ထည့္ထားတဲ့ MAC address ေတြကိုေတြ့ရမွာပါ
- Sh port-security interface ကုိသြားျကည့္မယ္ဆုိရင္ေတာ့ port-security on ထားလား port status က up(secure-up) လား
down လား .. violation mode ကဘာလဲ စသျဖင့္ ျကည့္လုိ့ ရပါတယ္။
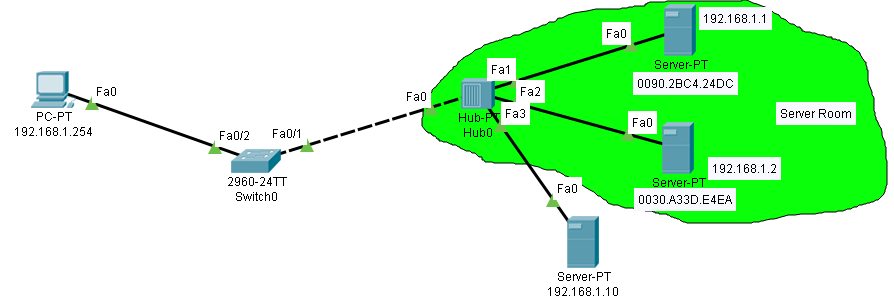
Server ေတြရွိတဲ့ ဘက္ျခမ္းျဖစ္တဲ့ Hub မွာ PC/server တစ္္ခု ထပ္ျခိတ္လိုက္ပါ။ traffic generateလုပ္ဖုိ့ အတြက္ same IP (192.168.1.10 /24)
တစ္ခု ေပးျပီး switch ရဲ ့တစ္ျခားဘက္ျခမ္းမွာ ရွိတဲ့ PC (192.168.1.254) ကို လွမ္း ping ျကည့္ပါ။
တစ္ခု ေပးျပီး switch ရဲ ့တစ္ျခားဘက္ျခမ္းမွာ ရွိတဲ့ PC (192.168.1.254) ကို လွမ္း ping ျကည့္ပါ။
Violation mode ကို protect ထားခဲ့ရင္ေတာ့ ping မရယံုပါပဲ.. Default mode shutdown ျဖစ္ေနရင္ေတာ့ switch ရဲ ့interface fa0/1 သည္
ေဒါင္းသြားပါလိမ့္မယ္။
ေဒါင္းသြားပါလိမ့္မယ္။
show port-security interface fastEthernet 0/1
ဒီေနရာမွာ ေျပာခ်င္တာတစ္ခုက shutdown ျဖစ္ေနတဲ့ interface ကို recover ျပန္လုပ္မယ္ဆုိရင္ နွစ္မ်ိဳးလုပ္လုိ့ရတယ္။
1. switch(config)# errdisable recovery cause psecure-violation
switch(config)# errdisable recovery interval 30
ဒါကေတာ့ auto recovery ျပန္လုပ္မယ္ေပါ့ေနာ္..violation ျဖစ္တဲ့ MAC ကို စကၠန့္ ၃၀ ျကာတဲ့အထိ မေတြ့ရင္ autorecovery
လုပ္မယ္လို့ ေျပာတာပါ။
လုပ္မယ္လို့ ေျပာတာပါ။
2. ေနာက္တစ္ခုကေတာ့ manual ေပါ့ packet tracer မွာေတာ့ ဒါပဲ သံုးလို့ရတယ္။ သူကေတာ့ .. ခု port
Security ေျကာင့္ down ေနတဲ့ interface ကို shutdown အရင္ရိုက္ ျပီးမွ no shutdown ျပန္ရိုက္။
အဲလိုဆုိ ျပန္upသြားလိမ့္မယ္။ No shut တစ္ခုထဲ မရိုက္မိေစနဲ့ေနာ္ ့..။
Port Security Lab2 - sticky
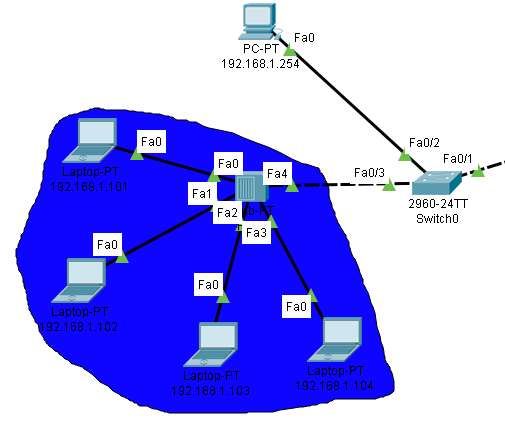
ပံုက ေသးေနတယ္.. ခု ကိုယ္ေတြလုပ္မယ့္ ဘက္ျခမ္းကို target ထားျကည့္ပါ။
Static မသံုးခ်င္ဘူး.. ၀င္လာတဲ့ packetေတြရဲ ့source MAC ေတြကို ျကည့္ျပီး premit ေပးခ်င္တယ္.. Secure MAC
address table ထည့္မယ္ဆုိ အဲ့လိုလုပ္ဖုိ ့အတြက္ sticky ကိုသံုးျပီး Lab လုပ္က်ရေအာင္ ။
address table ထည့္မယ္ဆုိ အဲ့လိုလုပ္ဖုိ ့အတြက္ sticky ကိုသံုးျပီး Lab လုပ္က်ရေအာင္ ။
enable
| |
conf t
| |
int fa0/3
| |
switchport mode access
|
interface fa0/1 ကို access mode ေျပာင္းေပးလိုက္တာပါ။
|
switchport port-security
|
port security feature ကို enable လုပ္လိုက္တာပါ။
ျပီးေတာ့
|
switchport port-security mac-address sticky
|
mac ကို stickly learning လုပ္မယ္လို့ ဆုိလိုတာပါ
|
switchport port-security maximum 4
|
default maximum number ကေတာ့ 1 ပါ
|
Switch(config-if)#switchport port-security violation ?
protect Security violation protect mode
restrict Security violation restrict mode
shutdown Security violation shutdown mode
| |
default violation mode က shutdown ပါ default အတိုင္းပဲ ထားလိုက္ပါ
| |
switch(config-if)#switchport port-security aging time 5
|
Aging time ကို 5 မိနစ္ထားလိုက္ပါ
|
အျပာဘက္ျခမ္းက PC ေလးလံုးကေန အျခားဘက္ျခမ္းကို စက္ ip 192.168.1.254 ကို ping ျပီး traffic ေတြ generate လုပ္လုိက္ပါ။
#show port-security
#show port-security address
#show port-security interface fastethernet 0/3
ခုတိုင္းကေတာ့ အကုန္ အဆင္ေျပေနလိမ့္မယ္.. Pc ေလးခု ဆိုေတာ့ MAC address ၄ ခုကို learning လုပ္ထားလိမ့္မယ္။
5 ခုေျမာက္ ၀င္လာတဲ့အခ်ိန္မွာ violation mode အရ shutdown ျဖစ္သြားလိမ့္မယ္။
5 ခုေျမာက္ ၀င္လာတဲ့အခ်ိန္မွာ violation mode အရ shutdown ျဖစ္သြားလိမ့္မယ္။
show port-security interface fastEthernet 0/3
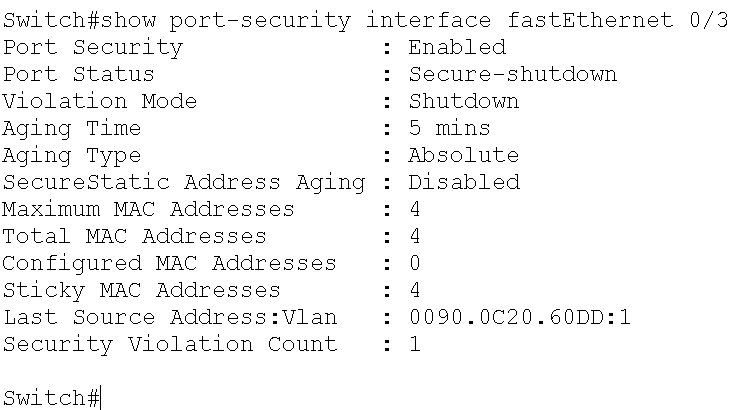
ခုဆုိရင္ secure-shutdown ဆုိျပီး ျပေနလိမ့္မယ္။ ျပန္ အပ္ဖုိ့ဆို အဲ့ ငါးလံုးေျမာက္ PC ကိုျဖဳတ္ interface fa0/3ကို Shutdown and
then No shutdown လုပ္ေပးလုိက္ရင္ ရပါျပီ။
then No shutdown လုပ္ေပးလုိက္ရင္ ရပါျပီ။
Port-security lab လုပ္တာပဲ ျဖစ္ျဖစ္ အျပင္မွာ သံုးတာပဲ ျဖစ္ျဖစ္ port-security onထားတဲ့ port နဲ့ ခ်ိတ္မွာက PC
တစ္လံုးထဲ မဟုတ္ပဲ.. အမ်ားျကီး ခ်ိတ္မယ္ဆုိ ေနာက္ switch တစ္လံုးသံုးတာထက္ hub ကို ပိုသံုးေစခ်င္ပါ။ switch မွာက
interface တုိင္းမွာ MAC address ရွိတဲ့ အျပင္ သူ့အတြက္ MAC address လဲ သတ္သတ္ရွိပါတယ္။ switch က Layer 2
device ျဖစ္တယ္ဆုိတာ မေမ့နဲ ့ေနာ္။
တစ္လံုးထဲ မဟုတ္ပဲ.. အမ်ားျကီး ခ်ိတ္မယ္ဆုိ ေနာက္ switch တစ္လံုးသံုးတာထက္ hub ကို ပိုသံုးေစခ်င္ပါ။ switch မွာက
interface တုိင္းမွာ MAC address ရွိတဲ့ အျပင္ သူ့အတြက္ MAC address လဲ သတ္သတ္ရွိပါတယ္။ switch က Layer 2
device ျဖစ္တယ္ဆုိတာ မေမ့နဲ ့ေနာ္။

အဲ့ေတာ့ port-security သည္ သူဆီလာတဲ့ source MAC ကို learning လုပ္တာျဖစ္လို့.. PC ကလာတာမဟုတ္ပဲ
သူ့ေအာက္switch ကေနလာတဲ့ generateလုပ္လိုက္တဲ့ STP packet ေတြ Management Vlan traffic ေတြ
အတြက္ ထည့္စဥ္းစားျပီး maximun number ကို ခ်ိန္ညွိ ကစားေပးဖုိ့လိုပါတယ္။ အနည္းဆံုး switch’ MAC နဲ့
port-sec enable port နဲ့ direct ခ်ိတ္ထားတဲ့ interface’ MAC ကိုေတာ့ permit ေပးထားမွ ရပါမယ္။
သူ့ေအာက္switch ကေနလာတဲ့ generateလုပ္လိုက္တဲ့ STP packet ေတြ Management Vlan traffic ေတြ
အတြက္ ထည့္စဥ္းစားျပီး maximun number ကို ခ်ိန္ညွိ ကစားေပးဖုိ့လိုပါတယ္။ အနည္းဆံုး switch’ MAC နဲ့
port-sec enable port နဲ့ direct ခ်ိတ္ထားတဲ့ interface’ MAC ကိုေတာ့ permit ေပးထားမွ ရပါမယ္။
Additional: ျပီးေတာ့ aging time command ကိုသံုးျပီး Secure MAC ရဲ့ time ကို သတ္မွတ္လို့ရပါတယ္။
Switch(config-if)# switchport port-security aging time 2
ခုcommand မွာဆုိ နွစ္မိနစ္လို့. သက္မွတ္လိုက္တာပါ။ default က aging timeသည္ desiable ပါ။ aging time မွာ type နွစ္မ်ိဳးရွိပါတယ္။
Absolute— ခု command အရ သူသည္ Secure MAC address ကို specific time (2 min) ေရာက္ရင္ ဖယ္ထုတ္(delete) လိုက္မွာပါ။
Inactivity— သည္ေကာင္ကေတာ့ Secure MAC address တစ္ခု idle ျဖစ္တဲ့အခ်ိန္ နွစ္မိနစ္ျကာမွ ဖ်က္ပစ္တာပါ။
Port-Security Lab3 - Sticky vs Dynamic
Switch Config
| |
For Interface Fa0/1 Sticky
|
For Interface Fa0/2 Dynamic (default mode)
|
enable
|
conf t
|
conf t
|
int fa0/2
|
int fa0/1
|
switchport mode access
|
switchport mode access
|
switchport port-security
|
switchport port-security
|
switchport port-security maximum 2
|
switchport port-security mac-address sticky
|
end
|
switchport port-security maximum 2
| |
end
| |
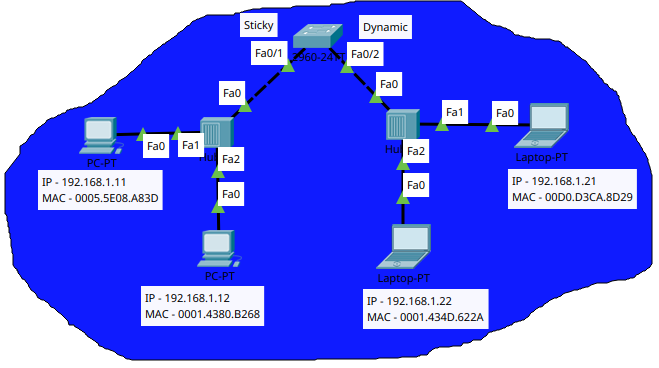
Traffic ေတြ generate လုပ္ဖုိ့ PC အခ်င္းခ်င္း ping ျကည့္ပါ။ show port-security address နဲ့ စစ္ျကည့္ပါ။ type မတူတာကိုေတြ ့ရပါလိမ့္္မယ္။။
show run ေခၚျကည့္ရင္လဲ.. Sticky နဲ့ config ခ်ထားတဲ့ interface မွာဆို ၀င္လာတဲ့ packet ေတြရဲ ့ source MAC ကိုျကည့္ျပီး config ထဲကို
သြားထည့္ပါတယ္။ dynamic ကေတာ့ မထည့္ပါဘူး.. Lab ေလးကို try ျကည့္ပါ..
show run ေခၚျကည့္ရင္လဲ.. Sticky နဲ့ config ခ်ထားတဲ့ interface မွာဆို ၀င္လာတဲ့ packet ေတြရဲ ့ source MAC ကိုျကည့္ျပီး config ထဲကို
သြားထည့္ပါတယ္။ dynamic ကေတာ့ မထည့္ပါဘူး.. Lab ေလးကို try ျကည့္ပါ..
•Static secure MAC addresses—These are manually configured by using the switchport port-security mac-address mac-address interface configuration command,
stored in the address table, and added to the switch running configuration.
stored in the address table, and added to the switch running configuration.
•Dynamic secure MAC addresses—These are dynamically learned, stored only in the address table, and removed when the switch restarts.
•Sticky secure MAC addresses—These can be dynamically learned or manually configured, stored in the address table, and added to the running configuration.
If these addresses are saved in the configuration file, the interface does not need to dynamically relearn them when the switch restarts.
Although sticky secure addresses can be manually configured, we do not recommend it.
If these addresses are saved in the configuration file, the interface does not need to dynamically relearn them when the switch restarts.
Although sticky secure addresses can be manually configured, we do not recommend it.
Switch#copy running-config startup-config
Destination filename [startup-config]?
Building configuration...
[OK]
Switch#show startup-config
Using 1436 bytes
!
version 12.2
no service timestamps log datetime msec
no service timestamps debug datetime msec
no service password-encryption
!
hostname Switch
!
!
!
no ip domain-lookup
!
!
spanning-tree mode pvst
spanning-tree extend system-id
!
interface FastEthernet0/1
switchport mode access
switchport port-security
switchport port-security maximum 2
switchport port-security mac-address sticky
switchport port-security mac-address sticky 0001.4380.B268
switchport port-security mac-address sticky 0005.5E08.A83D
!
interface FastEthernet0/2
switchport mode access
switchport port-security
switchport port-security maximum 2
!
Port Security Lab - All (Try yourself)
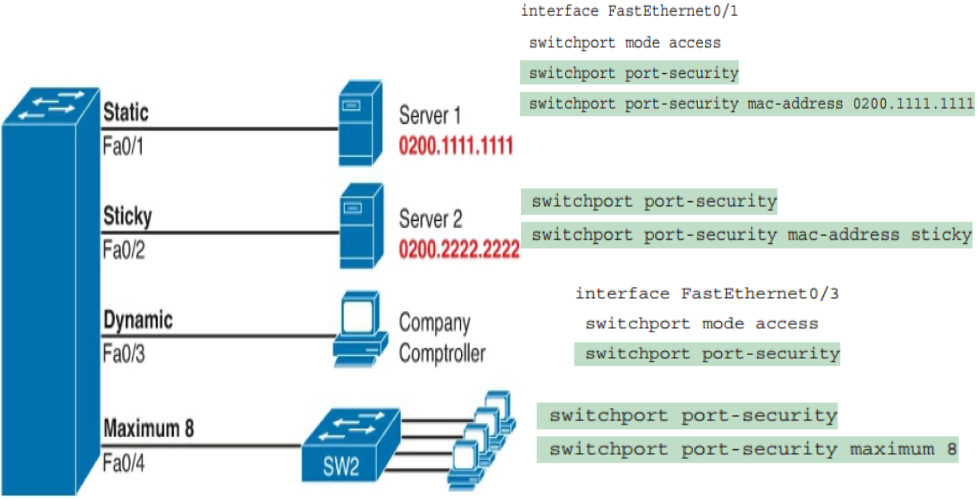
ေမ့မွာ ဆိုးလို့ ျပန္ေျပာမယ္ေနာ္ ့… Port ကို secure ျဖစ္ေအာင္ လုပ္တဲ့ေနရာမွာ … switchport port-security mac-address 0200.1111.1111
ဆုိျပီး MAC Address ကို အေသထား bind ပစ္တာရွိတယ္။ switchport port-security mac-addres stick ဆုိျပီး အဲ့switch port မွာ လာခ်ိတ္တဲ့
MAC Address ကိုပဲ dynamically learn လုပ္ခိုင္းလိုက္္တာပါ။ switchport port-security maximun 8 ဆိုတာကေတာ့ dynamically လုပ္လုိ့ရတဲ့
MAC address အေရအတြက္က မ်ားဆံုး ၈ခု ဆိုျပီး သတ္မွတ္လိုက္တာပါ။
Port security Command Proceure
| |
Switch(config)# interface interface_id
| |
Switch(config-if)#switchport mode access
|
Default က dynamic desirable ျဖစ္ေနရင္ port-security feature ကို configure လုပ္လုိ့မရလို့.. access mode ေျပာင္းေပးရတာပါ
|
Switch(config-if)#switchport port-security
|
အရင္ဆံုး port-security ကို enable လုပ္ပါ။
|
Switch(config-if)#switchport port-security maximum [value]
|
mac address အေရအတြက္ဘယ္ေလာက္မ်ားမ်ား လက္ခံမယ္ဆို သက္မွတ္တာပါ။ ၁ ကေန ၃၀၇၂ ခုထိ ရပါတယ္။ default က 1 ပါ။
|
Switch(config-if)#switchport port-security violation { restrict | shutdown}
|
unauthorized MAC address ၀င္လာရင္ action ယူမယ့္ mode ကို သတ္မွတ္ေပးတာပါ။
|
Comments
Post a Comment