- Port Security (Sticky & Dynamic)
ခုေျပာမွာကေတာ့ Port Security အေျကာင္းပါ။ ခု အရင္ဆံုးစေျပာမွာကေတာ့ …
- Dynamic
- Sticky
အေျကာင္းပဲ ျဖစ္ပါတယ္။ အဲ့ေနာက္မွေတာ့ Static အေျကာင္းဆက္ ေျပာသြားပါမယ္။


“Port Security” သူကေတာ့ interface port ေတြကို ဘယ္သူ့ computer တပ္တပ္ သံုးလို့ရေနတာထက္
security အတြက္ limit ေလးတစ္ခုထားလိုက္တာပါ။ ျပီးေတာ့ MAC flooding attack မျဖစ္ေအာင္
ကာကြယ္ဖုိ့အတြက္ သံုးသင့္ပါတယ္။
security အတြက္ limit ေလးတစ္ခုထားလိုက္တာပါ။ ျပီးေတာ့ MAC flooding attack မျဖစ္ေအာင္
ကာကြယ္ဖုိ့အတြက္ သံုးသင့္ပါတယ္။
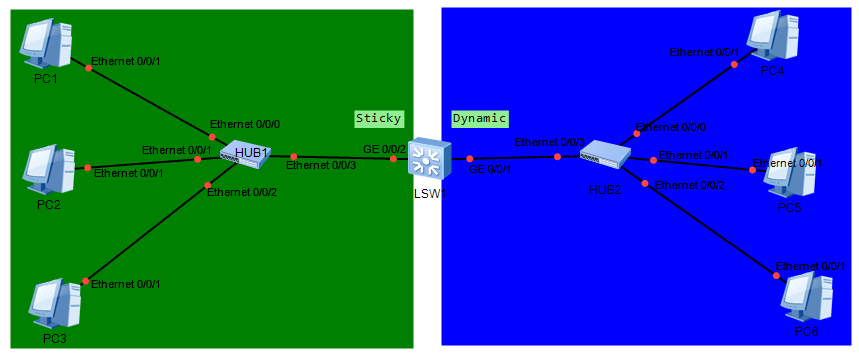
ခု အေပၚက ပံုမွာ ဆုိ အပိုင္းနွစ္ပိုင္းပါ ပါတယ္။ ညာဘက္က LSW1ရဲ ့interface GE0/0/0/2 နဲ့
ခ်ိတ္ေနတဲ့ အစိမ္းေရာင္ ဘက္ျခမ္း ကို sticky အေနနဲ ့config ခ်ပါမယ္။
ခ်ိတ္ေနတဲ့ အစိမ္းေရာင္ ဘက္ျခမ္း ကို sticky အေနနဲ ့config ခ်ပါမယ္။
ျပီးေတာ့ LSW1 ရဲ ့ interface GE0/0/1 (ဘယ္ဘက္ျခမ္း အျပာေရာင္) ကိုေတာ့ Dynamic အေနနဲ ့
configuration လုပ္ပါ့မယ္။
configuration လုပ္ပါ့မယ္။
ကဲ တစ္ဆင့္ခ်င္းဆီ သြားလိုက္ရေအာင္ ဗ်ာ ။။ ပထမဆံုးအေနနဲ ့LSW 1 interface GE0/0/2
(အစိမ္းေရာင္ အကြက္ / ညာဘက္ျခမ္း ) ကို အရင္ config ခ်ပါမယ္။
(အစိမ္းေရာင္ အကြက္ / ညာဘက္ျခမ္း ) ကို အရင္ config ခ်ပါမယ္။
LSW1
| ||
Dynamic
|
Sticky
|
Description
|
system-view
|
system-view
|
System view ကိုသြားပါ။
|
interface g 0/0/1
|
interface g 0/0/2
|
interface view ကိုသြားပါ
|
port-security enable
|
port-security enable
|
Port Security ကုိ on ပါ။ default က disable ပါ။
|
port-security mac-address sticky
|
Port Security enable လုပ္ျပီးမွ Sticky ကို config ခ်ပါ။
Sticky ကို enable မလုပ္ခဲ့ ရင္ Dynamic အေနနဲ့ ရွိေနမွာပါ
| |
port-security max-mac-num 2
|
port-security max-mac-num 2
|
အမ်ားဆံုးလက္ခံမယ္ Maximum MAC address အေရအတြက္ သက္မွတ္ပါ။
Default က 1 ပါ။
|
port-security protect-action protect
|
port-security protect-action protect
|
protect လုပ္မယ့္ Mode သတ္မွတ္ပါ။ restrict, protect and shutdown
ဆုိျပီး ရွိပါတယ္။ default က restrict ပါ
|
port-security aging-time 2
|
port-security aging-time 2
|
Aged out ျဖစ္မယ္ ့ အခ်ိန္ သတ္မွတ္ပါ။ default အတုိင္းဆုိ age မရွိပါဘူး။
|
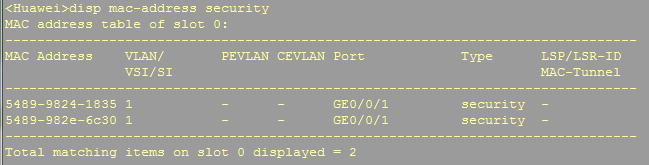
port -security သည္ သူ့ကို config ခ်ထားတဲ့ ၀င္တဲ့ ေကာင္ရဲ့ source MAC-address ကို learning/check
လုပ္တဲ့အတြက္ traffic ေတြ create လုပ္ဖုိ့အတြက္.. PC ေတြမွာ IP ေပးျပီး Ping ျကည့္ပါ။ အဲ့ေနာက္..
Display mac-address security နဲ ့ျပန္ ျကည့္ျကည့္ပါ။ (display mac-address sticky)
လုပ္တဲ့အတြက္ traffic ေတြ create လုပ္ဖုိ့အတြက္.. PC ေတြမွာ IP ေပးျပီး Ping ျကည့္ပါ။ အဲ့ေနာက္..
Display mac-address security နဲ ့ျပန္ ျကည့္ျကည့္ပါ။ (display mac-address sticky)
ေနာက္ တစ္မ်ိဳးကေတာ့ Port Security Static ပါ။ သူကေတာ့ dynamically Learn လုပ္တာမလိုခ်င္တဲ့
အခ်ိန္အခါ မိ်ဳးမွာ သံုးပါတယ္။ အထူးသျဖင့္ server ဘက္ျခမ္းမွာ security point of view အရ static
MAC address ကို configure ခ်သင့္ပါတယ္။ eNSP မွာက က်ြန္ေတာ့္ မွာရွိေနတဲ့ version မွာေတာ့ စမ္းလို့
မရပါဘူး.. ရတဲ့ version ေတြ့ရင္လဲ လက္တုိ့ က်ပါဦး…
အခ်ိန္အခါ မိ်ဳးမွာ သံုးပါတယ္။ အထူးသျဖင့္ server ဘက္ျခမ္းမွာ security point of view အရ static
MAC address ကို configure ခ်သင့္ပါတယ္။ eNSP မွာက က်ြန္ေတာ့္ မွာရွိေနတဲ့ version မွာေတာ့ စမ္းလို့
မရပါဘူး.. ရတဲ့ version ေတြ့ရင္လဲ လက္တုိ့ က်ပါဦး…
ခုေတာ့ config ကို ရွင္းျပထားပါ့မယ္။
- Port Security (static)
Static Secure MAC Address
| ||
Syntax
|
Command
|
Description
|
system-view
|
system-view
|
system view ကုိသြားပါ
|
interface interface-type interface-number
|
interface giga 0/0/1
|
အဲ့ကေနမွ interface view ကုုိသြာပါ။ port security သည္ inferface မွာ config လုပ္ရမွာမုိ့ပါ
|
port-security enable
|
port-security enable
|
Port security ကို enable လုပ္ပါ
|
port-security max-mac-num max-number
|
port-security max-mac 1
|
အဲ့မ်ားဆံုး ခြင့္ျပဳမယ့္ MAC Address အေရအတြက္ သတ္မွတ္ပါ
|
port-security mac-address mac-address vlan vlan-id
|
port-security mac-address 54-89-98-75-22-53 vlan 1
|
MAC address ကို static သက္မွတ္ပါ။ vlan ပါထည့္ေရးေပးလို့ရပါတယ္။ (optional)
|
port-security protect-action { protect | restrict | shutdown }
|
port-security protect-action shutdown
|
static MAC မဟုတ္ရင္ shutdown လုပ္ပါ
|
port-security aging-time time [ type { absolute | inactivity } ]
|
port-security aging-time 2
|
Age သတ္မွတ္ပါ
|
display mac-address sec-config
Display mac-address static ျဖင့္ စစ္ျကည့္ပါ။
ဒီေနရာမွာ တစ္ခုေျပာခ်င္တာက
အေပၚက aging-time command မွာဆုိ နွစ္မိနစ္လို့. သက္မွတ္လိုက္တာပါ။ default က aging timeသည္
desiable ပါ။ aging time မွာ type နွစ္မ်ိဳးရွိပါတယ္။
desiable ပါ။ aging time မွာ type နွစ္မ်ိဳးရွိပါတယ္။
Absolute— ခု command အရ သူသည္ Secure MAC address ကို specific time (2 min) ေရာက္ရင္
ဖယ္ထုတ္(delete) လိုက္မွာပါ။
ဖယ္ထုတ္(delete) လိုက္မွာပါ။
Inactivity— သည္ေကာင္ကေတာ့ Secure MAC address တစ္ခု idle ျဖစ္တဲ့အခ်ိန္ နွစ္မိနစ္ျကာမွ
ဖ်က္ပစ္တာပါ။
ဖ်က္ပစ္တာပါ။
Cisco မွာ မရဘဲ Huawei မွာ ရတဲ့ command တစ္ခု ရွိတယ္ဗာ် ့.. ဥပမာ interface view ေအာက္ထဲ ကို
၀င္ပါ။ ျပီးေတာ့ display this လို့ ရိုက္ျကည့္လုိက္ပါ။
၀င္ပါ။ ျပီးေတာ့ display this လို့ ရိုက္ျကည့္လုိက္ပါ။

သူ နဲ ့ သက္ဆုိင္တဲ့ config ေတြကို ျမင္ရမွာပဲ ျဖစ္ပါတယ္။ ခု လက္ရွိ run ေနတဲ့ config ေတြကို
ျကည့္ခ်င္တယ္ ဆုိရင္ display current-configuration ေနာ္.. Command ေမ့ေနမွာ ဆုိးလို့။။
ျကည့္ခ်င္တယ္ ဆုိရင္ display current-configuration ေနာ္.. Command ေမ့ေနမွာ ဆုိးလို့။။
- Spanning Tree Protocol (STP)
ခု LAB မွာက Spanning-Tree algorithm run ျပီး default အရ root bridge [switch] ျဖစ္သြားတာထက္
ကိုယ့္စိတ္ျကိဳက္ switch ကို root ျဖစ္္ခ်င္တာမ်ိဳး အတြက္ပါ။ ဘာေျကာင့္လဲ ဆုိေတာ့ root switch
မွာဆို port ေတြသည္ အကုန္ forwarding state ေတြပဲ ျဖစ္တဲ့ အတြက္ ေျကာင့္ပါ။ အကယ္ လို့
upper level နဲ့ ခ်ိတ္တဲ့ switch သည္ root မဟုတ္ခဲ့လို့ disable state ျဖစ္ေနမယ္ဆုိရင္
အဲ့ port မွာ ခ်ိတ္ထားတဲ့ switch သည္ direct မသြားနုိင္ပဲ တစ္ျခားကေန ပါတ္သြားေနရမွာကို
မလိုခ်င္တာေျကာင့္ပါ။
ဘာလို့အဲ့လိုBlock ျဖစ္ေနတာလဲ ဆုိေတာSTPသည္ switch ေတြမွာ .. ေျပာရရင္ layer 2 devices
ေတြမွာ loop မျဖစ္ေအာင္ ကာကြယ္ေပးမယ့္ protocolတစ္ခု ျဖစ္ပါတယ္။ layer 2 မွာဟ layer 3
(rouer) လုိ TTL (Time To Live) value မရွိတဲ့အတြက္.. Broadcast strom ျဖစ္နုိင္ေခ် အရမ္းမ်ားပါတယ္
STP သာမရွိ ခဲ့ဘူးဆုိရင္ေပါ။
ေတြမွာ loop မျဖစ္ေအာင္ ကာကြယ္ေပးမယ့္ protocolတစ္ခု ျဖစ္ပါတယ္။ layer 2 မွာဟ layer 3
(rouer) လုိ TTL (Time To Live) value မရွိတဲ့အတြက္.. Broadcast strom ျဖစ္နုိင္ေခ် အရမ္းမ်ားပါတယ္
STP သာမရွိ ခဲ့ဘူးဆုိရင္ေပါ။
ခု STP protocolေျကာင့္ switchေတြသည္power onျပီ ဆုိတာနဲ့ BPDU Hello (priority+MAC)
ေတြပို့ျပီး တစ္ခု နဲ ့တစ္ခု ကုိယ့္ကိုယ္ကို root switchj ျဖစ္ပါတယ္ေျပာရင္ infoေတြ ဖလွယ္ျပီး
ေနာက္ဆံုး lowest BID နဲ့ ေကာင္ကို root switchေရြး .. ျပီးေတာ့ Designate portေတြ Root
portေတြ သတ္မွတ္္.. Segment တုိင္းကို designate portတစ္ခု ရွိကို ရွိျပီးရင္ က်န္တာကို block
portလုပ္ ျပီး Loop Free ျဖစ္ေအာင္ ေဆာင္ရြက္ေပးပါတယ္။

STP ရဲ ့အလုပ္ လုပ္ပံုေလး တစ္ခ်က္ေျပာျကည့္ရင္း Huawei ရဲ ့အေခၚအေ၀ၚေလးေတြ လိုက္ျကည့္ရေအာင္
။ STP မွာဆို switch ေတြသည္ သူတို့ဆီကို ၀င္လာတဲ့ info (BID, PID, cost) ေတြကို ျကည့္
calculate လုပ္ျပီး RP, DP, AP ေတြသတ္မွတ္တာပါ။
။ STP မွာဆို switch ေတြသည္ သူတို့ဆီကို ၀င္လာတဲ့ info (BID, PID, cost) ေတြကို ျကည့္
calculate လုပ္ျပီး RP, DP, AP ေတြသတ္မွတ္တာပါ။
- Network ထဲမွာ ရွိေနတဲ ့switch ေတြထဲ ကေန Root Bridge (Switch) ကို ေရြးခ်ယ္ပါ။
ထင္က်ပါပဲ။ ဘယ္လို့ ေရြးလဲဆုိေတာ့ BPDU ( Bridge Protocol Data Unit) Hello ေတြကို စစခ်င္
း ပုိ့လြတ္ပါတယ္။ အဲ့မွာ အဓိက ဘာပါလဲ ဆုိေတာ့ BID (Bridge Identifier) ပါပါတယ္။
BID = Priority + MAC ပါ။ Lowest BID က win ျဖစ္ျပီး Root Bridge ျဖစ္လာပါတယ္။
- Root switch ကိုေရြးျပီးသြားရင္ Root port ေရြးရပါမယ္။ non-Root Switch ေတြကေန Root
လမ္းေျကာင္း (Root Path Cost) ရွိတဲ့ port ႕ကို root port (RP) အေနနဲ ့ ေရြးပါတယ္။ အကယ္လို့
RPC တန္းဖုိး တူေနရင္ …

သူနဲ့ ခ်ိတ္ဆက္ထားတဲ့ upstring switch ရဲ ့ BID ကို ျကည့္ပါတယ္။ BID ငယ္တဲ့ေကာင္ ကို
ခ်ိတ္ထားတဲ့ port ကို RP အေနနဲ ့ ေရြးပါတယ္။ အကယ္လို့ BID ပါ တူေနရင္…
ခ်ိတ္ထားတဲ့ port ကို RP အေနနဲ ့ ေရြးပါတယ္။ အကယ္လို့ BID ပါ တူေနရင္…
သူနဲ့ ခ်ိတ္ဆက္ထားတဲ့ upstring switch ရဲ့ PID (Port Identifier) ကို နွဳိင္းယွဥ္ပါတယ္။ PID
ငယ္တဲ့ ေကာင္က win ျဖစ္ျပီး RP အေနနဲ့ ရွိေနပါမယ္။
ငယ္တဲ့ ေကာင္က win ျဖစ္ျပီး RP အေနနဲ့ ရွိေနပါမယ္။
- ေနာက္တစ္ခါ DP (Designated Port) ကို သတ္မွတ္ေပးရမွာပါ။ အရင္ဆံုး Root Bridge/switch
ေရြးခ်ယ္ေပးပါ။ ကုိယ့္device ကေန Root ကိုသြားမယ့္ Root Path Cost အငယ္ဆံုး (highest Bandwidth)
ရွိတဲ့ ဘက္ျခမ္းက Port ကို DP အေနနဲ ့ သတ္မွတ္ပါ။ အကယ္လို့ RPC တူေနရင္ BID နဲ ့ ယွဥ္ျပီး ေရြးပါ..
Lowest BID က အနိုင္ရျပီး DP ျဖစ္မွာပါ။ BID ပါ တူေနရင္ PID နဲ ့ထပ္ျပီး စစ္ပါ။ PID အငယ္ဆံုးေကာင္ကို
Designated Port အေနနဲ ့သတ္မွတ္ရမွာပါ။


က်န္ေနတဲ့ port ေတြကို alternate port (AP) / blocking port အေနနဲ ့ထားပါ။
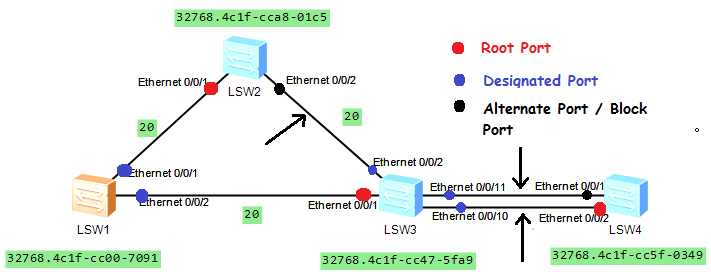
ပိုျပီးွရွင္းသြားေအာင္ ေအာက္ကပံုေလးကို ျကည့္ပါ။
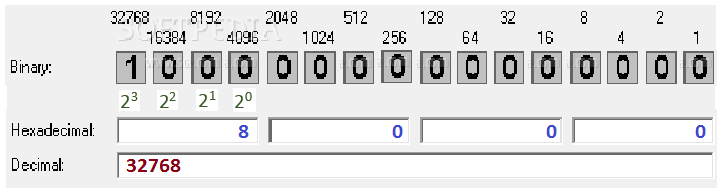
ခု STP မွာဆို BID သည္ Priority နဲ ့MAC ေပါင္းထားတာလို့ ေျပာခဲ့တယ္ေနာ္။ အဲ့ MAC ကို Huawei
device ေတြမွာ ဘယ္ကယူ လဲဆိုေတာ့ port ေတြတုိင္းမွာ MAC address ေတြရွိပါတယ္။
device ေတြမွာ ဘယ္ကယူ လဲဆိုေတာ့ port ေတြတုိင္းမွာ MAC address ေတြရွိပါတယ္။
အဲ့ေကာင္ေတြထဲကမွ အငယ္ဆံုး port number ရဲ ့MAC ကို ယူျပီး Bridge/switch ရဲ ့MAC အေနနဲ ့
ကုိယ္စားျပဳပါတယ္။
ကုိယ္စားျပဳပါတယ္။
STP LAB ေလး စလိုက္ က်ရေအာင္ဗ်ာ ..
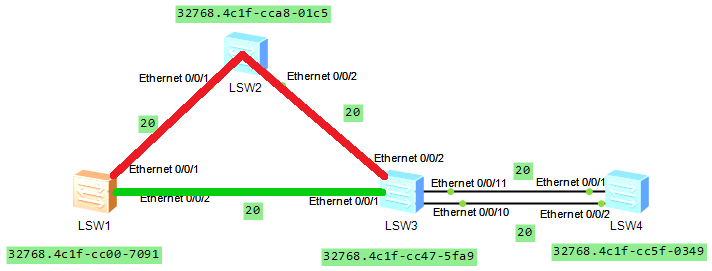
- အရင္ဆံုး ဘယ္ switch သည္ root bridge ဆုိတာကို BPDU အျပန္အလွန္ပို့ျပီး ေရြးပါတယ္။
ေတြ တူတာျဖစ္လို့ MAC ေတြကို ယွဥ္ျကည့္ပါ။ LSW1 မွာ ရွိတဲ့ 32768.4c1f-cc00-7091 သည္
အငယ္ဆံုးျဖစ္လို့. သူသည္ root bridge ျဖစ္ပါတယ္။ Display stp နဲ ့ စစ္ျကည့္ပါ
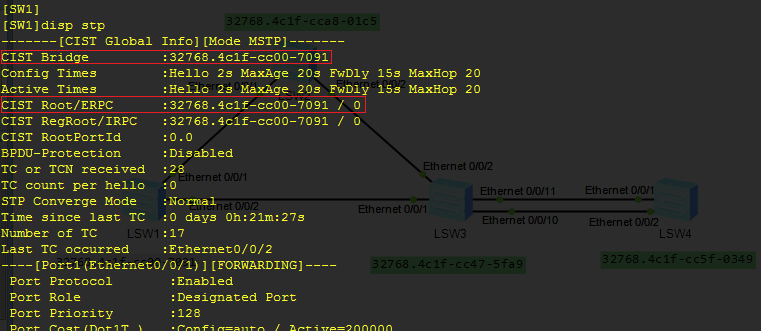
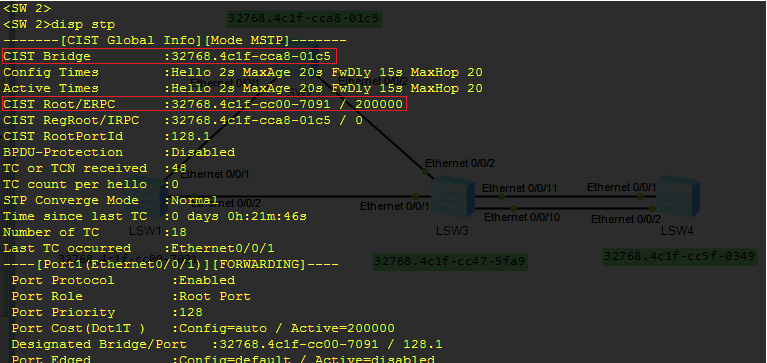

LSW1 မွာဆို CIST Bridge (Common and internal spanning tree (CIST) bridge ID) နဲ ့
CIST Root/ERPC (External path from the switch to the CIST root switch)
CIST Root/ERPC (External path from the switch to the CIST root switch)
မွာဆို အတူတူ ျပေနကို ေတြ ့ရပါမယ္။ CIST Bridge သည္ ကိုယ္ခု လက္ရွိ ျကည့္ေနတဲ့ device ရဲ ့BID
ကို ျပတာျဖစ္ပါတယ္။ CIST Root/ERPC ကေတာ့ ခုလက္ရွိ ေရြးခ်ယ္ခံထားရတဲ့ Root Bridge ရဲ ့BID
ကို ေဖာ္ျပေပးထားတာပါ။ / ေနာက္က 0 ကေတာ့ cost ကို ျပေပးထားတာပါ။ ခု ျကည့္တဲ့ switch သည္
Root ျဖစ္ေနတာမုိ ့အဲ့လို တူေနတာပါ။
ကို ျပတာျဖစ္ပါတယ္။ CIST Root/ERPC ကေတာ့ ခုလက္ရွိ ေရြးခ်ယ္ခံထားရတဲ့ Root Bridge ရဲ ့BID
ကို ေဖာ္ျပေပးထားတာပါ။ / ေနာက္က 0 ကေတာ့ cost ကို ျပေပးထားတာပါ။ ခု ျကည့္တဲ့ switch သည္
Root ျဖစ္ေနတာမုိ ့အဲ့လို တူေနတာပါ။
LSW 2 ကေန တစ္ခ်က္ျကည့္ ျကည့္ရေအာင္။
ခု Switch 2မွာဆို CIST Bridge ရဲ ့ 32768.4c1f-cca8-01c5 ဆိုတာသည္ Local Switch ရဲ ့BID
ကို ေဖာ္ျပတာျဖစ္ျပီးေတာ့ CIST Root/ERPC : 32768.4c1f-cc00-7091 / 200000 ကေတာ့ Root
Switch (LSW1) ရဲ ့ BID ကို ေဖာ္ျပေပးထားတာပါ။
ကို ေဖာ္ျပတာျဖစ္ျပီးေတာ့ CIST Root/ERPC : 32768.4c1f-cc00-7091 / 200000 ကေတာ့ Root
Switch (LSW1) ရဲ ့ BID ကို ေဖာ္ျပေပးထားတာပါ။
- ခု Root ကို သိျပီဆုိေတာ့ Non-Root Switch ေတြကေန Root switch ကိုသြားဖုိ့ (up link) RP ကို ေ
အရင္ဆံုး RCP ကို နွဳိင္းယွဥ္ပါ။ အကုန္ Ethernet ျကိဳးေတြပဲ ျဖစ္လို့ segment တစ္ခုခ်င္းဆီ တန္ဖုိးက
အတူတူပါပဲ။ သူ့ actual တန္ဖိုးက မ်ားေနေတာ့ ဂဏန္းေပါင္းရ ခက္ေနရင္ တစ္လင့္ကို cost 20 အေနနဲ ့
ယူလိုက္ပါ။


Forwarding State မွာပဲ Dataေတြ ပို ့လြတ္တယ္ဆုိတာကို မွတ္ထားပါ။ ;-) lab book မုိ ့Theory ေတြအက်ယ္ခ်ဲေနရင္ အိပ္ခ်င္မွာ ဆုိးလို့ပါ။


LSW2 မွာဆို Eth0/0/1 နဲ ့Eth0/0/2 ဆိုတဲ ့port နွစ္ခုရွိပါတယ္။ Eth0/0/1 ကေန Root ထိဆုိ
Ethernet Segment တစ္ခုပဲ ရွိလို့ cost က 20 ေပါ့။
Ethernet Segment တစ္ခုပဲ ရွိလို့ cost က 20 ေပါ့။
Eth0/0/2 ကေန root ထိ ဆုိ Switch တစ္လံုးခံေနျပီး Segment 2 ခုရွိလို့. 20+20=40 ေပါ့။
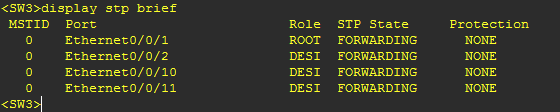
lowest cost ျဖစ္တဲ့ Port ကို ေရြးေတာ့ Eth0/0/1 သည္ RP ျဖစ္သြားပါတယ္။ display stp brief နဲ ့
စစ္ျကည့္လုိ့ရပါတယ္။
lowest cost ျဖစ္တဲ့ Port ကို ေရြးေတာ့ Eth0/0/1 သည္ RP ျဖစ္သြားပါတယ္။ display stp brief နဲ ့
စစ္ျကည့္လုိ့ရပါတယ္။
အုိေက အဲ့တာဆုိ SW3 အတြက္ RP တစ္ေရြးေပးျကည့္ရေအာင္.. သူမွာ Port က 4 ခုရွိပါတယ္။
Root ကိုသြားနုိင္တာက Eth0/0/2 နဲ ့Eth0/0/1 ကပဲ သြားနုိင္တာပါ။ RPC ေတြအရင္
နွိဳင္ယွဥ္ျကည့္ပါ။
Root ကိုသြားနုိင္တာက Eth0/0/2 နဲ ့Eth0/0/1 ကပဲ သြားနုိင္တာပါ။ RPC ေတြအရင္
နွိဳင္ယွဥ္ျကည့္ပါ။
Eth0/0/2 ကေနသြား Root ကိုသြားရင္ Cost သည္ 20 + 20 မုိ ့ 40 ပါ။
Eth0/0/1 ကေနဆုိရင္ Root ကို ေရာက္ဖုိ ့ cost (Root Path Cost) သည္ 20 ပဲ ရွိတာမုိ ့ Root Port
အေနနဲ ့ေရြးခ်ယ္ပါတယ္။
အေနနဲ ့ေရြးခ်ယ္ပါတယ္။
ဟုတ္ျပီး ခု LSW4 အတြက္ RP ေရြးက်ဆုိ ့။ သူ့မွာက် Eth0/0/1 နဲ ့Eth0/0/2 ဆုိျပီး port နွစ္ခု
ရွိတယ္။ နွစ္လံုးသည္ LSW3ကို Parallal ခ်ိတ္ထားတာမို့လို့ RPC (root path cost) သည္
တူညီေနပါတယ္ ( Root ကိုသြားဖုိ ့ရာ လမ္းသည္ LSW3 ကေန တစ္ဆင့္သြားဖုိ ့တစ္လမ္းပဲ
ရွိပါတယ္) ။ RCP တူရင္ BID (Bridge Identifier) ကိုစစ္ပါ။ Eth0/0/1 ေကာ Eth0/0/2
ေကာ port နွစ္ခုလံုးသည္ LSW3 ကို အျပိဳင္ခ်ိတ္ထားတာ မုိ ့လို ့ BID ကလဲ တူေနျပန္ေရာ..
အဲ့ေတာ့ PID(Port Identifier = Port-Priority + Port-number) ကို ယွဥ္ျကည့္ပါ။ default
port priority သည္ 128 ျဖစ္ပါတယ္။ အကုန္ default priority အတူတူပဲ မုိ ့ Port number
ကို နွိဳင္ယွဥ္ပါ။
port priority သည္ 128 ျဖစ္ပါတယ္။ အကုန္ default priority အတူတူပဲ မုိ ့ Port number
ကို နွိဳင္ယွဥ္ပါ။
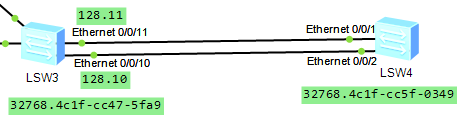
LSW4ရဲ ့ eth0/0/1 သည္ LSW3 ရဲ ့Eth0/0/11 ( 128.11) နဲ ့ခ်ိတ္ ထားတာ ျဖစ္ျပီး
LSW4 ရဲ ့Eth0/0/2 သည္ LSW3 ရဲ ့Eth0/0/10 ( 128.10) နဲ ့ခ်ိတ္ ထားတာ ျဖစ္ပါတယ္။
port number 10 ကပိုငယ္တာမုိ ့Eth0/0/10 နဲ့ ခ်ိတ္ ထားတဲ့ LSW4 ရဲ ့ Eth0/0/2 ကို RP
အေနနဲ ့ သတ္မွတ္ပါတယ္။
အေနနဲ ့ သတ္မွတ္ပါတယ္။
- ခု RP ေတြ ေရြးျပီး ျပီ ဆုိေတာ့ Designated Port ေရြးက်စို ့။ ပထမဆံုး Root switch မွာ ရွိတဲ ့
ျပီးေတာ့ DP မရွိေသးတဲ့ Segment တုိင္းကို DP ေရြးေပးရပါမယ္။ ခုဒီမွာ ဆုိ DP မရွိေသးတဲ့ Segment
သံုးခု ရွိပါတယ္။
သံုးခု ရွိပါတယ္။
အရင္ဆံုး LSW2 နဲ ့ LSW3 ျကားက Segment ကို ျကည့္ပါမယ္။ LSW2 ကေန Root ျကား အကြာ
အေ၀း cost သည္ 20 ပါ။ ထုိ ့အတူ LSW3 ကေန Root ကိုသြားရမယ့္ cost သည္လဲ 20ပါပဲ။ ဆုိေတာ့
RPC တူေနတဲ့ အတြက္ BID ခ်င္း နွိဳင္းယွဥ္ပါ။ LSW3 ရဲ ့BID သည္ LSW4 ထက္ ငယ္တာမို ့LSW3 ရဲ ့
Eth0/0/2 သည္ Desgnated port ပါ။
အေ၀း cost သည္ 20 ပါ။ ထုိ ့အတူ LSW3 ကေန Root ကိုသြားရမယ့္ cost သည္လဲ 20ပါပဲ။ ဆုိေတာ့
RPC တူေနတဲ့ အတြက္ BID ခ်င္း နွိဳင္းယွဥ္ပါ။ LSW3 ရဲ ့BID သည္ LSW4 ထက္ ငယ္တာမို ့LSW3 ရဲ ့
Eth0/0/2 သည္ Desgnated port ပါ။
LSW3 နဲ ့LSW 4 ျကားက လင့္(segment)နွစ္ခု ကို DP တစ္ခုဆီ ေရြးေပးက်စို ့။ LSW3 ရဲ ့Eth0/0/10
နဲ ့LSW4 ရဲ ့Eth0/0/2 ရွိတဲ့ Segment ကေတာ့ ရွင္းတယ္။ တစ္port က RP ျဖစ္ေနတာဆုိေတာ့
တစ္ျခားတစ္ဘက္ ျဖစ္တဲ့ LSW3 ရဲ ့Eth0/0/10 သည္ DP ေပါ့။
နဲ ့LSW4 ရဲ ့Eth0/0/2 ရွိတဲ့ Segment ကေတာ့ ရွင္းတယ္။ တစ္port က RP ျဖစ္ေနတာဆုိေတာ့
တစ္ျခားတစ္ဘက္ ျဖစ္တဲ့ LSW3 ရဲ ့Eth0/0/10 သည္ DP ေပါ့။
LSW3 ရဲ ့Eth0/0/11 နဲ ့LSW4 ရဲ ့Eth0/0/1 ရွိတဲ့ လင့္မွာက် LSW3 ရဲ ့RPC သည္ LSW4 ထက္ငယ္
ကို ငယ္တယ္။ LSW4 ရဲ ့RPC သည္ LSW3 ကိုျဖတ္သြားရမွ ရမွာေလ။ အဲ့ေျကာင့္ LSW3 ဘက္မွာ ရွိတဲ ့
Eth0/0/11 port သည္ DP ျဖစ္ပါတယ္။
ကို ငယ္တယ္။ LSW4 ရဲ ့RPC သည္ LSW3 ကိုျဖတ္သြားရမွ ရမွာေလ။ အဲ့ေျကာင့္ LSW3 ဘက္မွာ ရွိတဲ ့
Eth0/0/11 port သည္ DP ျဖစ္ပါတယ္။
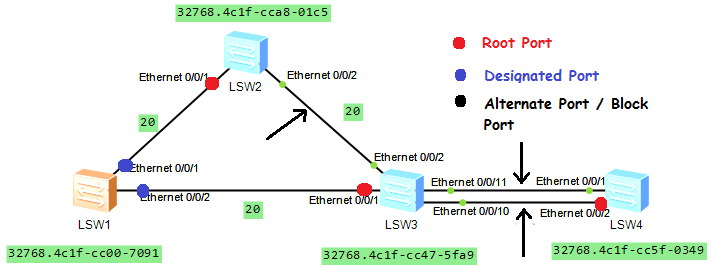
က်န္ေနတဲ့ Port ေတြ အားလံုးသည္ Alternate Port ပဲ ျဖစ္ပါတယ္။ Alternate Port ေတြသည္
Block လုပ္ထားတာ မို ့ Traffice မရွိ data ပို့လို့မရပါဘူ။ အဲ့လို stp algorithm run ျပီး RP, DP, AP
သတ္မွတ္ထားျခင္းျဖင့္ loop free topology ကို ရရွိေစပါတယ္။
Block လုပ္ထားတာ မို ့ Traffice မရွိ data ပို့လို့မရပါဘူ။ အဲ့လို stp algorithm run ျပီး RP, DP, AP
သတ္မွတ္ထားျခင္းျဖင့္ loop free topology ကို ရရွိေစပါတယ္။

Forwarding State မွာပဲ Dataေတြ ပို ့လြတ္တယ္ဆုိတာကို မွတ္ထားပါ။ ;-) lab book မုိ ့Theory ေတြအက်ယ္ခ်ဲေနရင္ အိပ္ခ်င္မွာ ဆုိးလို့ပါ။
display stp brief နဲ ့စစ္ျကည့္ပါ။ က်ြန္တာ္တုိ့ေတြ ေရြးခ်ယ္ခဲ့ သလို ျဖစ္မျဖစ္။
ခု Spanning Tree အလုပ္ လုပ္ပံုကို မ်က္စိထဲ ျမင္က်မယ္လို့ ေမ်ွာ္လင့္ပါတယ္။ Default ျဖစ္ေနတဲ့
topology ရဲ ့logical ကို နဲနဲ ေလး ျပင္ျကည့္က်ရေအာင္။ ကိုယ္ေတြက Network ကို ေကာင္းေကာင္း
CONFIG လုပ္နုိင္ဖုိ ့ျကိဳးစားေနက်တဲ့ သူေတြေလ.. အဲ့ေတာ့ ကိုယ္စိတ္ျကိဳက္ ကုိယ့္requirement နဲ ့
ကိုက္ေအာင္ ျပင္ျကည့္က်စို ့.. ;-)
topology ရဲ ့logical ကို နဲနဲ ေလး ျပင္ျကည့္က်ရေအာင္။ ကိုယ္ေတြက Network ကို ေကာင္းေကာင္း
CONFIG လုပ္နုိင္ဖုိ ့ျကိဳးစားေနက်တဲ့ သူေတြေလ.. အဲ့ေတာ့ ကိုယ္စိတ္ျကိဳက္ ကုိယ့္requirement နဲ ့
ကိုက္ေအာင္ ျပင္ျကည့္က်စို ့.. ;-)
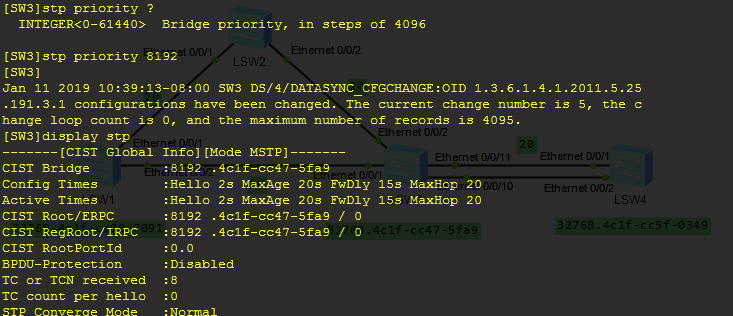
ခုပံုမွာဆုိ ဘယ္ဘက္က LSW1 သည္ Root ျဖစ္ေနပါတယ္ အဲတာကို LSW3 ကို Root အေနနဲ ့
ထားခ်င္တယ္ ဆုိရင္ switch ရဲ ့priority ကုိခ်ိန္းေပးလို့ရတယ္။
ထားခ်င္တယ္ ဆုိရင္ switch ရဲ ့priority ကုိခ်ိန္းေပးလို့ရတယ္။
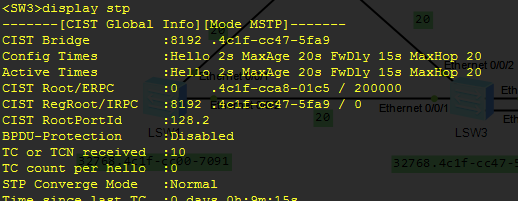
Display stp နဲ ့ျပန္ျကည့္လိုက္ရင္ LSW3 ရဲ ့Priority ကို 8192 အေနနဲ ့ ေတြ့ရျပီးေတာ့ သူ ့ကို
Root အေနနဲ ့ေတြ့ရမွာပါ။
Root အေနနဲ ့ေတြ့ရမွာပါ။
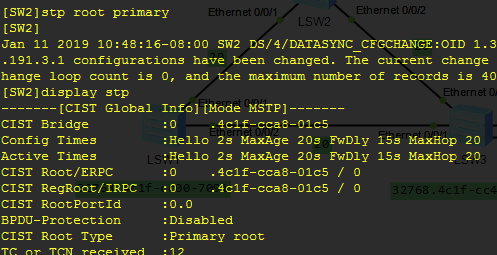
အဲ့လို Priority ကို [SW3]stp priority 8192 လို့ေျပာင္း Root ျဖစ္ေအာင္လုပ္လို့ရသလို ့
[SW2]stp root primary ဆုိျပီးေတာ့လဲ Root Switch ျဖစ္ေအာင္ လုပ္ေပးလို့ရပါတယ္။
[SW2]stp root primary ဆုိျပီးေတာ့လဲ Root Switch ျဖစ္ေအာင္ လုပ္ေပးလို့ရပါတယ္။
Switch တုိင္းကို လိုက္ျကည့္ ျကည့္ပါ 0 .4c1f-cca8-01c5 ကို root အေနနဲ ့ ရွိေနတာကို ေတြ ့ရပါမယ္။
ခု network ေတြမွာဆို Root ကို access layer switch ထက္ transport/core layer က switch ေတြကို
Root အေနနဲ ့ထားက်ပါတယ္။ root ရဲ ့port တုိင္းသည္ DP ျဖစ္တာမုိ့ Forwarding state ျဖစ္ေနတာမို့ပါ။
ေနာင္ VLAN ခန္းေရာက္ရင္ ခုေျပာတာကို ပုိျပီး ျမင္လာလိမ့္မယ္လို့ ေမ်ွာ့္လင့္ပါတယ္။
ခု network ေတြမွာဆို Root ကို access layer switch ထက္ transport/core layer က switch ေတြကို
Root အေနနဲ ့ထားက်ပါတယ္။ root ရဲ ့port တုိင္းသည္ DP ျဖစ္တာမုိ့ Forwarding state ျဖစ္ေနတာမို့ပါ။
ေနာင္ VLAN ခန္းေရာက္ရင္ ခုေျပာတာကို ပုိျပီး ျမင္လာလိမ့္မယ္လို့ ေမ်ွာ့္လင့္ပါတယ္။
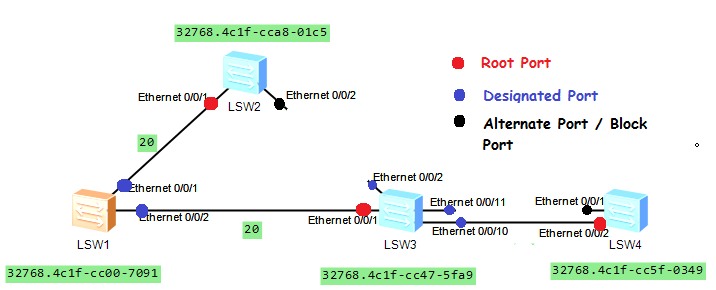
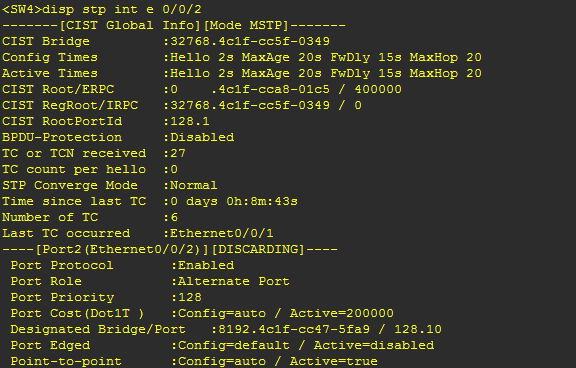
ခုေနာက္တစ္ခါ LSW3 နဲ ့LSW4 ျကားက RP နဲ ့AP ကို ေျပာင္းျကည့္ရေအာင္။ ခုဆိုရင္ LSW4 ရဲ ့ Eth0/0/1
သည္ Alternate Port (AP) ျဖစ္ေနပါတယ္။ အဲ့တာကို Root Port (RP) ျဖစ္ေအာင္ လုပ္ပါမယ္။
သည္ Alternate Port (AP) ျဖစ္ေနပါတယ္။ အဲ့တာကို Root Port (RP) ျဖစ္ေအာင္ လုပ္ပါမယ္။
LSW4 အတြက္ RP တစ္ခု ရွိဖုိ ့လိုအပ္ပါတယ္။ အဲ့တြက္ Eth0/0/1 သည္ Eth0/0/11 နဲ ့ခ်ိတ္ဆက္ထားျပီး
LSW4 ရဲ ့Eth0/0/2 သည္ LSW3 ရဲ ့Eth0/0/10 ကို ခ်ိတ္ထားပါတယ္။ Eth0/0/11 ေကာ Eth0/0/10 သည္
Priority 128 ပါ။ Priority သည္ အတူတူ ျဖစ္လုိ့ port number ျကည့္ေတာ့ 10 ကပိုငယ္တာမုိ ့ LSW3 ရဲ ့eth0/0/10
နဲ ့ခ်ိတ္ ထားတဲ့ Eth0/0/2 က Root port ျဖစ္လာတာပါ
Priority 128 ပါ။ Priority သည္ အတူတူ ျဖစ္လုိ့ port number ျကည့္ေတာ့ 10 ကပိုငယ္တာမုိ ့ LSW3 ရဲ ့eth0/0/10
နဲ ့ခ်ိတ္ ထားတဲ့ Eth0/0/2 က Root port ျဖစ္လာတာပါ
အဲ့ေတာ့ LSW3 ရဲ ့ Eth0/0/11 ကို priority ငယ္ေအာင္ ေပးလိုက္ရင္ သူနဲ ့ခ်တ္ထားတဲ့ LSW4 ရဲ ့Eth0/0/1
သည္ Root Port ျဖစ္လာပါလိမ့္မယ္။
သည္ Root Port ျဖစ္လာပါလိမ့္မယ္။
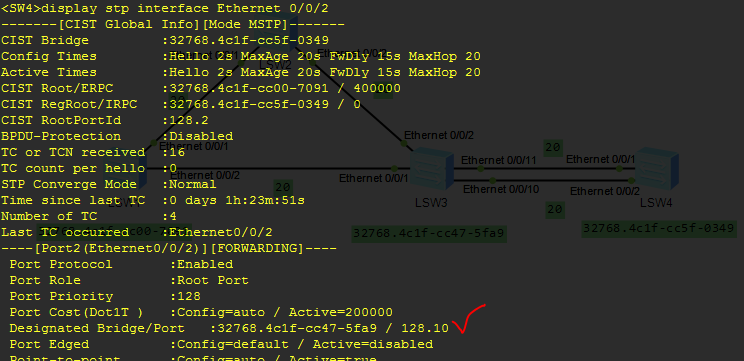
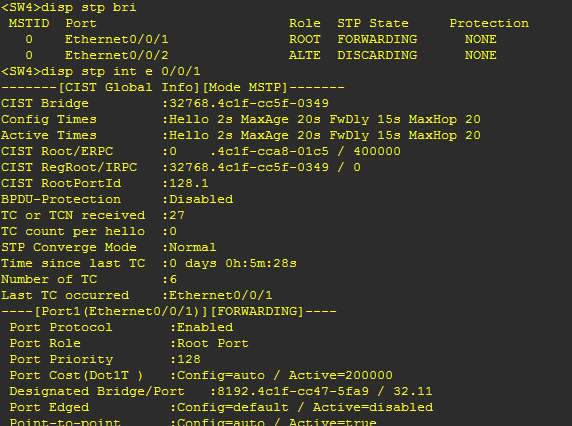
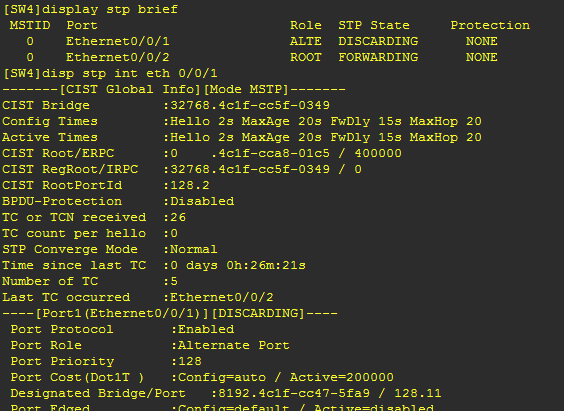
ခု ေျပာင္းျပီးျပီ ဆုိေတာ့ LSW4 ဘက္ျခမ္းကို ျပန္ျကည့္ပါ။ RP သည္ Eth0/0/1 သည္ ျဖစ္ေနပါလိမ့္မယ္။
<SW4>display stp interface Ethernet 0/0/2 နဲ ့စစ္ျကည့္လုိက္တာ priority 32 ရွိတဲ့ port နဲ့
ခ်ိတ္ထားတဲ့ interface သည္ RP အေနနဲ ့ရွိ ေနပါလိမ့္မယ္။
ခ်ိတ္ထားတဲ့ interface သည္ RP အေနနဲ ့ရွိ ေနပါလိမ့္မယ္။
Comments
Post a Comment