OSPF Lab For CCNA (Focus on LSA)
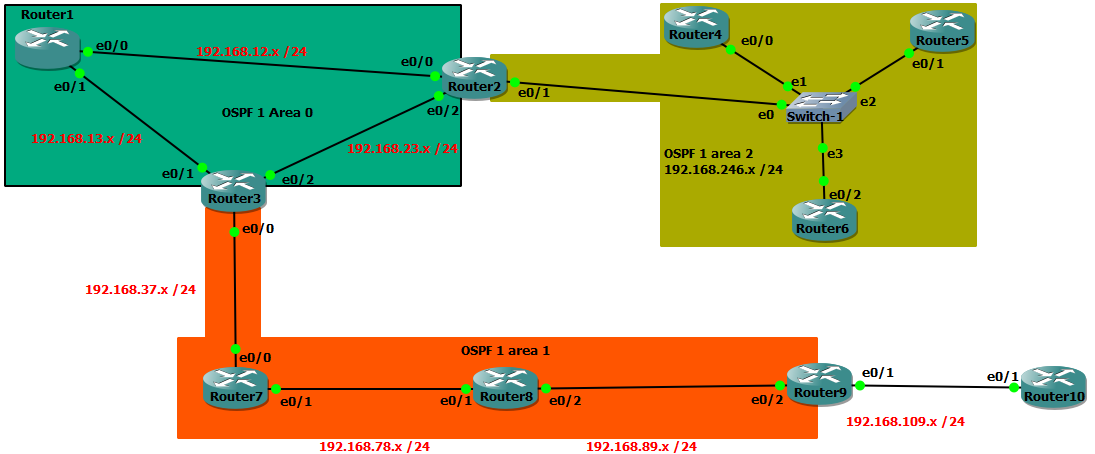
ပံုကို ျကည့္ျပီးေတာ့ router ေတြ မ်ားတယ္ဆုိျပီး စိတ္ရွဳတ္မသြားပါနဲ ့။ ခု topology မွာဆုိရင္ OSPF area အေနနဲ ့
3 ခု ရွိပါတယ္။ Area 0, Area 1, Area 2 ရယ္ေပါ့။ ျပီးေတာ့ router 10 ကိုေတာ့ OSPF မ run ပဲထားမွာပါ။ ခုဒီ lab သည္
LSA ေတြ လုပ္လုပ္ပံု ကို သတိထားမိေစခ်င္လို့ပါ။ တစ္ပိုင္းခ်င္း စလုပ္လိုက္ ျကည့္ရေအာင္။။..
3 ခု ရွိပါတယ္။ Area 0, Area 1, Area 2 ရယ္ေပါ့။ ျပီးေတာ့ router 10 ကိုေတာ့ OSPF မ run ပဲထားမွာပါ။ ခုဒီ lab သည္
LSA ေတြ လုပ္လုပ္ပံု ကို သတိထားမိေစခ်င္လို့ပါ။ တစ္ပိုင္းခ်င္း စလုပ္လိုက္ ျကည့္ရေအာင္။။..
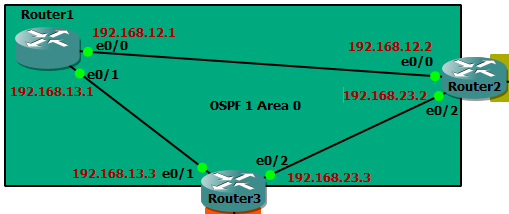
ခုပထမဆံုး area 0 ကုိ အရင္ Configure လုပ္ျကည့္ရေအာင္။
IP Addressing
| ||
Router 1
|
Router 2
|
Router 3
|
configure terminal
|
configure terminal
|
configure terminal
|
hostname R1
|
hostname R2
|
hostname R3
|
int eth 0/0
|
int eth 0/0
|
int eth 0/2
|
ip address 192.168.12.1 255.255.255.0
|
ip address 192.168.12.2 255.255.255.0
|
ip address 192.168.23.3 255.255.255.0
|
no sh
|
no sh
|
no sh
|
exit
|
exit
|
exit
|
int eth 0/1
|
int eth 0/2
|
int eth 0/1
|
ip address 192.168.13.1 255.255.255.0
|
ip address 192.168.23.2 255.255.255.0
|
ip address 192.168.13.3 255.255.255.0
|
no sh
|
no sh
|
no sh
|
end
|
end
|
end
|
sh ip interface brief | include up
|
sh ip interface brief | include up
|
sh ip interface brief | include up
|
Enable OSPF
| ||
Router 1
|
Router 2
|
Router 3
|
conf t
|
conf t
|
conf t
|
router ospf 1
|
router ospf 1
|
router ospf 1
|
router-id 0.0.0.1
|
router-id 0.0.0.2
|
router-id 0.0.0.3
|
network 192.168.12.0 0.0.0.255 area 0
|
network 192.168.12.0 255.255.255.0 area 0
|
network 192.168.23.3 0.0.0.0 area 0
|
network 192.168.13.0 0.0.0.255 area 0
|
network 192.168.23.0 255.255.255.0 area 0
|
network 192.168.13.3 255.255.255.255 area 0
|
exit
|
exit
|
exit
|
do show run | section router ospf
|
do show run | section router ospf
|
do show run | section router ospf
|
do show ip ospf interface brief
|
do show ip ospf interface brief
|
do show ip ospf interface brief
|
show ip ospf neighbour
| ||
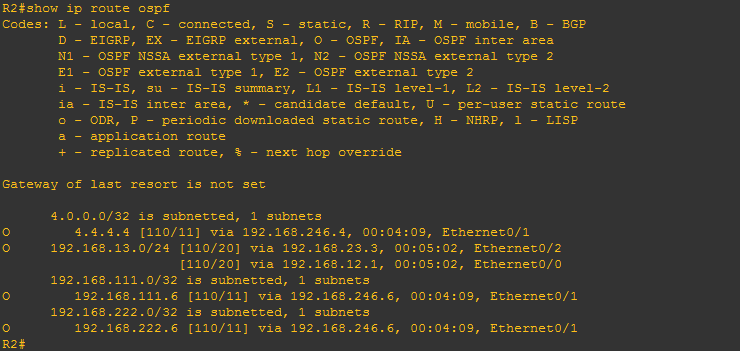
show ip route ospf
| ||
show run | section router ospf နဲ ့ျကည့္တုန္းက OSPF မွာ network ကို ဘယ္လိုပဲ ေျကျငာ ေျကျငာခဲ ့
widecard-mask အေနနဲ ့ပဲ config ထဲ ကို ၀င္သြားတာကို ေတြ့ရမွာပါ။
widecard-mask အေနနဲ ့ပဲ config ထဲ ကို ၀င္သြားတာကို ေတြ့ရမွာပါ။

network 192.168.12.0 0.0.0.255 area 0 >> widecard-mask ကို သံုးျပီး OSPF ရဲ ့Network ကုိေျကျငာတာပါ
။
။
ခုဒီ command မွာ ဆုိ 192.168.12.0 to 192.168.12.255 range ကို ရည္ရြယ္ျပီး ေျကျငာထားတာပါ။ အဲ့ေတာ့
Router သည္ အဲ့ range ထဲ မွာ ၀င္ေနတဲ ့IP ရွိတဲ့ interface ေတြကို လိုက္ျကည့္ပါတယ္။ ရွိရင္ အဲ့ Interface သည္
OSPF enable ျဖစ္ျပီး hello ေတြ ပို ့neighbour ေတြ တည္ေဆာက္ျပီး LSA ေတြ ဖလွယ္ပါတယ္။ Router 1 အေနနဲ ့
ဆုိ 192.168.12.1 ဆိုတဲ ့ IP ရွိတဲ ့interface သည္ OSPF enable ျဖစ္သြားပါတယ္။ OSPF enable interface
(active interface) ေတြသည္ သူတုိ့မွာရွိေနတဲ ့ OSPF network ထဲမွာ အျကံုး၀င္ေနတဲ့ link(network) ေတြ ကို LSA
ေတြကို အသံုးျပီး ျပီး LSDB တည္ေဆာက္က်ပါတယ္။ ေျပာရရင္ ဒီ network 192.168.12.0 0.0.0.255 area 0
ဆုိတဲ့ command သည္ interface ေတြကို ospf ထဲ ထည့္တဲ့အခါမွာ ACL (Access control list) လိုပဲ အလုပ္လုပ္ပါ
တယ္။ 192.168.12.0 to 192.168.12.255 အတြင္းရွိတဲ့ ေကာင္ေတြကို လိုက္ရွာ တုိက္စစ္ပါတယ္။ ရွိမွ pass ျဖစ္ျပီး
OSPF enable ျဖစ္သြားတာပါ။
network 192.168.23.0 255.255.255.0 area 0 >> subnet mask ကို သံုးျပီး OSPF ရဲ ့ Network ကို ေျကျငာ
တာပါ။
တာပါ။
သူလဲ အေပၚက လိုပါပဲ။ widecard နဲ ့subnet ပဲ ကြာတာပါ။
network 192.168.13.3 255.255.255.255 area 0 >> သူကက်ေတာ့ OSPF enable လုပ္မယ့္ interface ရဲ ့ IP
ကိုပဲ ေျကျငာလိုက္တာပါ။
ကိုပဲ ေျကျငာလိုက္တာပါ။
network 192.168.23.3 0.0.0.0 area 0 >> အေပၚကေကာင္နဲ ့အတူတူပါပဲ.. ကြာတာက ခုဒီ command က
widecard ကုိသံုးျပီး လုပ္သြားတာပါ။
widecard ကုိသံုးျပီး လုပ္သြားတာပါ။
ကဲ IP ေတြလဲ ေပးျပီးျပီ OSPF network ေတြလဲ ေျကျငာျပီးျပီ။ enable လဲ ျဖစ္ျပီး.. LSA ေတြ ဖလွယ္ LSDB ေ
ဆာက္ျပီး SPF algorithm နဲ ့ best route ေတြလဲ routing table ထဲ ေရာက္ျပီဆုိေတာ့ .. OSPF route ေတြကို
ျကည့္မယ္ဆုိ # show ip route ospf နဲ့ ျကည့္ပါ။
ဆာက္ျပီး SPF algorithm နဲ ့ best route ေတြလဲ routing table ထဲ ေရာက္ျပီဆုိေတာ့ .. OSPF route ေတြကို
ျကည့္မယ္ဆုိ # show ip route ospf နဲ့ ျကည့္ပါ။
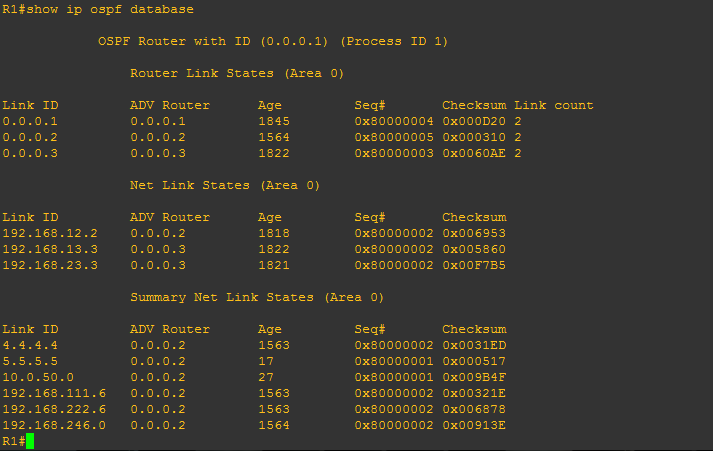
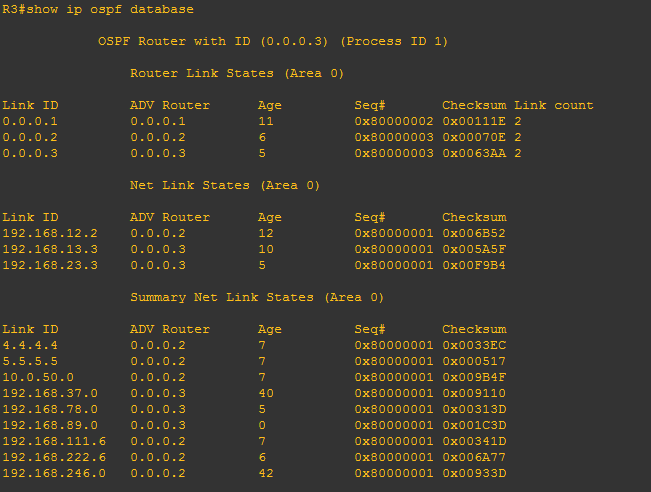
#show ip ospf database နဲ ့ ျကည့္လိုက္ရင္ ေအာက္ပါပံုအတုိင္း ျမင္ရပါလိမ့္မယ္။ (for LSA)

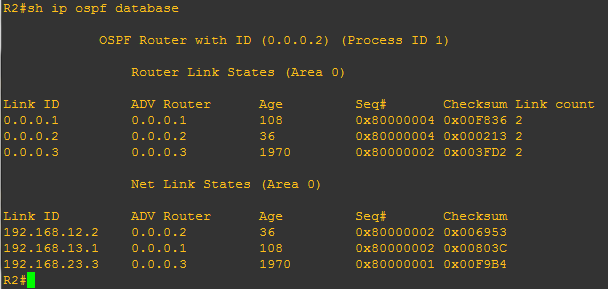
ခု R3 ကိုပဲ နမူနာ အေနနဲ ့ေျပာျပပါ့မယ္။ OSPF Router with ID (0.0.0.3) (Process ID 1) မွာဆို ခု ကြ်န္ေတာ္
တုိ့ေတြ ၀င္ျကည့္ေနတဲ့ local router ရဲ ့Router ID သည္ 0.0.0.3 ျဖစ္ျပီး ospf process 1 နဲ ့run ေနတယ္ ဆုိတာ
ကို ျမင္ရမွာပါ။
တုိ့ေတြ ၀င္ျကည့္ေနတဲ့ local router ရဲ ့Router ID သည္ 0.0.0.3 ျဖစ္ျပီး ospf process 1 နဲ ့run ေနတယ္ ဆုိတာ
ကို ျမင္ရမွာပါ။
LSA type - 1 (Router LSA) >>> သူက Router LSA ျဖစ္တဲ့အတုိင္း router တုိင္းကေန ထုတ္လြင့္ပါတယ္။
type 1 LSA မွာ ဘာေတြ ပါလဲဆုိေတာ့ သူနဲ ့ခ်ိတ္ဆက္ထားတဲ့ connected ျဖစ္ေနတဲ့ ospf Interface list ပါ
ပါတယ္။ Router Link States (Area 0) မွာ ADV Router ဆိုတာသည္ advertise လုပ္တဲ့ router ကို ရည္ညြန္း
တာပါ။ ခု area 0 ထဲမွာဆုိ router သံုးခု ရွိပါတယ္။
type 1 LSA မွာ ဘာေတြ ပါလဲဆုိေတာ့ သူနဲ ့ခ်ိတ္ဆက္ထားတဲ့ connected ျဖစ္ေနတဲ့ ospf Interface list ပါ
ပါတယ္။ Router Link States (Area 0) မွာ ADV Router ဆိုတာသည္ advertise လုပ္တဲ့ router ကို ရည္ညြန္း
တာပါ။ ခု area 0 ထဲမွာဆုိ router သံုးခု ရွိပါတယ္။
R1 (Router-id 0.0.0.1), R2 (Router-id 0.0.0.2) နဲ ့R3 (Router-id 0.0.0.3) တုိ ့ကေနျပီး သူတုိ့မွာ ရွိေနတဲ့
link info ေတြကို type-1 LSA အေနနဲ ့ေျပာတဲ့ အခါ အေပၚက ပံုလိုမ်ိဳး ျမင္ရမွာပါ။ R1, R2, R3 တုိ့မွာ ospf
interface 2ခု ဆီရွိပါတယ္။ အဲ့ေျကာင့္ link ေနရာမွာ 2 လုိ့ေပၚေနတာပါ။ အဲ့ interface မွာ ရွိတဲ့ network
segment info ေတြ ခုLSA မွာ ရွိပါတယ္။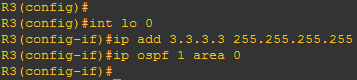
link info ေတြကို type-1 LSA အေနနဲ ့ေျပာတဲ့ အခါ အေပၚက ပံုလိုမ်ိဳး ျမင္ရမွာပါ။ R1, R2, R3 တုိ့မွာ ospf
interface 2ခု ဆီရွိပါတယ္။ အဲ့ေျကာင့္ link ေနရာမွာ 2 လုိ့ေပၚေနတာပါ။ အဲ့ interface မွာ ရွိတဲ့ network
segment info ေတြ ခုLSA မွာ ရွိပါတယ္။
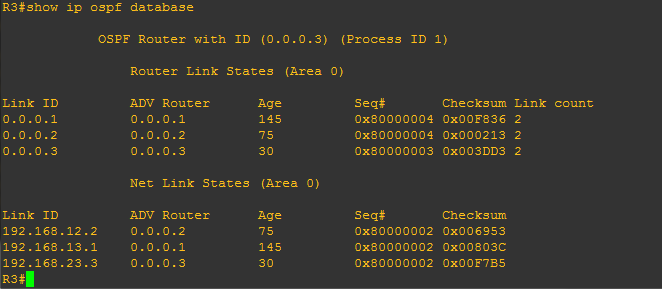
ခု R3 မွာ loopback interface တစ္ခုထပ္ ထည့္ျပီး OSPF run လိုက္ပါ။ ip တစ္ခုေတာ့ ေပးဦးေနာ္ ့..
အဲ့ေနာက္#show ip ospf database နဲ ့ျပန္ျပီးေတာ့ ျကည့္ျကည့္ပါ။
အဲ့ေနာက္#show ip ospf database နဲ ့ျပန္ျပီးေတာ့ ျကည့္ျကည့္ပါ။
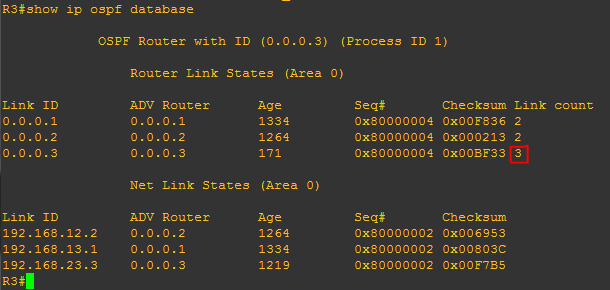
R3 (router-id 0.0.0.3) ကေန advertise လုပ္တဲ့ link အေရအတြက္သည္ 2 ကို 3 ကုိ ေျပာင္းသြားတာကို ျမင္ရပါမယ္။
ဟုတ္ျပီ Type-1 ျပီးေတာ့ Type-2 (Network LSA) ကို တစ္ခ်က္ျကည့္က်ရေအာင္။ သူက DR ကေန ထုတ္လြင့္တဲ့
LSA ပါ။
LSA ပါ။
ခုပံုမွာ ျမင္သာေအာင္လို့.. Interface အလိုက္ ေပးခဲ့တဲ့ IP ေတြကိုု ထည့္ေပးထားပါတယ္။ DR / BDR သည္ ethernet
(Bradcast)မွာ segment အလိုက္ ေရြးခ်ယ္တယ္ဆုိတာကို မွတ္မိမယ္လို့ ေမ်ွာ္ လင့္ပါတယ္။ ခု ဒီပံုမွာ ဆုိ
Network Setment ( 192.168.12.X, 192.168.13.X and 192.168.23.X ) သံုးခုရွိပါတယ္။ အဲ့သံုးခု အတြက္
DR/BDR ေတြက ဘယ္သူေတြလဲ ဆုိတာ တစ္ခ်က္ျကည့္ က်ရေအာင္။
(Bradcast)မွာ segment အလိုက္ ေရြးခ်ယ္တယ္ဆုိတာကို မွတ္မိမယ္လို့ ေမ်ွာ္ လင့္ပါတယ္။ ခု ဒီပံုမွာ ဆုိ
Network Setment ( 192.168.12.X, 192.168.13.X and 192.168.23.X ) သံုးခုရွိပါတယ္။ အဲ့သံုးခု အတြက္
DR/BDR ေတြက ဘယ္သူေတြလဲ ဆုိတာ တစ္ခ်က္ျကည့္ က်ရေအာင္။
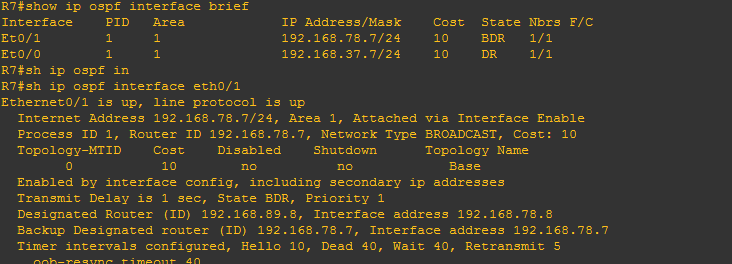
#show ip ospf neighbour နဲ ့ျကည့္ ပါ။ .. or #show ip ospf interface brief


ခုပံုမွာ Segment အလိုက္ DR အေနနဲ ့ေရြးခ်ယ္ခံထားရတဲ ့ ေကာင္ေတြကို အျပာေရာင္ ေျပာင္းေပးထား ပါတယ္။
config ခ်တုန္းက ospf မွာ router-id ေတြေပးခဲ့တာ မွတ္မိတယ္ ဟုတ္?..
config ခ်တုန္းက ospf မွာ router-id ေတြေပးခဲ့တာ မွတ္မိတယ္ ဟုတ္?..
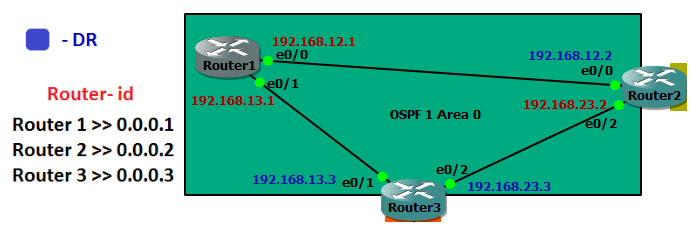
Router တစ္လံုးမွာ #show ip ospf database နဲ ့ျကည့္ ျကည့္ပါ။
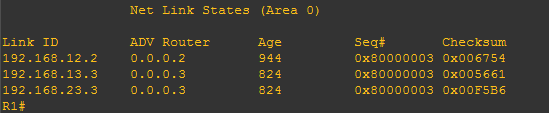
Link ID မွာ DR ေတြကို ျမင္ရမွာျဖစ္ပါတယ္။.. ADV Router မွာေတာ့ အဲ့ေကာင္ေတြကို advertise လုပ္တဲ ့
Router ID ေတြကို ျမင္ရမွာပဲျဖစ္ပါတယ္။ DR/BDR ကို ေရြးခ်ယ္ရင္ ပထမဆံုး interface ေတြရဲ ့ OSPF priority
ကို နွိဳင္းယွဥ္ပါတယ္။ default priority က 1 ျဖစ္ပါတယ္။ (priority က 0 to 255 အတြင္း ေပးလို့ရပါတယ္.. Priority 0
ဆိုရင္ DR အေနနဲ ့ ေရြးခ်ယ္တဲ့ အထဲ မထည့္ေတာ့ပါဘူး) အကုန္ default priority က တူေနတဲ့ အတြက္ Highest
Router-ID ရွိတဲ့ ေကာင္ကို DR အေနနဲ ့ ေရြးခ်ယ္ပါတယ္။
ေနာက္ထပ္ area တစ္ခု ျဖစ္တဲ့ AREA 2 ကို config လုပ္ျကည့္က်ရေအာင္။
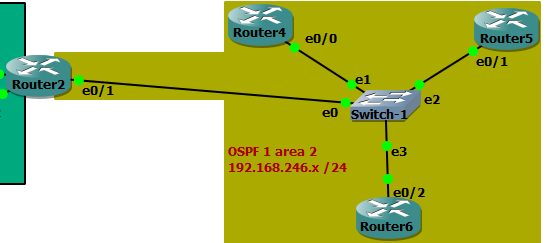
IP Addressing
| |
Router 2
|
Router 4
|
configure terminal
|
configure terminal
|
int eth 0/1
|
hostname R4
|
ip add 192.168.246.2 255.255.255.0
|
int eth 0/0
|
no sh
|
ip add 192.168.246.4 255.255.255.0
|
end
|
no sh
|
exit
| |
int loopback 0
| |
ip address 4.4.4.4 255.255.255.255
| |
no sh
| |
end
| |
sh ip interface brief | include up
|
sh ip interface brief | include up
|
Router 5
|
Router 6
|
configure terminal
|
configure terminal
|
hostname R5
|
hostname R6
|
int eth 0/1
|
int eth 0/2
|
ip add 192.168.246.5 255.255.255.0
|
ip add 192.168.246.6 255.255.255.0
|
no sh
|
int lo 0
|
end
|
ip add 192.168.111.6 255.255.255.0
|
sh ip interface brief | include up
|
int lo 1
|
ip add 192.168.222.6 255.255.255.0
| |
no sh
| |
end
| |
sh ip interface brief | include up
| |
Enable OSPF
| |
Router 2
|
Router 4
|
conf t
|
conf t
|
router ospf 1
|
router ospf 1
|
network 192.168.246.0 0.0.0.255 area 2
|
network 192.168.246.0 0.0.0.255 area 2
|
exit
|
network 4.4.4.4 0.0.0.0 area 2
|
do show run | section router ospf
|
exit
|
do show ip ospf interface brief
|
do show run | section router ospf
|
do show ip ospf interface brief
| |
Router 6
|
Router 5
|
conf t
|
conf t
|
router ospf 1
|
router ospf 1
|
router-id 0.0.0.6
|
router-id 0.0.0.5
|
network 192.168.0.0 0.0.255.255 area 2
|
network 0.0.0.0 0.0.0.0 area 2
|
end
|
end
|
show run | section router ospf
|
show run | section router ospf
|
show ip ospf interface brief
|
show ip ospf interface brief
|
ခု အေပၚက config ေတြမွာဆို နွစ္ပုိင္းရွိတယ္။ တစ္ပိုင္းက IP address ေပးတာ.. အဲ့တာကေတာ့ ေအးေဆးပါ ;-)
ျပီးေတာ့ OSPF enable လုပ္တာ။ အဲ့မွာဆုိ R2 သည္ OSPF area 0 အတြက္ လုပ္ထားတဲ့ Process ID 1 မွာပဲ ဆက္ျပီး
Area 2 နဲ ့သက္ဆုိင္တဲ့ ေျကာျငာလိုက္ယံုပါပဲ။ OSPF ရဲ ့Process ID သည္ router တစ္လံုးနဲ ့တစ္လံုး တူစရာမလိုဘူးေနာ္။
local router မွာေတာ့ Process ID တူေအာင္ေပးပါ။ Different Process ID ကိုေတာ့ NPစာအုပ္ထဲ က်မွ ရွင္းျပေပးမယ္။..
ေအာက္မွာေတာ့ home work lab ေလး ထည့္ေပးထားမယ္။ သိခ်င္တဲ့ သူေတြ စမ္းလုိ့ရေအာင္။
ျပီးေတာ့ Router 4, သူလဲ အရင္တိုင္းပဲ widecard ကိုသံုးျပီး Network ေျကျငာေပးထားတယ္။ router-id မေပးပဲ
ထားခဲ့တာမုိ့ highest loopback IP ကုိ ယူသံုးသြားပါလိမ့္မယ္။ အကယ္လို့ Loopback interface မရွိရင္ up ေနတဲ ့
highest Physical Interface IP ကို router-ID အေနနဲ ့ယူသံုးသြားပါ့မယ္။။ R5 နဲ ့ R6 က် နဲနဲ ေလး ကြဲသြားပါတယ္။
ထားခဲ့တာမုိ့ highest loopback IP ကုိ ယူသံုးသြားပါလိမ့္မယ္။ အကယ္လို့ Loopback interface မရွိရင္ up ေနတဲ ့
highest Physical Interface IP ကို router-ID အေနနဲ ့ယူသံုးသြားပါ့မယ္။။ R5 နဲ ့ R6 က် နဲနဲ ေလး ကြဲသြားပါတယ္။
network 192.168.0.0 0.0.255.255 area 2 ဆိုျပီး R6 မွာ config ခ်ထားပါတယ္။ အေပၚမွာတုန္းကလဲ ေျပာခဲ့တယ္ေနာ္
.. Network ေျကျငာတဲ့ 192.168.0.0 to 192.168.255.255 range ထဲမွာ ရွိတဲ ့ interface ေတြကို တုိက္စစ္ျပီးေတာ့
ကိုက္ညီတဲ့ ေကာင္ေတြကို OSPF Network ထဲ ထည့္ျပီး OSPF enable ျဖစ္သြားတာပါ။ router 6 မွာ ရွိတဲ ့
interface ေတြရဲ ့IP ေတြျဖစ္တဲ ့ 192.168.246.6, 192.168.111.6, 192.168.222.6 တုိ့သည္ range
အတြင္း၀င္တာမုိ့ အကုန္ ospf ထဲ ေရာက္သြားပါတယ္။
network 0.0.0.0 0.0.0.0 area 2 လို့ R5 မွာ ေျကာျငာခဲ့တဲ့ command ကေတာ့ ရွင္းပါတယ္။ ေရွ ့ 0.0.0.0 ( Zero ၄လံုး)
သည္ any network (IP အားလံုး) ကို ရည္ရြယ္တာျဖစ္ျပီး ေနာက္က Zero ေလးလံုးကေတာ့ any mask ကို
ေျပာတာပါ။ default route တုန္းကလဲ အဲ့လို ေတြ့ဘူးတယ္ ဟုတ္ ? အဲ့ေတာ့ interface ေတြရဲ ့ IP အကုန္ OSPF
ထဲ ထည့္ enable လုပ္မယ္လို့ ေျပာလိုက္တာပါ။ တစ္ေျကာင္းတည္းနဲ ့အကုန္ ျပီးတာေပါ့ ဗ်ာ ။။
သည္ any network (IP အားလံုး) ကို ရည္ရြယ္တာျဖစ္ျပီး ေနာက္က Zero ေလးလံုးကေတာ့ any mask ကို
ေျပာတာပါ။ default route တုန္းကလဲ အဲ့လို ေတြ့ဘူးတယ္ ဟုတ္ ? အဲ့ေတာ့ interface ေတြရဲ ့ IP အကုန္ OSPF
ထဲ ထည့္ enable လုပ္မယ္လို့ ေျပာလိုက္တာပါ။ တစ္ေျကာင္းတည္းနဲ ့အကုန္ ျပီးတာေပါ့ ဗ်ာ ။။
Trouble shoot လုပ္ဖုိ့ လိုလာရင္ ခုေအာက္ ေပးထားတဲ့ အတုိင္း တစ္ဆင့္ခ်င္း မွန္ မမွန္ စစ္ပါ။
sh ip interface brief | include up
|
Interface ေတြ up လားစစ္ပါ။ အဲ့ေနာက္ IP ေပးတားမွန္မမွန္စစ္ပါ။ physical connected neighbour
ရဲ ့ IP ကို Ping ပါ။ Eg,. R2#ping 192.168.246.4 or ping 192.168.12.1
|
show run | section router ospf
|
OSPF config လုပ္ထားတာ မွန္ မမွန္ စစ္ပါ။
|
show ip ospf interface brief
|
ospf interface ေတြကို စစ္ပါ။
|
show ip ospf neighbor
|
OSPF neighbor ျဖစ္မျဖစ္ စစ္ပါ။
|
show ip route ospf
|
OSPF ကေန တစ္ဆင့္ သိတဲ့ route ေတြကို စစ္ပါ။
|
show ip ospf database
|
LSA ေတြ ကို စစ္ပါ။
|


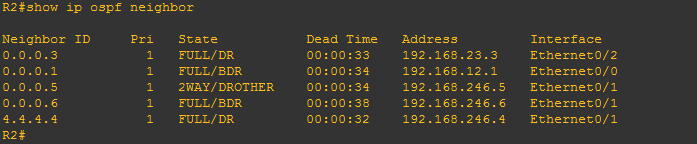
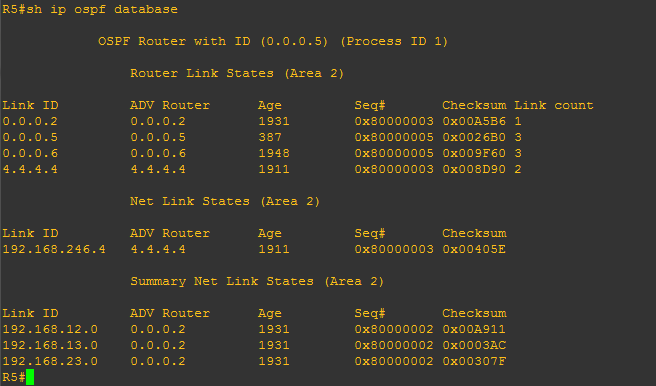
ခု ဒီပံုမွာ ဆုိ R2 သည္ R5( router-id 0.0.0.5) နဲ့ 2 way state အေနနဲ ့..ရွိေနတာကို ေတြ့ရမွာပါ။
ဘာလို့ သူတုိ့နွစ္ေကာင္ full မျဖစ္သြားလဲ ဆုိေတာ့ သူတုိ့ နွစ္လံုးသည္ DROther ေတြ ျဖစ္ေနလို့ပါ။ ျကည့္လို့ရတဲ့
command နွစ္ခု ရွိပါတယ္။ show ip ospf interface biref နဲ ့ show ip ospf neighbor ပါ။ ခုဆို R2 ဘက္ျခမ္းကေနျကည့္
တာဆုိေတာ့ R5 ဘက္ကေနလဲ show ip ospf neighbor နဲ ျပန္ျကည့္လိုက္ရင္ R2 ကို DROther အေနနဲ ့ ျမင္ရမွာပါ။
DR/BDR ေတြနဲ ့ပဲ LSA database ဖလွယ္က်တာပါ။ DR-Other အခ်င္းအခ်င္း ကေတာ့ မဖလွယ္ပါဘူး။
command နွစ္ခု ရွိပါတယ္။ show ip ospf interface biref နဲ ့ show ip ospf neighbor ပါ။ ခုဆို R2 ဘက္ျခမ္းကေနျကည့္
တာဆုိေတာ့ R5 ဘက္ကေနလဲ show ip ospf neighbor နဲ ျပန္ျကည့္လိုက္ရင္ R2 ကို DROther အေနနဲ ့ ျမင္ရမွာပါ။
DR/BDR ေတြနဲ ့ပဲ LSA database ဖလွယ္က်တာပါ။ DR-Other အခ်င္းအခ်င္း ကေတာ့ မဖလွယ္ပါဘူး။

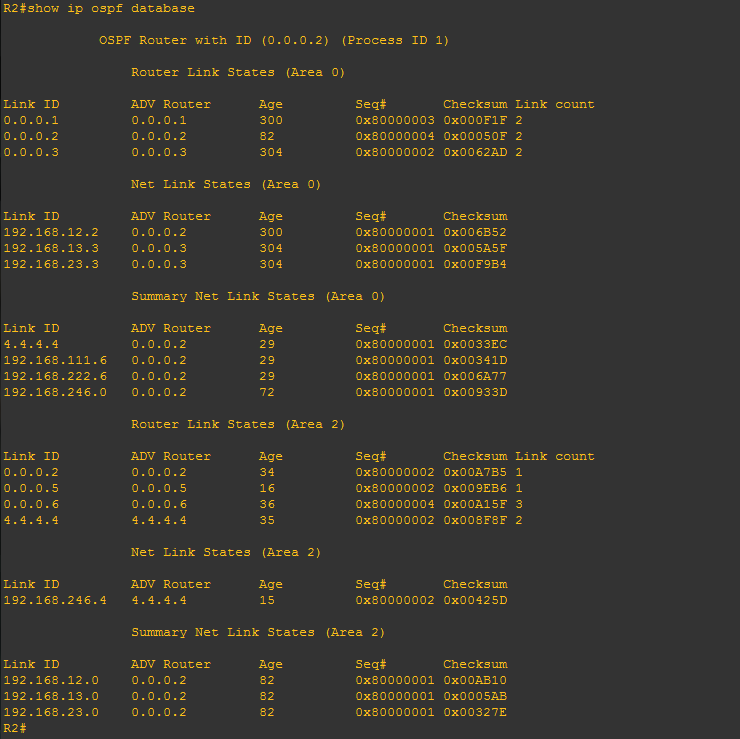
ခု ျကည့္ေနတဲ့ Router R2 သည္ ABR (Area Border Router) ျဖစ္တဲ့အတြက္..Type 3 Summary LSA
(Summary Net Link) ကိုထုတ္လြင့္ပါတယ္။သူ ့မွာ Area0 & Area2 တုိ့ နွစ္ခုလံုးကို ေတြ့ရမွာပါ။ ABR က
Area0 ဘက္ျခမ္း type1, type2 LSA ေတြကေနရတဲ့ info ေတြကို summary လုပ္ျပီး type 3 အေနနဲ ့ Area တုိင္းကို
ပို ့ေဆာင္ေပးပါတယ္။ Type1, Type2 ကေတာ့ area တစ္ခု အတြင္းမွာပဲ တည္ရွိတာပါ။ ABR router ကို ေက်ာ္ျပီး
မသြားပါဘူး။ ထို ့နည္းတူ.. ABR က Area 2 ဘက္ျခမ္း type1, type2 LSA ေတြကေနရတဲ့ info ေတြကိုလဲ summary
လုပ္ျပီး type 3 အေနနဲ ့ Area တုိင္းကို ပို ့ေဆာင္ေပးပါတယ္။
Router 1 ကေနျကည့္ အရင္ Area0 တစ္ခုတည္း တုန္းက Type1(router), Type2(Network) LSA ေတြကိုပဲ ေတြ့ခဲ ့
ရပါတယ္။ ခု area 2 ကို ထပ္ထည့္ျပီးေနာက္ #show ip ospf database နဲ ့ျပန္ျကည့္ရင္ ABR (Router 2) ကေနျပီး
Area2 ဘက္ျခမ္းက Network information ေတြကို Type3 summary LAS အေနနဲ ့ထုတ္လြင့္ထားတာကို ျမင္ရမွာပါ။
ရပါတယ္။ ခု area 2 ကို ထပ္ထည့္ျပီးေနာက္ #show ip ospf database နဲ ့ျပန္ျကည့္ရင္ ABR (Router 2) ကေနျပီး
Area2 ဘက္ျခမ္းက Network information ေတြကို Type3 summary LAS အေနနဲ ့ထုတ္လြင့္ထားတာကို ျမင္ရမွာပါ။
LSA type 3 မွာက loopback interface ေတြအတြက္ဆုိရင္ interface’s IP ကို Link ID မွာ ျမင္ရျပီး physical
interface ေတြဆုိရင္ေတာ့ Network address ကို ျမင္ရပါတယ္။ R1 ဘက္ကေနျကည့္မယ္ဆုိ.. Loopback
interface ေတြရဲ ့ 4.4.4.4, 192.168.111.6, 192.168.222.6 ဆိုျပီး Router 2 ကေန Advertise လုပ္တာကို
ျမင္ရမွာပါ။ Area 2 ဘက္မွာက physical အကုန္ သည္ 192.168.246.X /24 prefix network ထဲ မွာ ရွိလို့
192.168.246.0 ဆုိျပီး Network address အေနနဲ ့ျမင္ရမွာပါ။

ဆုိေတာ့ router 5 (network 0.0.0.0 0.0.0.0 area 2 ဆုိျပီး ေျကျငာခဲ့တဲ့ ေကာင္) မွာ ..
#conf t
#int e0/0
#ip add 10.0.50.5 255.255.255.0
#no sh
#exit
#int lo 0
#ip add 5.5.5.5 255.255.255.0
ဆိုျပီး ထည့္လုိက္ပါ။ အဲ့ေနာက္ #show ip ospf database နဲ ့ျပန္ျကည္ပါ။
Physical interface IP ျဖစ္တဲ့ 10.0.50.5 ရဲ ့ Network address 10.0.50.0 ကို advertise လုပ္ထားတာကို ေတြ ့
ရပါမယ္။
ရပါမယ္။
Loopback interface ကိုေတာ့ 5.5.5.5 အေနနဲ ့ ADVertise လုပ္တာကို ျမင္ရမွာပဲ ျဖစ္ပါတယ္။ ကိုယ္ပုိင္ topology နဲ ့
LAB လုပ္ပါ။ show command ေတြနဲ ့.. အျကိမ္ျကိမ္ ျပန္ျကည့္ပါ။.. တစ္ျကိမ္ ထက္ တစ္ျကိမ္ ပိုျပီး နားလည္လာပါလိမ့္မယ္။
LAB လုပ္ပါ။ show command ေတြနဲ ့.. အျကိမ္ျကိမ္ ျပန္ျကည့္ပါ။.. တစ္ျကိမ္ ထက္ တစ္ျကိမ္ ပိုျပီး နားလည္လာပါလိမ့္မယ္။
“practice makes perfect”
အုိေခ.. ခု Area 2 ဘက္ျခမ္းမွာရွိတဲ ့router ေတြျဖစ္တဲ့ R4 တုိ့ R6, R5 တုိ့ ကေန ျကည့္ျကည့္ရေအာင္။
ဒီမွာေတာ့ Type 3 အေနနဲ ့ရတဲ ့ 192.168.12.0, 192.168.13.0, 192.168.23.0 တုိ့ Physical Interface’s
Network ကို Advertise လုပ္တာပါ။ area 0 ဘက္ျခမ္မွာ OSPF enable loopback interface မရွိေသးလု့ိပါ။..
Router 1 မွာ loopback တစ္ခု create လုပ္ျပီး ospf network ထဲ ထည့္လုိက္ပါ။ ျပီးေတာ့ Area 2 ဘက္ျခမ္းက
router ကေနျပန္ျကည့္ ျကည့္ပါ။
Network ကို Advertise လုပ္တာပါ။ area 0 ဘက္ျခမ္မွာ OSPF enable loopback interface မရွိေသးလု့ိပါ။..
Router 1 မွာ loopback တစ္ခု create လုပ္ျပီး ospf network ထဲ ထည့္လုိက္ပါ။ ျပီးေတာ့ Area 2 ဘက္ျခမ္းက
router ကေနျပန္ျကည့္ ျကည့္ပါ။
ျပီးေတာ့ LSA type 2 (network LSA - come from DR) အရ ခု R4 (router-id 4.4.4.4) ရဲ ့interface e0/0
(IP - 192.168.246.4) သည္ 192.168.246.X /24 ဆုိတဲ ့ Broadcast network Segment မွာ DR ျဖစ္ေနတာကို
ေတြ့ရမွာပါ။
(IP - 192.168.246.4) သည္ 192.168.246.X /24 ဆုိတဲ ့ Broadcast network Segment မွာ DR ျဖစ္ေနတာကို
ေတြ့ရမွာပါ။
ဒီ 192.168.246.X Network အတြက္လဲ R4 ထက္ R2 ကိုပဲ DR ျဖစ္ေစခ်င္တယ္ ဆုိရင္ priority ကို ခ်ိန္းေပးလိုက္ယံု
ပါပဲ။
ပါပဲ။
#conf t
#interface eth0/1
#ip ospf priority 200
#end
#clear ip ospf
# [yes]
အဲ့တာမွ မရရင္ reboot သာ ခ်ေပးလိုက္.. Packet tracer, GNS3 နဲ ့ LAB စမ္းတာမုိ့ လုပ္ခိုင္းတာေနာ္.. Real field က
devices ေတြကိုေတာ့ reboot လုပ္မယ္ဆုိ အရင္ စဥ္းစားျပီးမွ လုပ္ပါ။
devices ေတြကိုေတာ့ reboot လုပ္မယ္ဆုိ အရင္ စဥ္းစားျပီးမွ လုပ္ပါ။
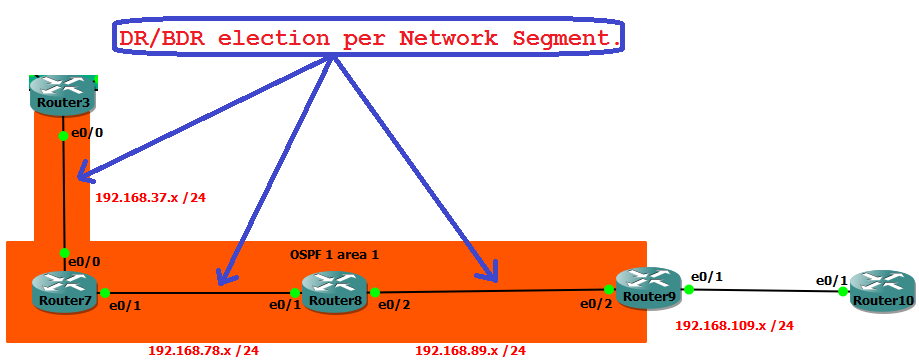
ခုေနာက္ထပ္ Area တစ္ခုုျဖစ္တဲ့ Area 1 ကို configure ခ် က်စို ့။။
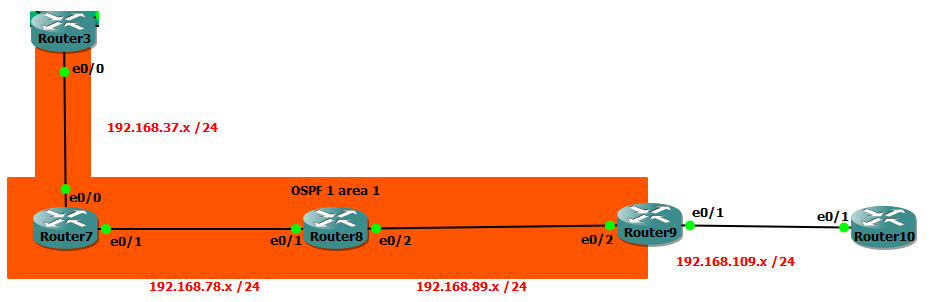
IP Addressing
| ||
Router 3
|
Router 7
|
Router 8
|
configure terminal
|
configure terminal
|
configure terminal
|
hostname R7
|
hostname R8
| |
int eth 0/0
|
int eth 0/0
|
int eth 0/2
|
ip address 192.168.37.3 255.255.255.0
|
ip address 192.168.37.7 255.255.255.0
|
ip address 192.168.89.8 255.255.255.0
|
no sh
|
no sh
|
no sh
|
exit
|
exit
|
exit
|
int eth 0/1
|
int eth 0/1
| |
ip address 192.168.78.7 255.255.255.0
|
ip address 192.168.78.8 255.255.255.0
| |
no sh
|
no sh
| |
end
|
end
| |
sh ip interface brief | include up
|
sh ip interface brief | include up
|
sh ip interface brief | include up
|
Router 10
|
Router 9
| |
configure terminal
|
configure terminal
| |
hostname R10
|
hostname R9
| |
int eth 0/1
|
int eth 0/2
| |
ip address 192.168.109.10 255.255.255.0
|
ip address 192.168.89.9 255.255.255.0
| |
no sh
|
no sh
| |
exit
|
exit
| |
int eth 0/1
| ||
ip address 192.168.109.9 255.255.255.0
| ||
no sh
| ||
end
| ||
sh ip interface brief | include up
|
sh ip interface brief | include up
| |
Enable OSPF
| |||
Router 3
|
Router 7
|
Router 8
|
Router 9
|
configure terminal
|
configure terminal
|
configure terminal
|
configure terminal
|
interface eth 0/0
|
interface range eth 0/0 - 1
|
interface range eth 0/1 - 2
|
interface range eth 0/2
|
ip ospf 1 area 1
|
ip ospf 1 area 1
|
ip ospf 1 area 1
|
ip ospf 1 area 1
|
end
|
end
|
end
|
end
|
sh ip ospf interface brief
|
sh ip ospf interface brief
|
sh ip ospf interface brief
|
sh ip ospf interface brief
|
ခုဆို IP ေတြလဲ ေပးျပီးျပီ ospf လဲ config ခ်ျပီးသြားျပီ။ ခု ဒီ area မွာ ospf ကို configure လုပ္ေတာ့
interface mode ေအာက္ကို သြားျပီးေတာ့ ip ospf 1 area 0 လို့ ေရးခဲ့ပါတယ္။ အဲ့ command အလုပ္
လုပ္ပံုကေတာ့ ခုလက္ရွိ ရွိေနတဲ ့ interface သည္ ospf process id သည္ 1 .. area သည္ 1 ျဖစ္တယ္ဆုိတာ
router ကေနသိေအာင္လို့ပါ။ show ip ospf interface brief နဲ ့ျကည့္မယ္ဆုိရင္ ospf enable ျဖစ္ေနတဲ ့
interface ေတြကို ျမင္ရမွာပါ။
Router ေတြမွာ show ip route OR show ip route ospf နဲ ့ျကည့္ပါ။ connected interface ကလြဲ လို့
က်န္တဲ့ network ေတြကို ospf အေနနနဲ ့ေတြ့ရပါမယ္။ မေတြ ့ခဲ ့ရင္ အေပၚမွာ ခဲ့သလို show command
ေတြနဲ ့ step by step စစ္ပါ။
က်န္တဲ့ network ေတြကို ospf အေနနနဲ ့ေတြ့ရပါမယ္။ မေတြ ့ခဲ ့ရင္ အေပၚမွာ ခဲ့သလို show command
ေတြနဲ ့ step by step စစ္ပါ။
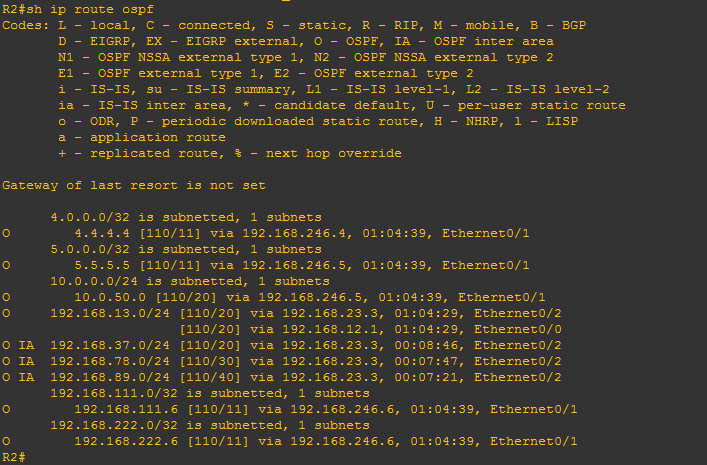
ခုျကည့္လိုက္တဲ့ router 2 သည္ area 0 ေကာ area 2 ေကာ နဲ ့ခ်ိတ္ထားတဲ့ ABR router မုိ့လို့ area 0, area 2 က route
ေတြကိုေတာ့ O (အို) ဆုိျပီးေတာ့ OSPF same area က route ေတြ အေနနဲ ့ ေတြ ့ရမွာပါ။ Area 1 ဘက္ျခမ္း က route
ေတြကိုေတာ ့ O IA ဆုိျပီးေတာ့ OSPF inter Area route အေနနဲ ့.. ေျပာရရင္ different area က route ေတြ အေနနဲ ့
ျမင္ရမွာပါ။
ေတြကိုေတာ့ O (အို) ဆုိျပီးေတာ့ OSPF same area က route ေတြ အေနနဲ ့ ေတြ ့ရမွာပါ။ Area 1 ဘက္ျခမ္း က route
ေတြကိုေတာ ့ O IA ဆုိျပီးေတာ့ OSPF inter Area route အေနနဲ ့.. ေျပာရရင္ different area က route ေတြ အေနနဲ ့
ျမင္ရမွာပါ။
အဲ့လို ABR router မဟုတ္တဲ့ router တစ္လံုးကေန ျကည့္ျကည့္ရေအာင္။ route ေတြကို topology မွာ IP ေတြ ေရးျပီး
ခနခန ျကည့္ပါ။ ပို ျပီး နားလည္လာပါလိမ့္မယ္။
ခနခန ျကည့္ပါ။ ပို ျပီး နားလည္လာပါလိမ့္မယ္။

Router 1(area 0) ကေန ျကည့္တဲ့ အခ်ိန္က်ေတာ့ 192.168.12.0 network နဲ ့192.168.13.0 Network ကိုေတာ့
Connected interace အေနနဲ ့ျမင္ရမွာ ျဖစ္ျပီးေတာ့ same ospf area ထဲက connected မဟုတ္တဲ ့192.168.23.0
Network ကုိေတာ့ O ဆုိျပီးေတာ့ ေတြ ့ရမွာပါ။ တစ္ျခား area ကေန လာတဲ့ route ေတြကိုေတာ့ O IA အေနနဲ ့
ျမင္ရမွာပဲ ျဖစ္ပါတယ္။
Connected interace အေနနဲ ့ျမင္ရမွာ ျဖစ္ျပီးေတာ့ same ospf area ထဲက connected မဟုတ္တဲ ့192.168.23.0
Network ကုိေတာ့ O ဆုိျပီးေတာ့ ေတြ ့ရမွာပါ။ တစ္ျခား area ကေန လာတဲ့ route ေတြကိုေတာ့ O IA အေနနဲ ့
ျမင္ရမွာပဲ ျဖစ္ပါတယ္။
ေနာက္ျပီး ospf database ကို တစ္ခ်က္ေလာက္ျကည့္ ျကည္ရေအာင္။ R3 ကေန တစ္ခ်က္ျကည့္ က်ရေအာင္..
Database က မ်ားလို့ နွစ္ခါ ခြဲ ျပီး screen shot ထားရတယ္။ ပထမ ပံုက area 0 အတြက္ LSA database အကုန္ပါ။ LSA
type 3 မွာေတာ့ Area 1 နဲ ့area 2 က ေကာင္ေတြကို ABR ကေန advertise လုပ္ထားတာကို ေတြ့ ရမွာပါ။
Database က မ်ားလို့ နွစ္ခါ ခြဲ ျပီး screen shot ထားရတယ္။ ပထမ ပံုက area 0 အတြက္ LSA database အကုန္ပါ။ LSA
type 3 မွာေတာ့ Area 1 နဲ ့area 2 က ေကာင္ေတြကို ABR ကေန advertise လုပ္ထားတာကို ေတြ့ ရမွာပါ။
ခုဒီ ဒုတိယပံု ေအာက္ပံုကေတာ့ Router 3 ကေန ျကည့္ထားတဲ့ OSPF database ရဲ ့ Area 1 နဲ ့ပါတ္သက္တဲ့
information ေတြကို ျပထားတာပါ။ LSA type 1 ဆုိတာက router တုိင္းက ထုတ္လြင့္တာ.. Type 2 က်ကေတာ့
DR ျဖစ္တဲ့ ေကာင္ေတြက ထုတ္တာပါ။ ခု ဒီ area 1 မွာဆို Network segment ( 192.168.37.0, 192.168.78.0,
192.168.89.0) တုိင္းအတြက္ DR elect လုပ္ထားလို့ Type 2 network LSA ကို 3 ခု ေတြ့တာပါ။ ethernet သည္
broadcast type ျဖစ္ေတာ့ အဲ့ interface သည္ Broadcast network interface ျဖစ္ေနလို့ပါ။ အဲ့တာကို ခနေန နဲနဲ
စမ္းျကည့္ရေအာင္ network type/ interface type ေျပာင္းျပီးေတာ့..
Area 0 အတြက္ျဖစ္လို့… LSA tyep 3 မွာေတာ့ Area 2 နဲ ့ area 1 က route ေတြကို ABR router ေန ကေန
တစ္ဆင့္ ေတြ့ရမွာပဲ ျဖစ္ပါတယ္။
တစ္ဆင့္ ေတြ့ရမွာပဲ ျဖစ္ပါတယ္။

အခု OSPF Network type/ interface ေတြ အေျကာင္း နဲနဲ ျကည့္က်ရ ေအာင္။
Router 7 ရဲ ့ Ethernet interface 0/1 သည္ Network type မွာ သြားျကည့္လုိက္ရင္ BROADCAST အေနနဲ ့ရွိေနတာကို
ေတြ့ရပါမယ္။ အဲ့တာေျကာင့္ DR/BDR ကို election လုပ္ေနတာ.. ဆုိေတာ့..
ေတြ့ရပါမယ္။ အဲ့တာေျကာင့္ DR/BDR ကို election လုပ္ေနတာ.. ဆုိေတာ့..
point to point ခ်ိတ္ဆက္ထားတဲ့ လင့္ေတြမွာ DR election မလုပ္ေစခ်င္ရင္ ..
Connected Interface ကို ေျပာင္း ျကည့္ပါ။
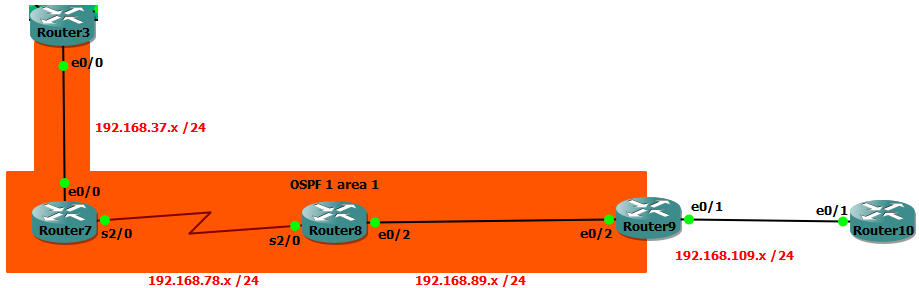

Interface အေဟာင္း config ျဖဳတ္ျပီး serial interface အသစ္အတြက္ config ခ်ပါ။ .. serial interface ဆုိတာနဲ ့
OSPF သည္ point to point ခ်ိတ္မယ့္ interface ဆိုျပီး တန္းသိပါတယ္။ အဲ့ အတြက္ Network type မွာဆုိရင္ လဲ
POINT_TO_POINT အေနနဲ ့ျမင္ရမွာပဲ ျဖစ္ပါတယ္။
OSPF သည္ point to point ခ်ိတ္မယ့္ interface ဆိုျပီး တန္းသိပါတယ္။ အဲ့ အတြက္ Network type မွာဆုိရင္ လဲ
POINT_TO_POINT အေနနဲ ့ျမင္ရမွာပဲ ျဖစ္ပါတယ္။
IP addressing & enable OSPF for serial interface
| |
Router 7
|
Router 8
|
configure terminal
|
configure terminal
|
int e 0/1
|
int e 0/1
|
no ip add
|
no ip add
|
exit
|
exit
|
int s 2/0
|
int s 2/0
|
ip address 192.168.78.7 255.255.255.0
|
ip address 192.168.78.8 255.255.255.0
|
no sh
|
no sh
|
ip ospf 1 area 1
|
ip ospf 1 area 1
|
end
|
end
|
sh ip ospf interface brief
|
sh ip ospf interface brief
|
ဟုတ္ျပီး .. ethernet interface ကိုလဲ Point to Point အေနနဲ ့ config လုပ္တာေလးက ပိုအဆင္မေျပဘူးလား.. .
အဲ့ေတာ့ R8 နဲ ့R9 ျကားက interface ကို network type ေျပာင္းျကည့္ရေအာင္။
အဲ့ေတာ့ R8 နဲ ့R9 ျကားက interface ကို network type ေျပာင္းျကည့္ရေအာင္။
ေျပာင္းလို့ ရတဲ့ Network type ေတြ သိခ်င္ရင္ ? နဲ ့ ျကည့္ျကည့္ပါ။
http://packetlife.net/blog/2008/jun/19/ospf-network-types/ မွာ ျကည့္ျကည့္ပါ။ ပိုရွင္းပါလိမ့္မယ္။

Change OSPF Network Type
| |
Router 8
|
Router 9
|
configure terminal
|
configure terminal
|
interface range eth 0/2
|
interface range eth 0/2
|
ip ospf network point-to-point
|
ip ospf network point-to-point
|
end
|
end
|
show ip ospf interface brief
|
show ip ospf interface brief
|

R3 ကေနပဲ show ip ospf database နဲ ့ျပန္ျကည့္ျကည့္ပါ။ DRေတြကေန generate လုပ္တဲ ့ Network LSA type 2
မွာ area 1 အတြက္ တစ္ခု (192.168.37.0 network segment) ပဲ ေတြ့ရေတာ့မွာပါ။ 192.168.78.0 & 192.168.89.0
network segment ေတြသည္ point to point ျဖစ္သြားးေတာ့ DR election မရွိေတာ့လို.. သူတုိ့ဆီက Network LSA
Type 2 ကို မေတြ့ရေတာ့တာပါ။ ..
မွာ area 1 အတြက္ တစ္ခု (192.168.37.0 network segment) ပဲ ေတြ့ရေတာ့မွာပါ။ 192.168.78.0 & 192.168.89.0
network segment ေတြသည္ point to point ျဖစ္သြားးေတာ့ DR election မရွိေတာ့လို.. သူတုိ့ဆီက Network LSA
Type 2 ကို မေတြ့ရေတာ့တာပါ။ ..
သိပ္မရွင္းရင္ ေနာက္တစ္ေခါက္ျပန္ ဖတ္ျပီး netowrk ခ်ိန္း ျပီး စမ္း ျကည့္ပါ။ LSA type ေတြ network type ေတြ
ospf route ေတြကို သိေစခ်င္လို.. ခု ဒီ LAB ကို ထည့္ေပးထားတာပါ။
ospf route ေတြကို သိေစခ်င္လို.. ခု ဒီ LAB ကို ထည့္ေပးထားတာပါ။
အုိေက.. ခုေလာက္ ဆုိ ေတာ္ေတာ္ေလးေတာ့ မ်က္လံုထဲ ျမင္ေလာက္ျပီ.. ခု တုိ့ေတြ သိခဲ့တာသည္ LSA type - 1, 2, 3
ကိုေတာ့ သိခဲ့ ျပီး ေနာက္ ထပ္ သိေစခ်င္တဲ ့ LSA type 4 & LSA type 5 ကို ထပ္ျပီး ေလ့လာက်ရေအာင္။ ေအာက္က
လင့္ကေန လဲ ဖတ္ျကည့္ေစခ်င္ပါတယ္။
ကိုေတာ့ သိခဲ့ ျပီး ေနာက္ ထပ္ သိေစခ်င္တဲ ့ LSA type 4 & LSA type 5 ကို ထပ္ျပီး ေလ့လာက်ရေအာင္။ ေအာက္က
လင့္ကေန လဲ ဖတ္ျကည့္ေစခ်င္ပါတယ္။
Type 4 & Type 5 LSA တုိ့နဲ ့ ပါတ္သက္တဲ့ router သည္ ASBR (Autonomous system boundary router)
Router ပဲ ျဖစ္ပါတယ္။ ASBR Router ရွိတဲ ့ Network မွာ မွ
Router ပဲ ျဖစ္ပါတယ္။ ASBR Router ရွိတဲ ့ Network မွာ မွ
- LSA Type 4: Summary ASBR LSA.
- LSA Type 5: Autonomous system external LSA. တုိ့ ကို ေတြ့ ျမင္ရတာပါ။ ဆုိေတာ့ ASBR
ဆုိတာသည္ မတူညီတဲ ့ routing protocol (eg, BGP, EIGRP, static route,etc,..) ေတြ အတူတူ ယွဥ္ ျပီး run
ေနတဲ ့OSPF Router ကို ASBR Router လုိေခၚပါတယ္။ ABR တုန္းက က်ေတာ့ မတူညီတဲ ့ Area ေတြ နဲ ့
ခ်ိတ္ဆက္ ျပီး တစ္ခုထက္ပိုတဲ ့Area ေတြ ယွဥ္တြဲျပီး ရွိေနတဲ ့ Router ကို ေခၚတာေနာ္.. မွတ္မွားမွာ ဆုိးလို့ ျပန္ေျပာေပးတာ
။ ASBR မွာ အဲ့လို မတူညီတဲ ့ Protocol ေတြရွိမယ္.. အဲ ့ route ေတြကို OSPF ထဲ ထည့္လိုက္တဲ့ အခါက် (eg,. Route
Redistribution) OSPF running Network အေနနဲ ့ အဲ့ လို router ကို ASBR အေနနဲ ့မွတ္ယူပါတယ္။
ခုေအာက္လုပ္မယ့္ ေကာင္ကို ျကည့္ရင္ ရွင္းသြားပါလိမ့္မယ္။ ခုထိ show ip ospf database နဲ ့ ျကည့္ ျမင္ရတာ သည္
LSA type 3 ထိပဲ ရွိေသးတယ္ ေနာ္။
Create static route between Router 9 and Router 10
| |
Router 9
|
Router 10
|
configure terminal
|
configure terminal
|
interface loopback 0
| |
ip address 10.10.10.10 255.0.0.0
| |
exit
| |
ip route 10.0.0.0 255.0.0.0 192.168.109.10
|
ip route 0.0.0.0 0.0.0.0 192.168.109.9
|
end
|
end
|
sh run | section ip route
|
sh run | section ip route
|
ခု အတုိင္း ဆုိရင္ R9 သည္ R10 ဘက္မွာ ရွိတဲ့ 10.10.10.10 ကို ေတာ့ ping လုိ့ရမယ္.. တစ္ျခား router (R1, R2,
R3, .. etc) ေတြကေနေတာ့ သိမွာလဲ မဟုတ္သလို ping လို့လဲ မရပါဘူး။
R3, .. etc) ေတြကေနေတာ့ သိမွာလဲ မဟုတ္သလို ping လို့လဲ မရပါဘူး။
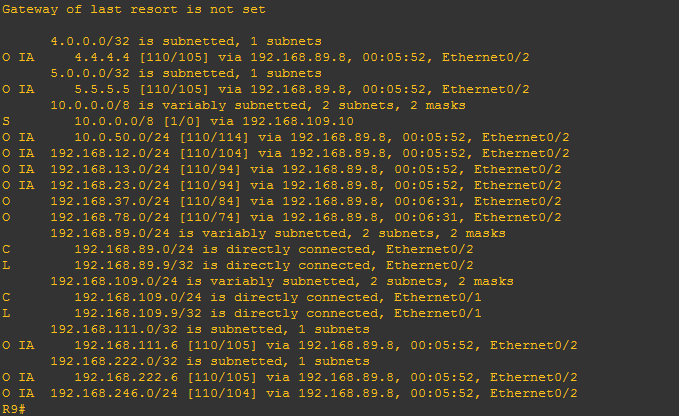
#show ip route နဲ့ ျကည့္ျကည့္ပါ။ 10.0.0.0 Network ကို Static (S) route အေနနဲ ့ သိေနတာပါ။ OSPF သည္
သူတုိ့အခ်င္းခ်င္း ပဲ route information ေတြကို ဖလွယ္တာပါ။ တစ္ျခား dynamic routing / static routing ေတြကို
မသိနုိင္ပါဘူး.. အဲ့တာထက္ ကုိယ့္ (local )connected interface ေတာင္ OSPF network ထဲ အျကံုးမ၀င္ရင္ OSPF
အေနနဲ ့ တစ္ျခား OSPF router ေတြ ကို advertise မလုပ္ပါဘူး။ အဲ့ေတာ့ static route ကို OSPF ထဲ ကို ထည့္ေပးမွ
ရမွာပါ။
မသိနုိင္ပါဘူး.. အဲ့တာထက္ ကုိယ့္ (local )connected interface ေတာင္ OSPF network ထဲ အျကံုးမ၀င္ရင္ OSPF
အေနနဲ ့ တစ္ျခား OSPF router ေတြ ကို advertise မလုပ္ပါဘူး။ အဲ့ေတာ့ static route ကို OSPF ထဲ ကို ထည့္ေပးမွ
ရမွာပါ။
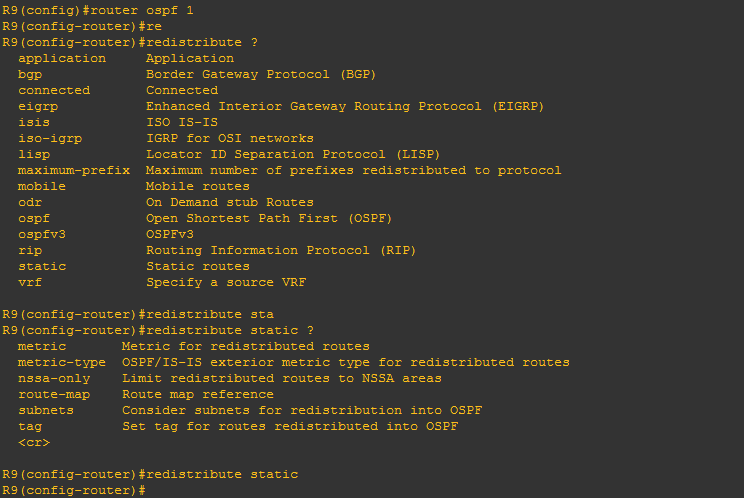
OSPF ထဲ ကိုအရင္ ၀င္ပါ။ အဲ့ေနာက္ redistribute လုိ့ ရိုက္ျပီး ? ေခၚျကည့္ပါ။ ဘာေတြကို OSPF ထဲ redistribute
လုပ္လို့ရမလဲ ဆုိတာကို သိေအာင္။
လုပ္လို့ရမလဲ ဆုိတာကို သိေအာင္။

တို့ေတြ ခု လုပ္မွာသည္ static route ကို OSPF ထဲ ထည့္မွာမုိ ့ redistribute static လုိ့ ေရးေပးလုိက္ပါ။ redistribute
လုပ္တဲ့အခ်ိန္မွာ metric ေတြ ဘာေတြ ကိုလဲ additional အေနနဲ ့ configure လို့ရ ေသးတယ္ေနာ္။ Lab လုပ္တယ္
ဆုိတာ စမ္းဖုိ့ပဲေလ.. ခုေတာ့ ဒီအတုိင္း redistribute လုပ္လိုက္ပါ။
လုပ္တဲ့အခ်ိန္မွာ metric ေတြ ဘာေတြ ကိုလဲ additional အေနနဲ ့ configure လို့ရ ေသးတယ္ေနာ္။ Lab လုပ္တယ္
ဆုိတာ စမ္းဖုိ့ပဲေလ.. ခုေတာ့ ဒီအတုိင္း redistribute လုပ္လိုက္ပါ။
အဲ့တာဆုိ OSPF routing နဲ ့ static route တစ္ျပိဳင္ထဲ ရွိျပီး static ကို OSPF ထဲ ထည့္ထားတဲ့ router သည္ ASBR
ျဖစ္သြားပါျပီ။
ျဖစ္သြားပါျပီ။
ASBR ကေနထုတ္တဲ့ သူသည္ ASBR ျဖစ္ေျကာင္းေျပာတဲ့ type 1 router LSA သည္ same Area ထဲ မွာေတာ့
Type 1 အေနနဲ ့ပဲ ရွိေနျပီးေတာ့ ABR router ကို ေက်ာ္သြားတာနဲ ့ABR router သည္ type 4
Type 1 အေနနဲ ့ပဲ ရွိေနျပီးေတာ့ ABR router ကို ေက်ာ္သြားတာနဲ ့ABR router သည္ type 4
summary ASBR LSA အေနနဲ ့ တစ္ျခား Area တုိင္းကို ပို ့လႊတ္ပါတယ္။
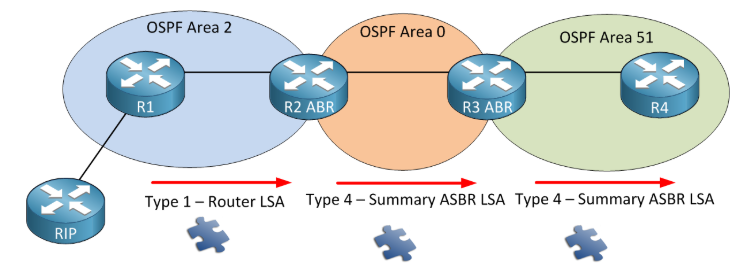
ဆုိခ်င္တာ LSA type 4 သည္ ASBR router သည္ ဘယ္ Router လဲ ဆုိတာ သိေစဖုိ ့ အဓိက ျဖစ္ပါတယ္။
ေနာက္တစ္ခု ျဖစ္တဲ ့type 5 external LSA ကေတာ့ ASBR ကေနျပီး OSPF မဟုတ္တဲ့ တစ္ျခား
( dynamic routing, static, connected,. ) external ေကာင္ေတြ redistribute လုပ္တဲ ့ Router
ေတြကို advertise လုပ္ေပးတဲ့ LSA ပါ။
( dynamic routing, static, connected,. ) external ေကာင္ေတြ redistribute လုပ္တဲ ့ Router
ေတြကို advertise လုပ္ေပးတဲ့ LSA ပါ။

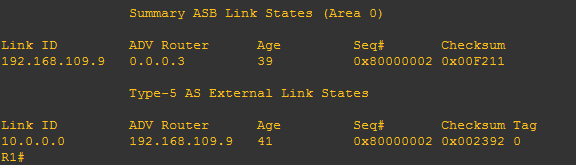
ခု လက္ရွိလုပ္ေနတဲ ့LAB မွာဆို static route ကို OSPF ထဲ ထည့္ခဲ့လိုက R9 သည္ ASBR ျဖစ္သြားျပီးေတာ့
static route ကုိ LSA type 5 အေနနဲ ့ ထုတ္လႊင့္ျပီး OSPF Network ထဲ က router ေတြကို သိေစပါတယ္။
static route ကုိ LSA type 5 အေနနဲ ့ ထုတ္လႊင့္ျပီး OSPF Network ထဲ က router ေတြကို သိေစပါတယ္။
Type 4 နဲ ့ Type 5 ကို ျပန္ျပီး အနွစ္ခ်ဳပ္ရရင္ Type 5 က OSPF မဟုတ္တဲ့ redistribute လုပ္ထားတဲ ့external
route ေတြကို advertise လုပ္ေပးမယ့္ LSA။ ဟုတ္ျပီး သြားခ်င္တဲ့ route ေတာ့သိျပီး (static route ကုိသြားမယ္
ဆုိက်ပါစို ့) အဲ့လို့ external route ေတြဆီကို သြားဖုိ့ ဆိုတာက ASBR ကို သိမွာရမယ္… သိနုိင္ဖုိ့ အတြက္က
Type 4 ASBR LAS ကေန တစ္ဆင့္သိမယ္။
route ေတြကို advertise လုပ္ေပးမယ့္ LSA။ ဟုတ္ျပီး သြားခ်င္တဲ့ route ေတာ့သိျပီး (static route ကုိသြားမယ္
ဆုိက်ပါစို ့) အဲ့လို့ external route ေတြဆီကို သြားဖုိ့ ဆိုတာက ASBR ကို သိမွာရမယ္… သိနုိင္ဖုိ့ အတြက္က
Type 4 ASBR LAS ကေန တစ္ဆင့္သိမယ္။

R8 ကေန show ip ospf database နဲ ့ ျကည့္လုိက္ရင္ ASBR ျဖစ္ေျကာင္းေျပာတဲ့ Type 1 Router LAS အေနနဲ ့

ျမင္ရမယ္။ ျပီးေတာ့ static router ကိုလဲ Type 5 External LAS ကေန ျမင္ရပါမယ္။

တစ္ျခား Area က router ျဖစ္တဲ ့ Router 1 ကေနျကည့္ရင္ ASBR ကေန ထုတ္လႊင့္တဲ ့ Router LSA type 1 သည္ ABR
router ျဖစ္တဲ ့R3 ဆီကို ေရာက္ျပီး သူ (ABR) ကေနျပန္ျပီး advertise လုပ္အခ်ိန္မွာ Summary LAS type 4 အေနနဲ ့ေျပာင္းျပီးေတာ့
တစ္ျခား area တုိင္းကို ထုတ္လႊင့္ပါတယ္။
router ျဖစ္တဲ ့R3 ဆီကို ေရာက္ျပီး သူ (ABR) ကေနျပန္ျပီး advertise လုပ္အခ်ိန္မွာ Summary LAS type 4 အေနနဲ ့ေျပာင္းျပီးေတာ့
တစ္ျခား area တုိင္းကို ထုတ္လႊင့္ပါတယ္။

#show ip route နဲ ့ ျကည့္ျကည့္ပါ။
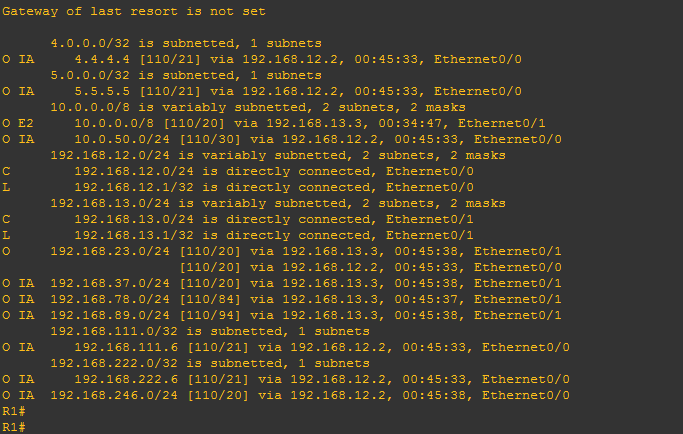
Router 1 သည္ external route (OSPF ထဲ ကို redistribute လုပ္တဲ့ Static route ) အေနနဲ ့O E2 or O E1 ဆို ျပီ
း ျမင္ရပါလိမ့္မယ္။ E2 ကေတာ့ defaul အေနနဲ ့ ျမင္ရမွာပါ။ R1 ကေန external router ျဖစ္တဲ ့10.10.10.10 ကို ping
test စမ္းျကည့္ပါ။
း ျမင္ရပါလိမ့္မယ္။ E2 ကေတာ့ defaul အေနနဲ ့ ျမင္ရမွာပါ။ R1 ကေန external router ျဖစ္တဲ ့10.10.10.10 ကို ping
test စမ္းျကည့္ပါ။

;-)
Passive interface လုပ္လိုက္ရင္ OSPF သည္ အဲ့ interface ကေနျပီးေတာ့ OSPF hello message ေတြကို
မပို့ေပးေတာ့ဘူး.. client network ေတြ ဘက္ကို ospf hello မပို ့တဲ ့အတြက္ bandwidth အတြက္လဲ ပိုေကာင္းတယ္
ျပီးေတာ့ attacker ေတြရဲ ့ ရန္ကေနလဲ ကင္းေ၀းေအာင္ လို့ပါ။
မပို့ေပးေတာ့ဘူး.. client network ေတြ ဘက္ကို ospf hello မပို ့တဲ ့အတြက္ bandwidth အတြက္လဲ ပိုေကာင္းတယ္
ျပီးေတာ့ attacker ေတြရဲ ့ ရန္ကေနလဲ ကင္းေ၀းေအာင္ လို့ပါ။
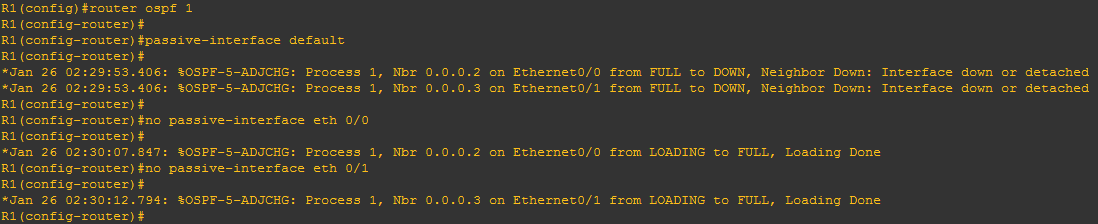
အေကာင္းဆံုးကေတာ့ အရင္ဆံုး interface အကုန္လံုးကို passive interface လုပ္ ျပီးမွာ router to router
ခ်ိတ္ဆက္ေနတဲ့ interface ေတြကို no passive interface ျပန္လုပ္။ မလုပ္လို့လဲ မရဘူးေလ.. Ospf hello မပို ့ရင္
neighbour state down သြားျပီး .. route ေတြကို ဘယ္သိေတာ့မလဲ..
ခ်ိတ္ဆက္ေနတဲ့ interface ေတြကို no passive interface ျပန္လုပ္။ မလုပ္လို့လဲ မရဘူးေလ.. Ospf hello မပို ့ရင္
neighbour state down သြားျပီး .. route ေတြကို ဘယ္သိေတာ့မလဲ..
တစ္လက္စတည္း OSPF authentication ေလး ဆက္လုပ္လုိက္ရေအာင္..
Enable OSPF authentication (Plain Text)
| ||
Router 7
|
Router 8
| |
configure terminal
|
configure terminal
| |
interface serial 2/0
|
interface serial 2/0
|
interface mode ထဲ ကို သြားပါ
|
ip ospf authentication
|
ip ospf authentication
|
Ospf plain text authentication ကို enable လုပ္ပါ
|
ip ospf authentication-key Sp@c3x
|
ip ospf authentication-key Sp@c3x
|
Password string ထည့္ပါ
|
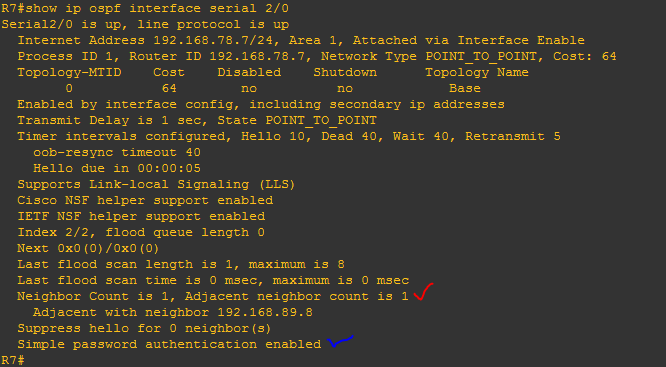
Show ip ospf interface serial 2/0 ဆုိျပီး ျကည့္လိုက္ရင္ ေအာက္နားမွာ simple password authentication enable
ဆိုတာကို ေတြရမွာပါ။
ဆိုတာကို ေတြရမွာပါ။
R8 ကေနလဲ တစ္ခ်က္ ျပန္ျကည့္ ျကည့္ပါ။
အကယ္လို့ Password သာမွားခဲ့မယ္ ဆုိရင္
ေတြ့ရမွာပါ။ ျပီးေတာ့
Neighbor state လဲ ေဒါင္းသြားပါလိမ့္မယ္။ ခု လုပ္ခဲ့တာသည္ interface အလိုက္ authentication လုပ္တာပါ။ အဲ့လိုပဲ
Area တစ္ခုခ်င္းအလိုက္လဲ authentication လုပ္လိ့ုရပါတယ္။
Area တစ္ခုခ်င္းအလိုက္လဲ authentication လုပ္လိ့ုရပါတယ္။
Eg >> R1(config)#router ospf 1
R1(config-router)#area 0 authentication
R1(config-router)#area 0 authentication
ခု OSPF Plain Text Authentication စမ္းျပီးျပီဆုိေတာ့ MD5 ေလး စမ္းျကည့္ရေအာင္
Router 9
|
Router 8
| |
configure terminal
|
configure terminal
| |
interface eth 0/2
|
interface eth 0/2
|
interface mode ထဲ ကို သြားပါ
|
ip ospf message-digest-key 89 md5 C!s60
|
ip ospf message-digest-key 89 md5 C!s60
|
Authentication မွာ လုိအပ္တဲ့ key ID နဲ ့ password
ကိုအရင္ သတ္မွတ္ပါ။ နွစ္ဘက္လံုးမွာ တူရပါမယ္။
|
ip ospf authentication message-digest
|
ip ospf authentication message-digest
|
MD5 Authentication ကို enable လုပ္ပါ
|
Show ip ospf interface eth0/2 နဲ ့ ျကည့္လုိက္ရင္ cryptographic authentication enable ျဖစ္ေနတာကို ေတြ ့ရမွာပါ။
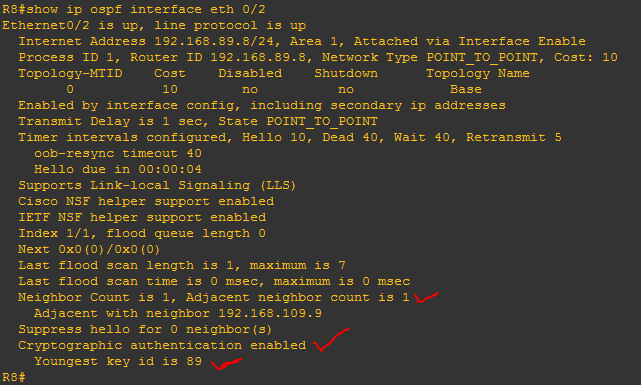
Show ip ospf neighbor နဲ ့လဲ စစ္ျကည့္လုိက္ရပါတယ္။ authentication fail ျဖစ္ရင္ time interval ကုန္ရင္
Neighbor state သည္ ေဒါင္းသြားပါ လိမ့္မယ္။
Neighbor state သည္ ေဒါင္းသြားပါ လိမ့္မယ္။
##### some of necessary commands and show commands you should try on the lab ####
OSPF Command
| |
Every 10 seconds an hello packet is sent and if we don't receive any hello packets
for 40 seconds then we will declare our neighbor "dead". If we want we can change
these tuners
|
Spade(config-if)#interface fastEthernet 1/0
|
Spade(config-if)#ip ospf hello-interval 5
| |
Spade(config-if)#ip ospf dead-interval 15
| |
We can also advertise a default route into OSPFIf you don't already have
a default route in your routing table then you need to add the always keyword
|
Spade(config)#router ospf 1
|
Spade(config-router)#default-information originate always
| |
Disable OSPF Hello packets from being sending on that interface
|
router OSPF 2
|
passive-interface FastEthernet 0/0
| |
First you need to use the ip ospf authentication command to enable plaintext
authentication on the interface. Secondly we need to configure a password using
the ip ospf authentication-key command
|
Spade(config)#interface fastEthernet 1/0
|
Spade(config-if)#ip ospf authentication
| |
Spade(config-if)#ip ospf authentication-key secret
| |
Enable OSPF on an interface
|
Spade(config)#interface fastEthernet 1/0
|
Spade(config-if)#ip ospf 1 area 0
| |
Change OSPF cost Metric on an Interface
|
Spade(config)#interface fastEthernet 1/0
|
Spade(config-if)#ip ospf cost 100
| |
check with ### show ip ospf interface brief
|

Thank for your Reading!!
အခမဲ ့ဆုိတာ အလကား မဟုတ္ဘူးေနာ္.. ခ်စ္ခ်င္း ေမတၱာမ်ားစြာနဲ ့ပါ။
With Best Regards,
Khant Phyo
thanks for sharing bro!
ReplyDelete