EIGRP with ### ip default-network ###
ခုဆက္ျပီး စမ္းျကည့္မွာက ip default-network command ေျကာင္းပဲ ျဖစ္ပါတယ္။ အဲ့ေကာင္က IOS version တုိင္းမွာ မရဘူးဗ်ာ ့။ ျပီးေတာ့ ip default-network ကို က်ြန္ေတာ္ေတာ့ Real field မွာ မသံုးခဲ့ဘူးပါဘူး.. Ip route တုိ့ ip default route တုိ့ကိုသာ သံုးျဖစ္တာပါ။ ခုက စာဖတ္ရင္ အဆင္ေျပေအာင္.. Command ေတြရဲ ့ အလုပ္လုပ္ပံု ကိုသိေစခ်င္လို့.. Lab အေနနဲ ့ထည္ျပီး စမ္းျပေပးထားတာပါ။ ခုေနာက္ပုိင္း IOS ေတြျဖစ္တဲ့ 15 မွာေတာ့ အဆင္မေျပေတာ့ပါဘူး.. အရင္ version အေဟာင္းေတြျဖစ္တဲ့ 12 တုိ့ ဘာတုိ့မွာေတာ့ စမ္း လို့ရပါတယ္။ just for Knowledge ေပါ့။ ေအာက္lab မွာ ISO verson 15 နဲ ့ေကာ version 12 နဲ ့ပါ.. Lab လုပ္ေပးထားပါတယ္။ အေပၚက method 3 ခုလိုပါပဲ default-network command ကို သံုးျပီး EIGRP ကေနတစ္ဆင့္ defaulte network ကို advertise လုပ္မွာပါ။
ခု ဒီ lab ကေတာ့ IOS version ကေတာ့ 15 ပါ။ show version | include Version နဲ ့တစ္ခ်က္စစ္ ျကည့္ပါ။

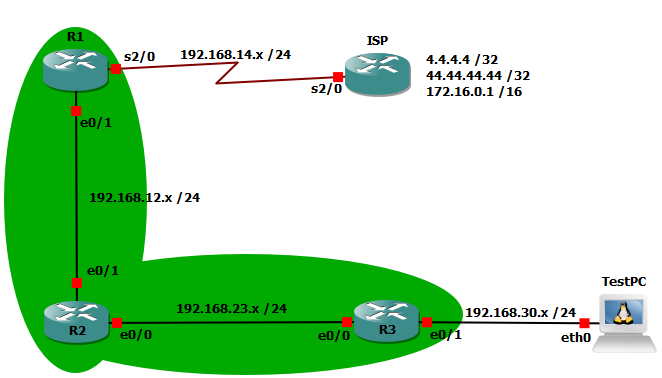
ဟုတ္ျပီး Lab စလုပ္မယ္ဆုိေတာ့ အရင္ဆံုး Topology ထဲက အတုိင္း IP address ေတြ config လုပ္ပါ။ အဲ့ေနာက္ Routing ကို enable လုပ္ပါ။
EIGRP ip default-network
| |||
ISP Router
|
Router 1
|
Router 2
|
Router 3
|
enable
|
enable
|
enable
|
enable
|
configure terminal
|
configure terminal
|
configure terminal
|
configure terminal
|
hostname ISP
|
hostname R1
|
hostname R2
|
hostname R3
|
int e0/0
|
int e0/0
|
int e0/0
|
int e0/0
|
ip add 192.168.14.4 255.255.255.0
|
ip add 192.168.14.1 255.255.255.0
|
ip add 192.168.23.2 255.255.255.0
|
ip add 192.168.23.3 255.255.255.0
|
no sh
|
no sh
|
no sh
|
no sh
|
exit
|
exit
|
exit
|
exit
|
int lo 0
|
int eth0/1
|
int eth0/1
|
int eth0/1
|
ip add 4.4.4.4 255.255.255.255
|
ip add 192.168.12.1 255.255.255.0
|
ip add 192.168.12.2 255.255.255.0
|
ip add 192.168.30.3 255.255.255.0
|
exit
|
no sh
|
no sh
|
no sh
|
int lo 1
|
end
|
end
|
end
|
ip add 44.44.44.44 255.255.255.255
| |||
int lo 2
| |||
ip add 172.16.0.1 255.255.255.255
| |||
exit
| |||
#show ip interface brief | include up နဲ ့စစ္ျကည့္ပါ။ အကုန္ အဆင္ေျပ မေျပ ကို။


Enable EIGRP and static route on ISP
| |||
ISP Router
|
Router 1
|
Router 2
|
Router 3
|
conf t
|
conf t
|
conf t
|
conf t
|
ip route 192.168.0.0 255.255.0.0 192.168.14.1
|
router eigrp 1
|
router eigrp 1
|
router eigrp 1
|
end
|
network 192.168.12.0 0.0.0.255
|
network 192.168.0.0 0.0.255.255
|
network 192.168.0.0 0.0.255.255
|
no auto-summary
|
no auto-summary
|
no auto-summary
| |
end
|
end
|
end
| |
ISP ဘက္မွာ Static route ရယ္ က်န္တဲ့ေကာင္ေတြမွာ Eigrp on ျပီးျပီ ဆုိေတာ့ #show ip route နဲ ့ စစ္ျကည့္ ပါ။

R1 ကေနျပီး ေတာ့ ISP’ Loopback IP ျပီးေတာ့ တစ္ျခား router ေတြရဲ ့IP ေတြကို လွမ္းျပီး ping test စမ္းျကည့္ပါ။

ISP ဘက္ကိုေတာ့ Ping လုိ့ရဦးမွာ မဟုတ္ပါဘူး. Route မွ မရွိေသးတဲ့အတြက္ေျကာင့္ပါ။ အဲ့အတြက္ေျကာင့္ ip route ေတြ မသံုးပဲ ip default-network ကို သံုးျကည့္ပါ။
conf t
| |
ip default-network 192.168.14.0
|
Border Router (R1) နဲ ့ ISP ျကားက Network segment
ကို default network အေနနဲ ့config ခ်ပါ။
|
ip route 192.168.14.0 255.255.255.0 192.168.14.4
|
default-network ကို static route ေရးပါ။
|
end
| |
show ip route
|
Command တစ္ခု config ခ်ျပီး တုိင္း ဘာေျပာင္းလဲ သြားလဲ ဆုိတာစစ္ျကည္ပါ။
အဲ့မွ ကိုယ္လုပ္ေနတဲ့ lab ကို သိမွာေပါ့။
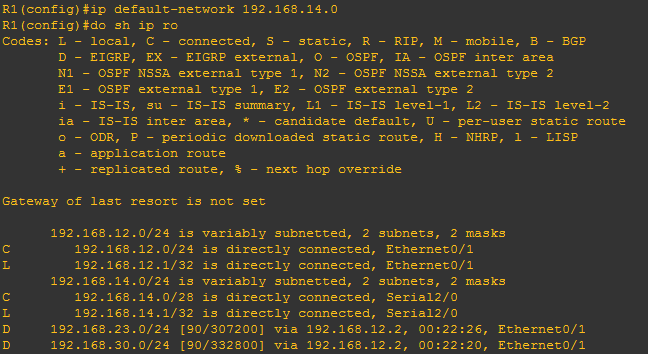
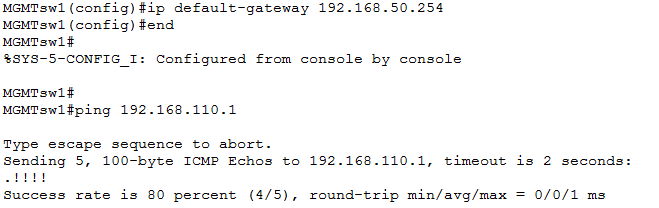
ဘာမွ routing table ထဲ ကို မ၀င္လာေသးပါဘူး.. ခု လက္ရွိ run ေနတဲ့ router ေတြသည္ IOS version 15 ျဖစ္တယ္ ဆုိတာ မေမ့နဲ ့ေနာ္။ IOS version 12 နဲ့ လုပ္တဲ့အခ်ိန္က် သတိထားျပီး ျကည့္ျကည့္ပါ။
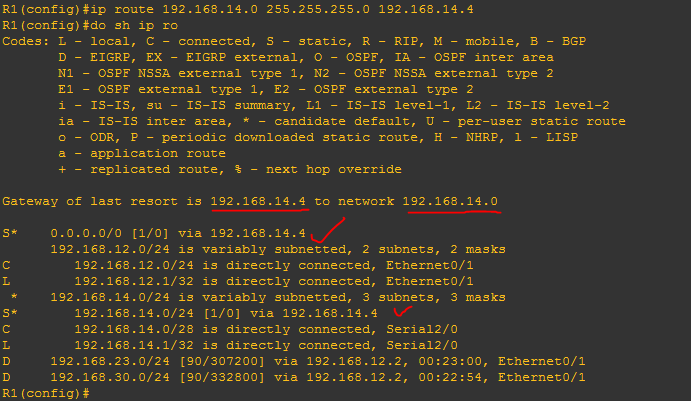
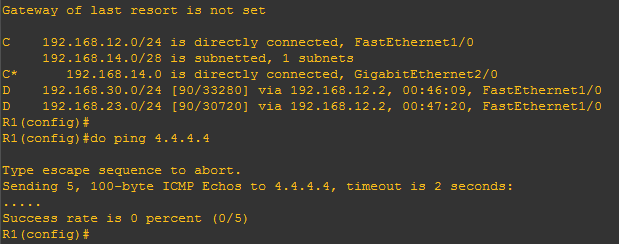
Ip route 192.168.14.0 255.255.255.0 192.168.14.4 ဆိုပီး config ခ်လိုက္တဲ့အခ်ိန္က်မွ candidate default route နွစ္ေျကာင္းလဲ Routing table ထဲ ကို ေရာက္လာတယ္။ S (static) ကိုမွ ေဘးမွာ * (start)
ေလးနဲ ့ပါ။ ျပီးေတာ့ Gateway of last resort ကို လဲ သိသြားပါတယ္။ ကုိယ္မသိတဲ့ route ေတြဆုိ gateway of last resort ပို ့ေပးပါတယ္။ ခု R1 ရဲ ့ Routing table ထဲမွာ မရွိတဲ့ ISP ဘက္ျခမ္းက IP ေတြကို ping test စမ္းျကည့္ပါ။

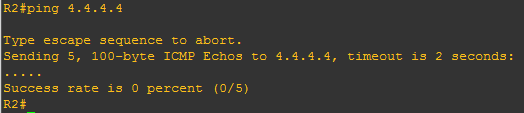
ဟုတ္ျပီ ping test အဆင္ေျပျပီဆုိေတာ့ R1 မွာ ရွိေနတဲ့ default network / route ကို EIGRP ကိုသံုးျပီးေတာ့ က်န္တဲ့ တစ္ျခား router ေတြပါ ISP ဆီကို လာလို့ရေအာင္ ping လုိ ့ရေအာင္ စမ္းျကည့္ရေအာင္။ အဲ့အတြက္ လိုတဲ့ command ကေတာ့ တစ္ေျကာင္းထဲပါ။ ခုခ်ိန္မွာ R2, R3 တုိ့ကေန ping ရင္ေတာ့ ရဦးမွာ မဟုတ္သလို routing table ထဲမွာလဲ gateway of last resort ကို ေတြ့ရဦးမွာမဟုတ္ပါဘူး။
configure terminal
| |
router eigrp 1
|
eigrp ထဲ ကို ၀င္ပါ
|
network 192.168.14.0
|
default-network ကို eigrp network အေနနဲ ့ေျကျငာပါ
|
end
|
Config ခ်ျပီးျပီဆုိေတာ့ routing table ကို စစ္ျကည့္ပါ။
Gateway of last resort ကိုေတြ့ရမွာမဟုတ္ သလို.. Ping test စမ္းလဲ ရမွာ မဟုတ္ပါဘူး။
အဲ့ command ေတြကို IOS version အေဟာင္းျဖစ္တဲ့ 12 မွာ ျပန္စမ္ျကည့္ က် ဦး စို ့။ command ေတြကေတာ့ ခု version 15 မွာ သံုးခဲ့တဲ့ command ေတြ ပါပဲ။


ဟုတ္ျပီး IOS version 15 မွာေတာ့ အဆင္မေျပခဲ့ဘူး.. အဲ့ေတာ့ ISO version 12 မွာ စမ္းျကည့္က်ရေအာင္။ အရင္ဆံုး version ကိုတစ္ခ်က္စစ္ပါ။

Lab စလုပ္က်စို ့။ config ကေတာ့ IOS 15 နဲ ့စမ္းတုန္းက config ေတြ အတုိင္းပါပဲ။

EIGRP ip default-network (IOS 12)
| |||
ISP Router
|
Router 1
|
Router 2
|
Router 3
|
enable
|
enable
|
enable
|
enable
|
configure terminal
|
configure terminal
|
configure terminal
|
configure terminal
|
hostname ISP
|
hostname R1
|
hostname R2
|
hostname R3
|
int g 2/0
|
int g 2/0
|
int fa 0/0
|
int fa 0/0
|
ip add 192.168.14.4 255.255.255.240
|
ip add 192.168.14.1 255.255.255.240
|
ip add 192.168.23.2 255.255.255.0
|
ip add 192.168.23.3 255.255.255.0
|
no sh
|
no sh
|
no sh
|
no sh
|
exit
|
exit
|
exit
|
exit
|
int lo 0
|
int fa 1/0
|
int fa 1/0
|
int fa 1/0
|
ip add 4.4.4.4 255.255.255.255
|
ip add 192.168.12.1 255.255.255.0
|
ip add 192.168.12.2 255.255.255.0
|
ip add 192.168.30.3 255.255.255.0
|
exit
|
no sh
|
no sh
|
no sh
|
int lo 1
|
end
|
end
|
end
|
ip add 44.44.44.44 255.255.255.255
| |||
int lo 2
| |||
ip add 172.16.0.1 255.255.255.255
| |||
end
| |||
IP address ေတြ ေပးျပီးသြားျပီဆုိေတာ့ .. Routing ကို enable လုပ္က်စို ့။
Enable EIGRP and static route on ISP
| |||
ISP Router
|
Router 1
|
Router 2
|
Router 3
|
conf t
|
conf t
|
conf t
|
conf t
|
ip route 192.168.0.0 255.255.0.0 192.168.14.1
|
router eigrp 1
|
router eigrp 1
|
router eigrp 1
|
end
|
network 192.168.12.0 0.0.0.255
|
network 192.168.0.0 0.0.255.255
|
network 192.168.0.0 0.0.255.255
|
no auto-summary
|
no auto-summary
|
no auto-summary
| |
end
|
end
|
end
| |
#show ip route ျကည့္ျကည့္ပါ။ eigrp network (အစိမ္းေရာင္ ဘက္ျခမ္း) က route ေတြကိုပဲ..ျမင္ရမွာပါ။ ျပီးေတာ့ မသိတဲ့ Route ေတြကို သြားဖုိ ့ Default ဘယ္ကိုသြားရမယ္ဆုိတာကိုလဲ မသိရေသးပါဘူး..
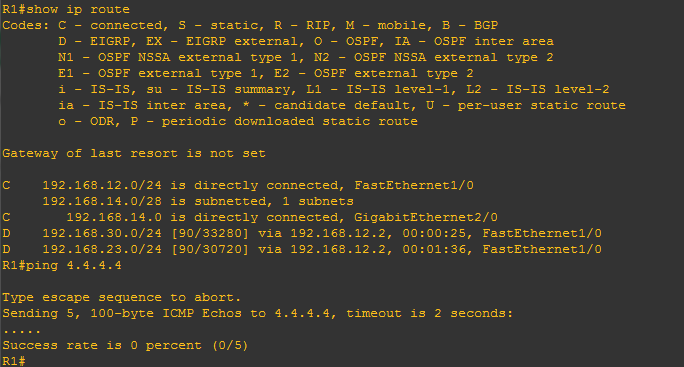
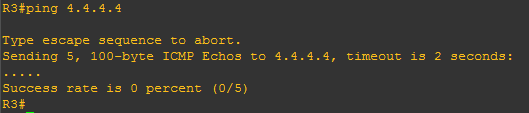
ISP ဘက္ျခမ္းက IP ေတြကို ping ျကည့္ပါ။ R1 ကေနျပီးေတာ့ 4.4.4.4 တုိ့ 172.16.0.1 တုိ့ကို ping ျကည့္ပါ။ ခုခ်ိန္မွာေတာ့ ping လုိ့ရဦးမွာ မဟုတ္ပါဘူး။

Ip default network ကို အသံုျပဳျပီးေတာ့ PC-1 ကေန ISP ဘက္ျခမ္းက loopback interface IP ေတြကို ping လုိ့ ရေအာင္လုပ္ ျကည့္ရေအာင္။
conf t
| |
ip default-network 192.168.14.0
|
Border Router (R1) နဲ ့ ISP ျကားက Network segment
ကို default network အေနနဲ ့config ခ်ပါ။
|
ip route 192.168.14.0 255.255.255.0 192.168.14.4
|
default-network ကို static route ေရးပါ။
|
end
| |
show ip route
|
အဲ့အေပၚက command ေတြကုိ ကူးျပီး တန္းမထည့္နဲ ့ေနာ္.. တစ္ေျကာင္းရိုက္ျပီး ဘာေတြေျပာင္းလဲ သြားလဲ .. ဘာေတြျဖစ္သြားလဲ စမ္းသပ္ျကည့္ပါ။
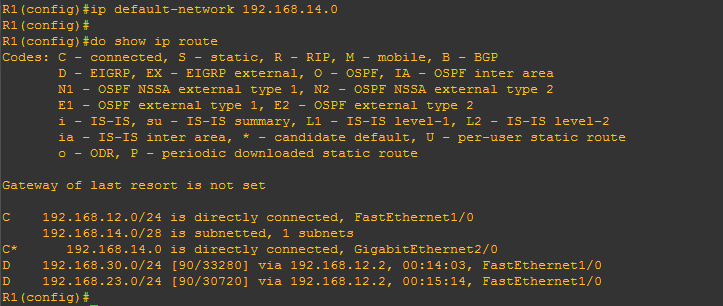
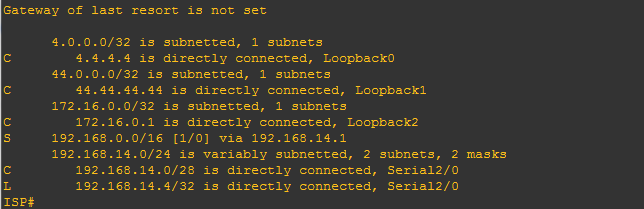
#ip default-network 192.168.14.0 ဆုိျပီး ISP နဲ ့ခ်ိတ္ဆက္ေနတဲ့ Router (R1) မွာ ထည့္လိုက္ပါတယ္။ ဒီေနရာမွာ တစ္ခုမွတ္ထားရမွာက default-network command သည္ classfull Network အေနနဲ ့ပဲ အလုပ္ လုပ္တာပါ။ အဲ့ေနာက္ show ip route ေခၚျကည့္ရင္ 192.168.14.0 နဲ ့ သက္ဆုိင္တဲ့ အေျကာင္းမွာ.. C ရဲ့ ေနာက္မွာ *(Star) ေလးပါေနတာကို ေတြ ့ရမွာပါ။ * သည္ ဘာကို ေျပာတာလဲဆိုေတာ့ candidate default လုိ့ ေျပာတာပါ။ 4.4.4.4 ကို ping ရင္ေတာ့ ping လုိ့ရဦးမွာ မဟုတ္ပါဘူး။
#ip route 192.168.14.0 255.255.255.0 192.168.14.4 ဆုိျပီး default-network ကို static route ေရးျပီး သကာလ R1 ကေန ISPရဲ ့loopback’s IP ေတြကို ping ျကည့္ပါ။

R1 ကေန ping တာ အဆင္ေျပျပီးဆုိေတာ့ R1 ေနာက္က တစ္ျခား router ေတြကိုလဲ ping လို့ ရမရ စမ္းျကည့္ပါ။
Ping လုိ့ မရေသးတာကို ေတြ့ရမွာပါ။ #show ip route နဲ ့Routing table ကို ျကည့္ရင္လဲ connected နဲ ့ပံုမွန္ EIGRP route ေတြကိုပဲ ေတြ ့ရဦးမွာပါ။
အုိေက ဟုတ္ျပီ ISP နဲ ့ခ်ိတ္ဆက္ထားတဲ့ Router 1 မွာ default-network ကို eigrp ကေနတစ္ဆင့္ က်န္တဲ့ တစ္ျခား router ေတြသိေအာင္ advertise လုပ္ေပးဖုိ့ေတာ့ လိုေနျပီး အဲ့အတြက္ command က ေတာ့ >>
configure terminal
| |
router eigrp 1
|
eigrp ထဲ ကို ၀င္ပါ
|
network 192.168.14.0
|
default-network ကို eigrp network အေနနဲ ့ေျကျငာပါ
|
end
|
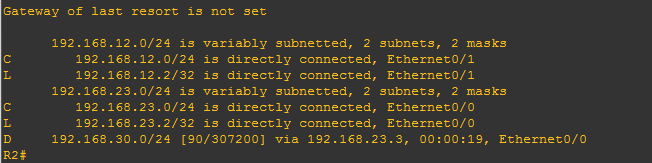
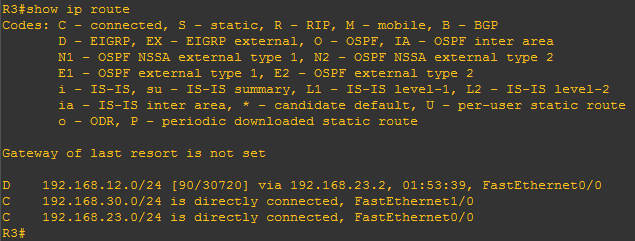
အဲ့ေနာက္ Router 2 တုိ့ Router 3 တုိ့ကေန ျကည့္လိုက္ရင္ 192.168.14.0 network ကို D* ေလး အေနနဲ့ ျမင္ေတြ့ရမွာပါ။ ဆုိလိုတာက အဲ့ေကာင္သည္ eigrp ကေနတစ္ဆင့္ သိရျပီးေတာ့ Default gateway အတြက္ candidate ျဖစ္တယ္လို့ ဆုိလိုတာပါ။ ျပီးေတာ့ gateway of last resort is 192.168.12.1 to network 192.168.14.0 ဆုိတာသည္ ကိုယ့္ routing table ထဲမွာ ျကည့္လို မရွိရင္ default gateway အေနနဲ ့192.168.14.0 Network ကို 192.168.12.1 ကေန တစ္ဆင့္ပို့ပါလို့ .. ေျပာတာပါ။
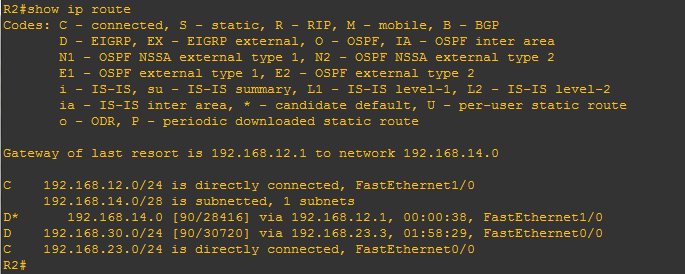

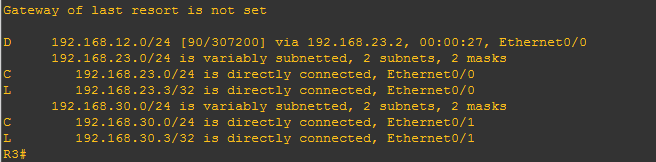
အေပၚပံုမွာက R3 ကေန ျကည့္ထားတာပါ။ အဲ့မွာဆုိလဲ Gateway of last resort မွာ 192.168.14.0 ကို 192.168.23.2 ကေန တစ္ဆင့္ သြားရမယ္ ဆုိတာကို ျမင္ေတြ့နုိင္ပါတယ္။ အုိေက အဲ့ဆုိ.. End to Eng ping ျကည့္ဖုိ့ PC ကေန ISP ရဲ ့loopback ip ျဖစ္တဲ့ 4.4.4.4 ကို ping ျကည့္ပါ။

အဆင္ေျပက်မယ္လို့ ေမွ်ာ္လင့္ပါတယ္။
ip default-network အေျကာင္းကို ရွင္းသြားျပီးဆိုေတာ့.. သူနဲ ့တြဲ ျပီး သိေစခ်င္တာက ip default-route ပဲ ျဖစ္ပါတယ္။

ဒီေနရာမွ တစ္ခု မွတ္ထားေစခ်င္တာက ip default-network သည္ routing on ေနတဲ ့ device ေတြမွာ မွ သံုးလို့ရတာပါ။ ip default-gateway က က်ေတာ့ routing disable ျဖစ္ေနမွ သံုးလို့ရတာပါ ဥပမာ ip default-gateway ကို layer 2 swith ေတြမွာ management VLan ေတြ အတြက္ သံုးက်ပါတယ္။ Layer 3 switchေတြ router ေတြမွာ ip default-gateway ကို သံုးခ်င္ရင္ no ip rouing ဆုိျပီး ip routing ကို ပိတ္ေပးရပါတယ္။ ပံုမွန္ခ်ိန္မွာထက္ router ကို boot mode ကေန TFTP သံုးမယ္ဆုိ ip routing က disable ျဖစ္ေနတာမုိ့ လုိေကာင္လိုနုိင္ပါတယ္။ ip routing feature enable ျပန္လုပ္ရင္ ေတာ့ global config mode မွာ ip routing လုိ့ run လိုက္ ယံုပါပဲ။ Lab ေလး တစ္ခုလာက္ Try ျကည့္က်ရေအာင္။
Configure Default-Gateway on Switch (VLAN Lab - 4)
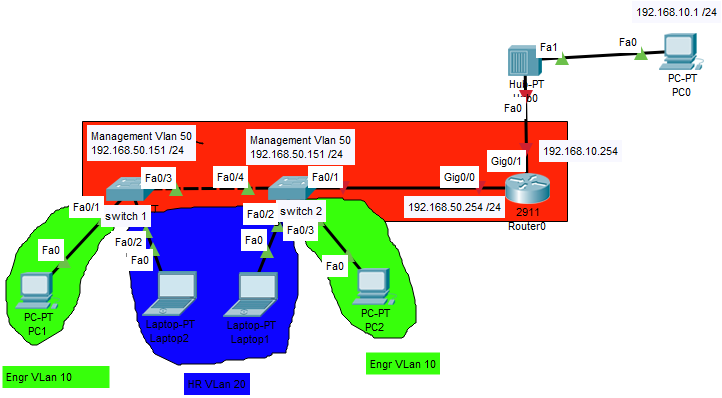
Switch1 - Management Vlan 50 IP - 192.168.50.151
|
Switch2 - Management Vlan 50 IP - 192.168.50.152
|
Router 1 - Vlan 50 Gateway IP - 192.168.50.254
| |||
PC1 - Vlan 10 IP - 192.168.10.1
|
PC 2 - Vlan 10 IP - 192.168.10.2
|
R1_G0/0.10 -Vlan 10 Gateway IP - 192.168.10.254
| |||
Laptop 2- Vlan 20 IP - 192.168.20.2
|
Laptop 1 - Vlan 20 IP - 192.168.20.1
|
R1_G0/0.20 -Vlan 10 Gateway IP - 192.168.20.254
| |||
ip default-gateway
| ||
Switch 1
|
Switch 2
|
Router 1
|
enable
|
enable
|
enable
|
configure terminal
|
configure terminal
|
configure terminal
|
hostname MGMTsw1
|
hostname MGMTsw2
|
hostname Router1
|
username spacex password cisco
|
username spacex password cisco
|
username spacex password cisco
|
line vty 0 4
|
line vty 0 4
|
line vty 0 4
|
login local
|
login local
|
login local
|
exit
|
exit
|
exit
|
enable password ccna
|
enable password ccna
|
enable password ccna
|
vlan 50
|
vlan 50
|
int g0/1
|
name ManagementVLAN
|
name ManagementVLAN
|
ip add 192.168.110.254 255.255.255.0
|
exit
|
exit
|
no sh
|
vlan 10
|
vlan 10
|
exit
|
name EngrVLAN
|
name EngrVLAN
|
int g0/0
|
exit
|
exit
|
no sh
|
vlan 20
|
vlan 20
|
exit
|
name HRVLAN
|
name HRVLAN
|
int g0/0.10
|
exit
|
exit
|
encapsulation dot1Q 10
|
vlan 127
|
vlan 127
|
ip add 192.168.10.254 255.255.255.0
|
name NativeVLAN
|
name NativeVLAN
|
int g0/0.20
|
exit
|
exit
|
encapsulation dot1Q 20
|
interface range fa0/1-24,g0/1-2
|
interface range fa0/1-24,g0/1-2
|
ip add 192.168.20.254 255.255.255.0
|
switchport mode access
|
switchport mode access
|
int g0/0.50
|
switchport access vlan 127
|
switchport access vlan 127
|
encapsulation dot1Q 50
|
exit
|
exit
|
ip add 192.168.50.254 255.255.255.0
|
interface fa0/3
|
interface fa0/4
|
int g0/0.127
|
switchport mode trunk
|
switchport mode trunk
|
encapsulation dot1Q 127 native
|
switchport trunk native vlan 127
|
switchport trunk native vlan 127
|
end
|
exit
|
exit
|
show ip int bri | inc up
|
interface fa0/1
| ||
switchport mode trunk
| ||
switchport trunk native vlan 127
| ||
exit
| ||
interface fa0/1
|
interface fa0/3
| |
switchport mode access
|
switchport mode access
| |
switchport access vlan 10
|
switchport access vlan 10
| |
exit
|
exit
| |
interface fa0/2
|
interface fa0/2
| |
switchport mode access
|
switchport mode access
| |
switchport access vlan 20
|
switchport access vlan 20
| |
exit
|
exit
| |
vlan dot1q tag native
|
vlan dot1q tag native
| |
exit
|
exit
| |
show vlan brief
|
show vlan brief
| |
show interfaces trunk
|
show interfaces trunk
| |
ခု အေပၚက command ေတြထဲမွာ ေမ့သြားမွာ ဆုိးလို့ ျပန္ေႏြးေပးခ်င္တာက
int g0/0.127
|
encapsulation dot1Q 127 native
|
Vlan 127 ကို native ဆုိျပီး config ခ်လိုက္တာပါ။ security point of view အရ ျကည့္ရင္ default native vlan 1 ထက္ တစ္ျခား vlan တစ္ခုခု ထားတာက ပိုေကာင္းပါတယ္။ Router ဘက္မွာ ခ်ိန္းျပီးသြားေတာ့ switchport trunk native vlan 127 ဆုိျပီး switch ဘက္မွာလဲ ထပ္ခ်ိန္းပါ။ vlan dot1q tag native ဆုိတာက ပံုမွန္ဆုိ dot1q encapsulation မွာ native vlan ကို tag မလုပ္ပါဘူး။ ခု ဒီcommand ေျကာင့္ native vlan ကို လဲ tag လုပ္ျပီး ပို့ေဆာင္မယ္လို့. ေျပာတာပါ။ အကယ္လို့ အဲ့ command ရိုက္ထားတဲ့ device မွာ untag packet ေရာက္လာရင္ သူသည္ drop လုပ္ပစ္မွာပါ။
ဟုတ္ျပီ ခုဆုိရင္ Remote Login ဆိုတဲ့ PC ကေန တစ္ျခား Vlan ကေကာင္ေတြကို ping လုိ့ရေနပါျပီ။ vlan 10 တုိ့ 20တုိ့ကေကာင္ေတြကို လွမ္း ping ျကည့္ပါ။ vlan 10, 20 ဘက္က PC ေတြကေနလဲ remote login ဆုိတဲ ့PC ကို လွမ္း Ping ျကည့္ပါ။
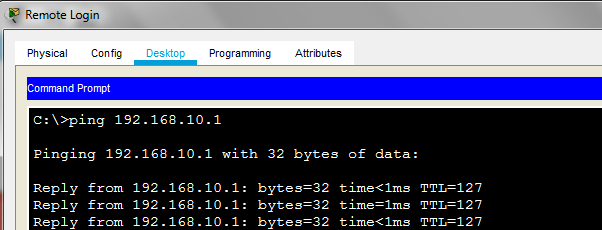
RemotLogin အတြက္ ထားတဲ့ PC ကေန vlan 10, 20က PC ေတြေတာ့ Ping လုိ့ရျပီး.. အဲ့ေတာ့ အျပန္အလွန္ ေသခ်ာ ေအာင္ Vlan ဘက္ေန Remote Login ဆိုတဲ ့ PC ကို ping ျကည့္ပါ။
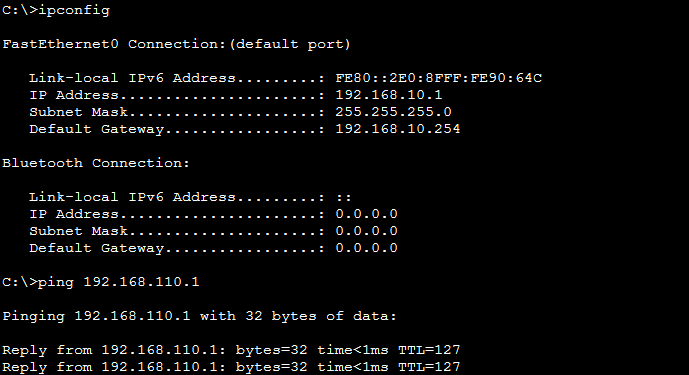
PC သည္ ping တဲ့အခ်ိန္မွာ သြားမယ့္ Destination IP (Remote Login PC - IP = 192.168.110.1 )ကို ျကည့္ပါတယ္။။ အဲ့ခ်ိန္မွာ Destination IP သည္ same network မဟုတ္ပဲ different Network ျဖစ္ေနပါတယ္။ အဲ့အတြက္ သူ့ရဲ ့ default gateway(192.168.10.254) ျဖစ္တဲ့ router ကုိ လွမ္းျပီး ပို့ေပးလိုက္ပါတယ္။ router သည္ connected interface ေတြဆုိရင္ေတာ့ Routing table ထဲမွာ ရွိေနတာမုိ့ Destination IP ရွိရာ Network နဲ့ ခ်ိတ္ဆက္ေနတဲ့ Interface ကေန တစ္ဆင့္ ပို့ေဆာင္ေပးပါတယ္။ ping packet ကို replay ျပန္တဲ့ အခ်ိန္မွာလဲ ထုိ့နည္းတူပါပဲ။ သူ့ကို ping တဲ့ pc ဆီကို ပို့မွာဆုိေတာ့ Destination သည္ 192.168.10.1 ျဖစ္ပါတယ္။ အဲ့တြက္.. Different network ျဖစ္တာမုိ့ default gateway (192.168.110.254) ကို ပုိ့ေပးပါတယ္။ Router သည္ routing table ကို ျကည့္ျပီးေတာ့ 192.168.10.0 network ရွိတဲ့ G0/0.10 (192.168.10.254) ကေန ပို့ေပးလိုက္ပါတယ္။ အေရွ့မွာ ေျပာခဲ့ျပီးသား ကို ေမ့မွာ ဆုိးလို့ ျပန္ေႏြးေပးတာပါ။
Ping တာေတာ့ အဆင္ေျပျပီ အဲ့ဆုိ.. Switch ေတြကို remote login ၀င္ဖုိ့ telnet တုိ့ ssh တုိ့ သံုးရင္ IP နဲ့ သြားတာဆုိေတာ့ vlan interface ကို IP ေပးမယ္ ျပီး ရင္ remote login ၀င္ျကည့္မယ္။ okay? ;-)
Switch 1
|
Switch 2
|
enable
|
enable
|
configure terminal
|
configure terminal
|
interface vlan 50
|
interface vlan 50
|
ip add 192.168.50.151 255.255.255.0
|
ip add 192.168.50.152 255.255.255.0
|
end
|
do ping 192.168.50.254
|
ping 192.168.50.254
| |

Vlan 50 ရဲ ့interface မွာ IP ေပးလိုက္တယ္ ျပီးေတာ့ vlan 50 အတြက္ config ခ်ထားတဲ့ Router ရဲ ့sub-interface g0/0.50 ရဲ ့ IP ကို ping ျကည့္ရင္ same network ဆုိေတာ့ အဆင္ေျပေနပါလိမ့္မယ္။ ဒါေပမယ့္ Router ရဲ ့တစ္ျခားဘက္ျခမ္းမွာ ရွိတဲ့ RemoteLogin အတြက္ PC ကိုေတာ့ Ping လုိ့ရဦးမွာ မဟုတ္ပါသလုိ Remote Login PC ကေနလဲ Management လုပ္ဖုိ့ login လုပ္ရမယ့္ switch ေတြရဲ ့vlan 50 interface IP ေတြကို ping လုိ့ရဦးမွာ မဟုတ္ပါဘူး.. Remote Login PC(192.168.110.1) ကေန vlan 50 (192.168.50.151 or 192.168.50.152) ကိုသြားမယ္ဆုိရင္ different Network ျဖစ္လို့ router ဆီကို ေရာက္ပါမယ္။ router ကလဲ routing table ကို ျကည့္လိုက္ေတာ့ connected အေနနဲ ့ သိေနျပီးေတာ့ interface g0/0.50 ကေနတစ္ဆင့္ vlan 50 ထဲ ကို ပို့လိုက္ပါတယ္။ switch ေတြဆီကို ေရာက္သြားပါလိမ့္မယ္။ အဲ့ေနာက္ replay ျပန္ဖုိ့.. Source ကို ျကည့္လိုက္ေတာ့ 192.168.110.1 ျဖစ္ေနပါတယ္။ သူတို့သည္ different Network ကို ျပန္ပို့ဖုိ့ အတြက္ default gateway ဘယ္သူဆုိတာ သိဖု့ိလို့ပါတယ္။ ဒါေပမယ့္ ခု လက္ရွိ config အရ မသိတဲ့ အတြက္ မရေသးပါဘူး။
အဲ့အတြက္ လုိေနတဲ့ switch ေတြ different Network လာတဲ့ packet ေတြကို reply ျပန္နုိင္ဖုိ့ အေရးအတြက္ လိုအပ္တဲ့ config ေလး ထည့္လိုက္က်ရေအာင္။
Switch 1
|
Switch 2
|
configure terminal
|
configure terminal
|
ip default-gateway 192.168.50.254
|
ip default-gateway 192.168.50.254
|
Config ထည့္ျပီးသြားျပီဆုိေတာ့ different Network က IP ေတြ ping ျကည့္ပါ။ Ping လုိ့ရေနပါလိမ့္မယ္။
Remote login လုပ္ျပီး လွမ္းManage လုပ္ျကည့္ရေအာင္။ Remote Login PC ကေန switch ေတြရဲ ့IP ကို telnet လွမ္း၀င္ပါ။
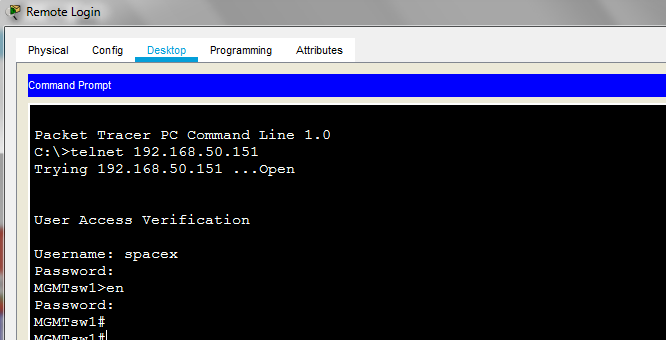
ip default-gateway ဆိုတဲ့ command ေလး ကို ျဖဳတ္ျကည့္ျပီး ျပန္ping ျကည့္ပါ။ အဲ့အခါက် different network ကိုသြားဖုိ့ default gateway ကို မသိေတာ့တဲ့ အတြက္ ping လုိ့ ရေတာ့မွာ မဟုတ္သလို remote login ျဖစ္တဲ့ Telnet လဲ အသံုးျပဳလို့ ရေတာ့မွာ မဟုတ္ပါဘူး..
ခုဆိုရင္ အေပၚမွာ ip default-network ကို EIGRP တုန္းက ေျပာခဲ့တယ္။ ip default-network သည္ distance vector အႏြယ္၀င္ routing protocol ေတြမွာပဲ အလုပ္လုပ္တာပါ။ OSPF တုိ့ IS-IS တုိ့မွာ အလုပ္မလုပ္ပါဘူး။
ပီးေတာ့ ip route ဆုိတာကေတာ့ အျမဲသံုးေနရေတာ့ သိတယ္..ဘယ္network ဆုိ ဘယ္ Next Hop (IP) ကေနသြား / ဘယ္ interface ကေနထြက္ ဆုိတာမ်ိဳးေလ ..
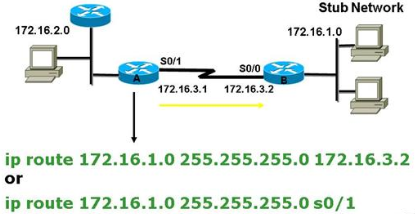
ခုဒီ အေပၚက example မွာဆုိ 172.16.1.0 ဆုိတဲ့ Network ကို သြားမယ္ဆုိ့ forward လုပ္ေပးရမယ္ Neighbour router (Next Hop’ IP = 172.16.3.2) ကို ညြန္းေပးလို့ရသလို ့ ထြက္ရမယ္ ကုိယ့္ local existing interface ကို လဲ ညြန္းေပးလို့ရပါတယ္။ ဒါမွမဟုတ္ ip route 172.16.1.0 255.255.255.2550 172.16.3.2 s0/1 ဆုိျပီး ေပးပို့ရမယ့္ Next hop ရဲ IP နဲ ့ ကုိယ့္ Local existing interface ကိုလဲ တြဲျပီး ေရးေပးလို့ရပါတယ္။
IP route ေရးတဲ့ ေနရာမွာ router နွစ္လံုး point to point ဆုိရင္ေတာ့ existing interface ကုိသံုးတာ ျပသနာ မရွိေပမယ့္.. တစ္ျခား ေနရာေတြမွာေတာ့ existing interface ကို မသံုးတာ အေကာင္းဆံုးပါပဲ။ Next Hop’ IP (OR) Next Hop’ IP + local existing interface သံုးးက်ပါတယ္။ Next Hop’ IP + local existing interface နွစ္ခုတြဲသံုးေတာ့ IP လဲ သိတယ္ ထြက္ရမယ့္ interface လဲ သိေတာ့ lookup ထပ္လုပ္စရာ မလုိတာေပါ့။ Next Hop’ IP တစ္ခုပဲ သံုးေတာ့ အဲ့ Next Hop ကုိေရာက္ဖုိ့ ထြက္ရမယ့္ interface ကို တစ္ခ်က္ ျပန္ျကည့္ရတာေတာ့ ရွိတာေပါ့။
ျပီးေတာ့ ခု ip default-gateway အသံုးျပဳ ပံု နဲ ့ အလုပ္လုပ္ ပံုကို ျမင္မယ္လို့ ေမ်ွာ္လင့္ပါတယ္။
တစ္ခုေတာ့ မွတ္ထားဦးေနာ္ ip default-network နဲ ့ip route က routing enble ျဖစ္ေနမွ အလုပ္ လုပ္မွာျဖစ္ျပီးေတာ့ ip default-gateway သည္ routing feature off ေနမွ သံုးရမွာေနာ္။
Wish you all the very best,
Khant Phyo
Core Network Team Leader
Comments
Post a Comment